|
Firemonkey Styles - Felix John COLIBRI. |
- abstract : FireMonkey Styles tutorial : changing styles for all or for some selected components.
- key words : FireMonkey Styles - Style Designer - .STYLE files -
StyleLookup - StyleName - FindComponentResource - Predefined Styles - Delphi XE2
- software used : Windows XP Home, Delphi XE2
- hardware used : Pentium 2.800Mhz, 512 M memory, 140 G hard disc
- scope : Delphi XE2
- level : Delphi developer
- plan :
1 - FireMonkey Styles
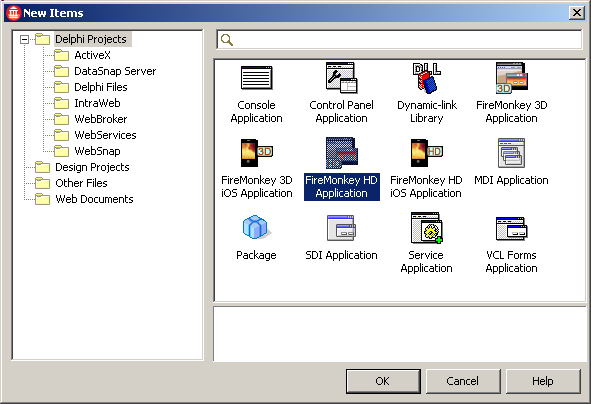
1.1 - Starting a Delphi XE2 FireMonkey Application First we start a FireMonkey HD App (HD for High Definition, which here
means 2D, as opposed to 3D FireMonkey apps)  | launch Delphi XE2
| | |
File | New | FireMonkey HD Application" 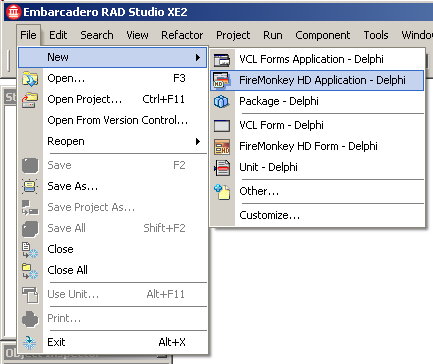 We could also use "File | New | Other | Delphi Projects | FireMonkey HD Applications"
|
1.2 - Custom FireMonkey Styles - a tButton Style
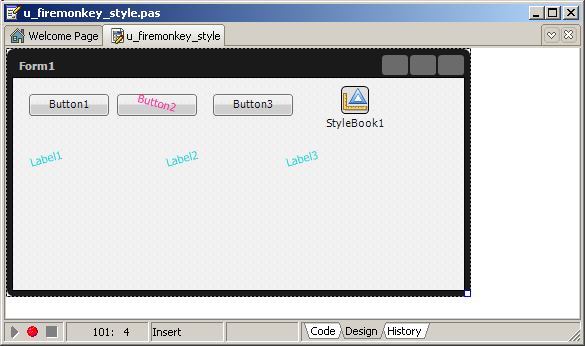
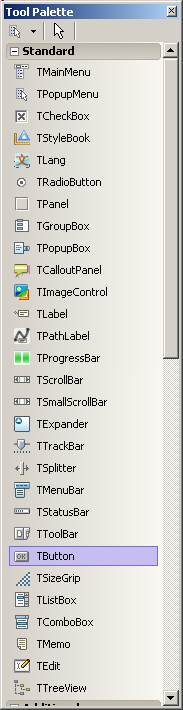
First let's drop two tButtons on the Form | | select "Tools Palette | Standard | tButton" and drag-and-drop two of them on the Form
 | | |
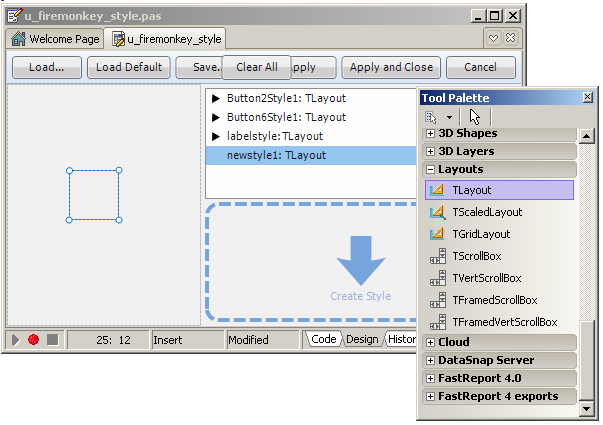
to modify the style of the Button2 alone, "select Button2 | right click | Edit Custom Style" 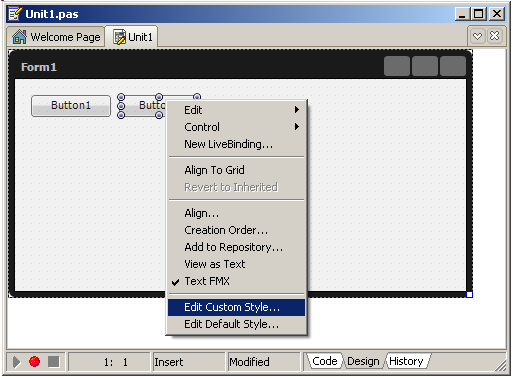 |
 | the "Style Designer" is opened, 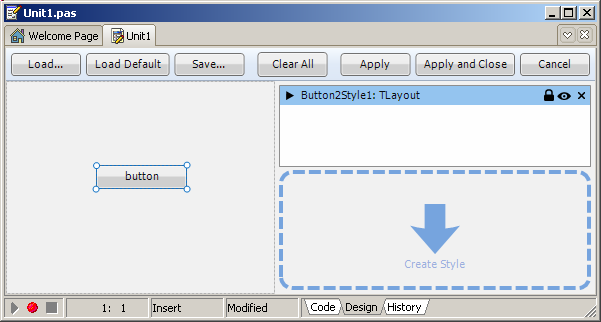 It contains
- at the top buttons to load, save, apply, return to the standard designer buttons
- in the left center region, a representative of a button with the default style
- at the right top, a treeview which will be expanded below
- at the bottom right a tDropTarget
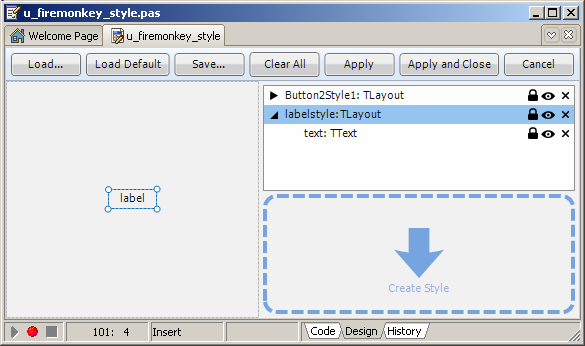
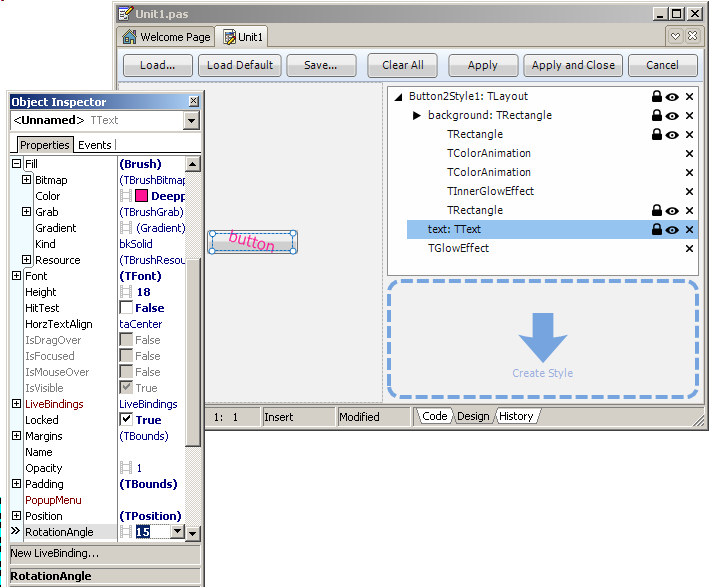
| | | expand the top-right treeview to display the detail of the tButton:
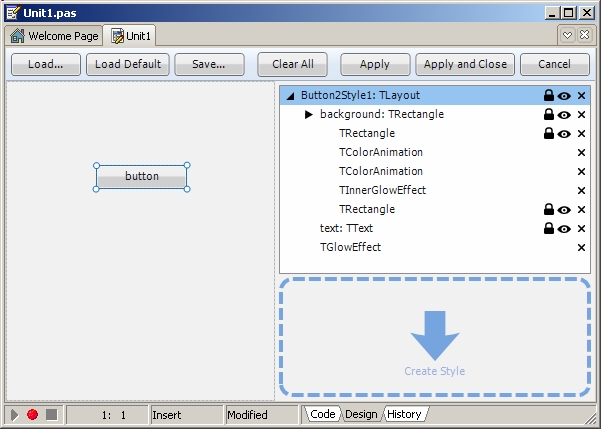 The treeview clearly shows that the tButton is composed of several pieces - the background rectangle
- the text
- a glow which is visible when we clic the tButton
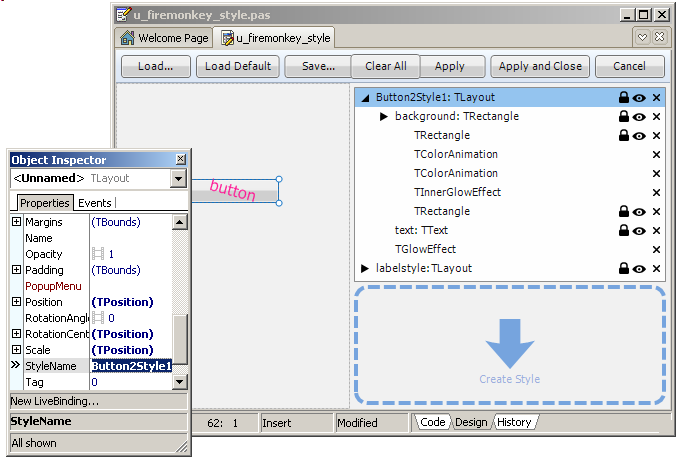
| | | when we select one of the parts, the properties of this part are displayed
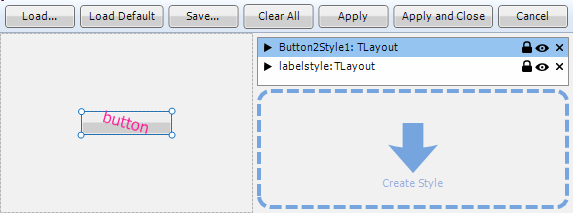
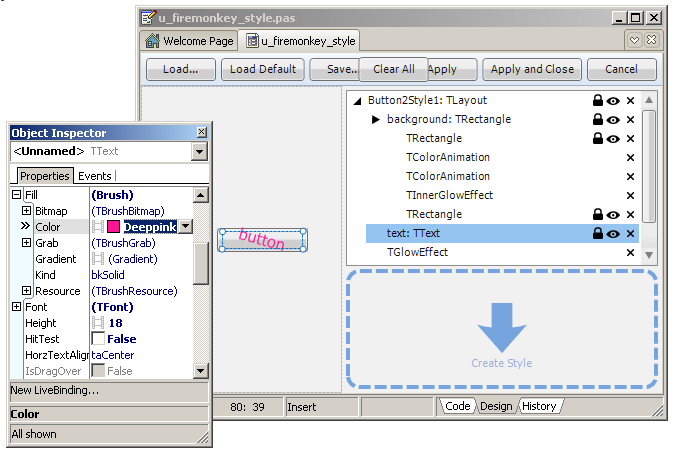
in the Object Inspector. Select, for instance, the text property : 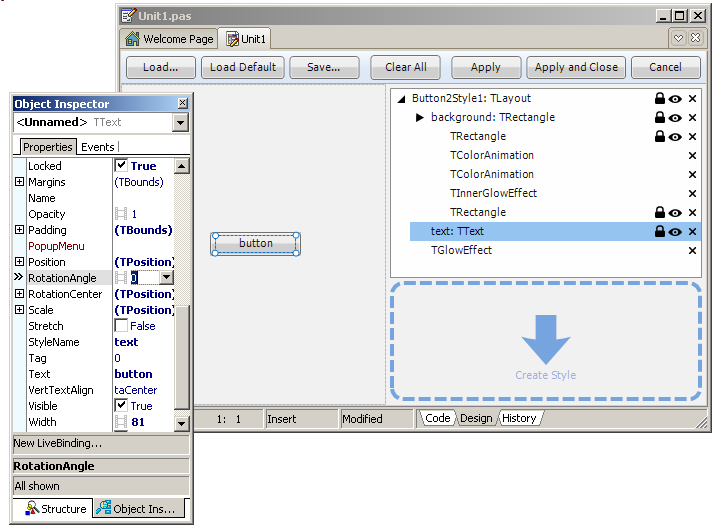 | |
| to tilt the text drawing, in the Object Inspector,
- select RotationAngle and enter 15 (15 degrees),
- select a font of size 16
- select the Fill color red
 | | |
click "Apply and close" | | | the standard Designer displays our Button2 with the new "text" style:
 And, at the top left position FireMonkey added a StyleBook1 tStyleBook
which contains our new custom style. You can move this component at a more convenient position on the Form. Clicking twice on this StyleBook1 opens the Style Designer again. We can close it by clicking "Cancel"
|
You can compile and run the program.
Note that - the just defined style is specific to Button2. It did not change Button1. And if we add a Button3, it still will have the standard style
- the tLayout, tRectangle and tText, tColorAnimation types displayed in the Style Designer are real types that we can find in the Tool Palette.
We could "assemble" a tButton by gluing those together as child controls of a tLayout. Here is a simplified version: 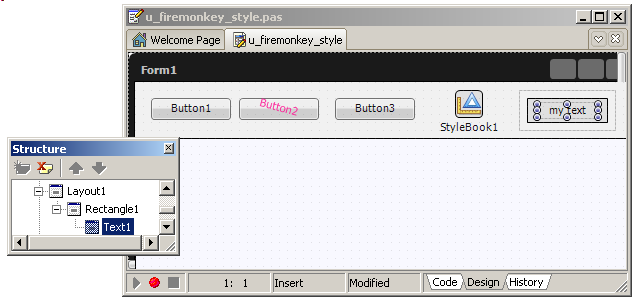
However those components are "primitive components" and have no style themselves. They are used to build "styled components", like tEdits, tButtons etc. This is explained in the
FireMonkey Component Guide - the composition of child components on any FireMonkey component is also available for any component. We could add a chile tButton styled component
to another tButton style component !
- in addition, this composition of elements to build real controls is really at the heart of FireMonkey
- the controls are just painted on the screen
- they are not encapsulations of Operating System native controls (which contrasts with the tEdit which is a thin encapsulation of Windows TextBox)
- the display is then adapted at the GPU engine level (or a simulation of a
GPU, which is the case on our XP System) to look and behave as native controls
- the mouse and keyboard events are then added to mimick as closely as possible the standard Delphi VCL events
1.3 - the .STYLE file content To view the content of our Button2 style, we can save the style on disc:
This file is an ASCII file which can be opened with Notepad (or with the Delphi Editor ):
Object _1: TLayout
Align = alClient
Position.Point = '(0,33)'
Width = 253.000000000000000000
Height = 237.000000000000000000
Object TLayout
StyleName = 'Button2Style1'
Position.Point = '(81,106)'
Width = 91.000000000000000000
Height = 24.000000000000000000
DesignVisible = False
Object TRectangle
StyleName = 'background'
Align = alContents
Width = 91.000000000000000000
Height = 24.000000000000000000
HitTest = False
Fill.Color = xFFEFEFEF
Stroke.Kind = bkNone
XRadius = 3.000000000000000000
YRadius = 3.000000000000000000
Object TRectangle
Align = alContents
Width = 91.000000000000000000
Height = 24.000000000000000000
HitTest = False
Fill.Kind = bkGradient
Fill.Gradient.Points = <
item
Color = x24F4F4F4
End
item
Color = x24EAEAEA
Offset = 0.499000012874603300
End
item
Color = x4E868686
Offset = 0.500000000000000000
End>
Stroke.Color = xC84F4F4F
XRadius = 3.000000000000000000
YRadius = 3.000000000000000000
End
Object TColorAnimation
Duration = 0.200000002980232200
Trigger = 'IsMouseOver=true'
StartValue = xFFEFEFEF
StopValue = xFFA5D9FF
PropertyName = 'Fill.Color'
End
Object TColorAnimation
Duration = 0.200000002980232200
Trigger = 'IsMouseOver=false'
StartValue = xFFA5D9FF
StopValue = xFFEFEFEF
PropertyName = 'Fill.Color'
End
Object TInnerGlowEffect
Trigger = 'IsPressed=true'
Enabled = False
Softness = 0.400000005960464400
GlowColor = xFF4F4848
Opacity = 0.899999976158142100
End
Object TRectangle
Align = alClient
Position.Point = '(1,1)'
Locked = True
Width = 89.000000000000000000
Height = 22.000000000000000000
Padding.Rect = '(1,1,1,1)'
HitTest = False
Fill.Kind = bkNone
Stroke.Color = x96FCFCFC
XRadius = 2.000000000000000000
YRadius = 2.000000000000000000
End
End
Object TText
StyleName = 'text'
Align = alClient
Position.Point = '(5,3)'
RotationAngle = 15.000000000000000000
Locked = True
Width = 81.000000000000000000
Height = 18.000000000000000000
Padding.Rect = '(5,3,5,3)'
HitTest = False
Fill.Color = claDeeppink
Font.Size = 16.000000000000000000
Text = 'button'
End
Object TGlowEffect
Trigger = 'IsFocused=true'
Enabled = False
Softness = 0.200000002980232200
GlowColor = x82005ACC
Opacity = 0.899999976158142100
End
End
End |
The tText object clearly displays our RotationAngle, font size and fill color changes. Note that saving the style in a file was only done to display the content of a style, and is not necessary to apply styles or to deploy the
application .EXE.
1.4 - Default FireMonkey Styles The "Custom Style" only applied to Button2. Button1 is not modified, and if we drop a Button3, it will display the standard style.
We can also change the style of ALL components of some type :
Please note
- all new tLabels added to the Form will have this new style
- to remove a style, in the Style Designer clic the "x" at the end of the treeview line of the style you want to remove
1.5 - Using an existing style If we want to reuse an existing style, we simply set its name in the StyleLookup property of the object. | |
drop another tButton on the Form
| | | select Button4, in the Object Inspector, select StyleLookup and type
Button2Style1 | | | the text is now tilted at a 15 degree angle, colored in red
|
The "Button2Style1" string is visible
Note that - the "Custom Style" name receives the name wich includes the object name:
"Button2Style1" - the "Default Style" name is not tied to a specific object, but to the
Class :
"LabelStyle" - the StyleBook1 contains the values which we already displayed in the .STYLE file. Those values are visible in the .FMX above. The .EXE will therefore
contain all the information (there is no need to save the .STYLE file and of course no need to deploy this file, because the information is in the .EXE)
1.6 - Changing Style at Runtime
We can also assign a Style value at runtime. To assign the "Button2Style1" to Button4, we simply use :
Procedure TForm1.assign_style_Click(Sender: TObject);
Begin
Button3.StyleLookup:= 'Button2Style1';
End; // assign_style_Click
|
We could also change the style at runtime, using a two step process :
- fetch the style resource using FindStyleResource
- modifying some values of this resource
FindStyleResource is defined as: |
Function FindStyleResource(Const AStyleLookup: string): TFmxObject; Override
| and - aStyleLookup is the name of a style, say "Button2Style1", "background" or "text"
- the result is the root tFmxObject
To be able to set some usefull property, like tLayout, tRectangle or tText, we must cast the result with the real type of the child object. So the best is to open the Style Designer and find out which style name we want
to modify, and remember its associated type. Here is the "text" style, of type tText, with the Fill.Color property highlighted in the Object Inspector:
 Therefore, here is the code to change the (font) color of Button1
Procedure TForm1.find_style_resource_Click(Sender: TObject);
Var l_c_ttext_resource: TText;
Begin
l_c_ttext_resource := Button1.FindStyleResource('text') As TText;
If Assigned(l_c_ttext_resource)
Then l_c_ttext_resource.Fill.Color := TAlphaColors.Blueviolet;
End; // find_style_resource_Click
|
Similarily, to change the background of Button4, we could use:
Procedure TForm1.find_style_resource_Click(Sender: TObject);
Var l_c_rectangle_resource: TRectangle;
Begin
l_c_rectangle_resource:= Button4.FindStyleResource('background') As TRectangle;
If Assigned(l_c_rectangle_resource)
Then l_c_rectangle_resource.Fill.Color := TAlphaColors.Blue;
End; // find_style_resource_Click
| with the following result : 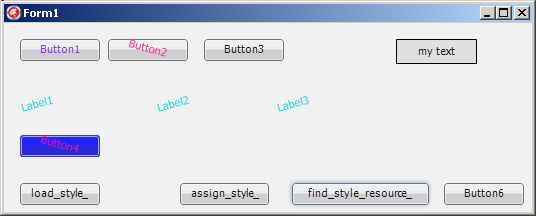
1.7 - Creating a new style To create a new style from scratch, we use the Tool Palette and the tDropTarget at the bottm right of the Style Designer. Here is a simple example : (Ed: thanks to Mr Panagiotis for explaining this).
1.8 - Tying values to the control The CustomListBox Demo contains an example of a tListBox where each item is composed of several elements 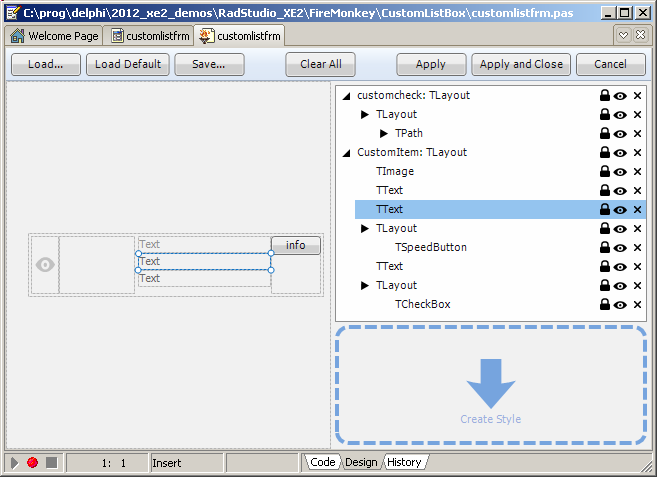 and the code also shows how to get or set values from the tListBoxItems
1.9 - No separate designer tool As explained, we use the IDE to create new syles. There is no separate designer
(like the Style Designer for the VCL Styles). In addition, there is no searate tool which could be used to hand over the graphical construction of the whole applicaton to a design team, leaving the
code to the Pascal developpers. This "separation of concerns" available in some other platforms is considered as a success.
1.10 - Predefined Styles FireMonkey already contains several .STYLE files. On our system (XP Home), they
are located in C:\Program Files\Embarcadero\RAD Studio\9.0\Redist\styles\Fmx 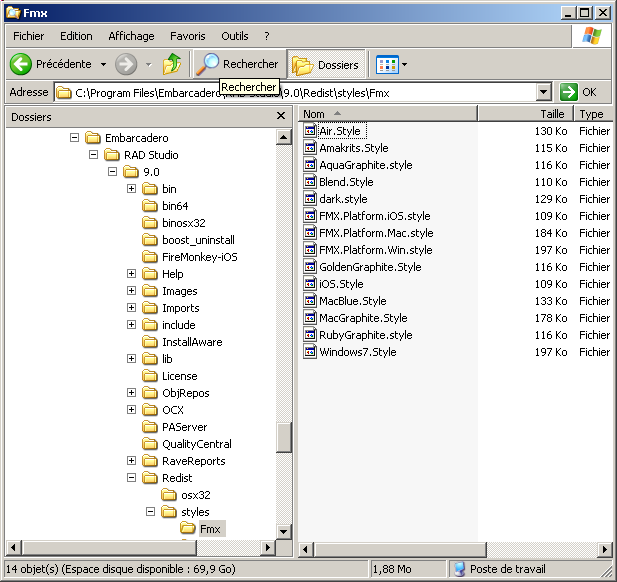
To use this style on our Form
| | copy some .STYLE file in the .EXE folder of your application. In our case C:\Documents and Settings\user\My Documents\RAD
Studio\Projects\09_firemonkey_style\Win32\Debug | | | drop a tOpenDialog on the Form
| |
| drop another tButton, and write it's OnClick method:
Procedure TForm1.load_style_Click(Sender: TObject);
Begin
If OpenDialog1.Execute
Then Application.StyleFileName := OpenDialog1.FileName;
End; // load_style_Click
| | | |
execute and run | | | here is a snapshot of the form: 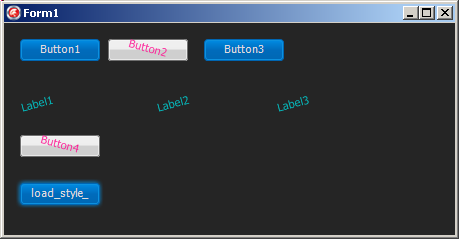
|
Note that - the copying of the .STYLE file to our .EXE path is just to avoid navigating with the OpenDialog to find some .STYLE file
- the aqua graphite style has the same structure as the .STYLE file name we showed previously
1.11 - FireMonkey Styles in perspective The first reaction is surprise.
Coloring a tLabel or the Font of a tListbox is not performed by changing the Color in the Object Inspector. You have to change the color of the nested
tText or tRectangle child components. At THIS stage, I understood that Styles were not the last step of the learning curve, the frosting on the cake, but one of the foundations of the Firemonkey Framework.
In fact, FirmeMonkey Styles are much more than simply changing the background colors of all controls, or selecting a round rectangle aspect of all windows, like themes or skins do.
FireMonkey Styles (together with the Class hierarchy, of course) are at the heart of the component composition. They allow the graphical nature of the controls allowing easy cross-platform applications. In some sense, they manage
the whole rendering process. In addition, they include features like 3D and animations which will make the difference with the standard VCL controls.
2 - Remarks At this stage:
- I recommend reading the FireMonkey Application Guide. As of today, it is the only information available I'm aware of. So reading those 20 pages will save you many hours.
- given the amount of information available so far, it is clear
- that Embarcadero has to make new versions of the wiki available in the coming weeks
- that the future of FireMonkey will need a little hand from all of us.
After all the excitement of the announcements, it is quite sobering to program this new framework. Well, we have been thru this quite a few time before, those last couple of years. The enthousiasm at the presentations
is impressive. The flurry of the Embarcadero team and evangelists all over the world unseen in recent years. And the FireMonkey vision is truley awesome. To make this baby fly will require some effort, and
sharing our experience thru blogs, EDN forums or Stack Overflow, videos will certainly benefit all of us.
3 - Download the Sources Here are the source code files:
4 - Download the Sources Here are the source code files:
As usual:
- please tell us at fcolibri@felix-colibri.com if you found some errors, mistakes, bugs, broken links or had some problem downloading the file. Resulting corrections will
be helpful for other readers
- we welcome any comment, criticism, enhancement, other sources or reference suggestion. Just send an e-mail to fcolibri@felix-colibri.com.
- or more simply, enter your (anonymous or with your e-mail if you want an answer) comments below and clic the "send" button
- and if you liked this article, talk about this site to your fellow developpers, add a link to your links page ou mention our articles in your blog or newsgroup posts when relevant. That's the way we operate:
the more traffic and Google references we get, the more articles we will write.
5 - References
6 - The author
Felix John COLIBRI works at the Pascal Institute. Starting with Pascal in 1979, he then became involved with Object Oriented Programming, Delphi, Sql, Tcp/Ip, Html, UML. Currently, he is mainly
active in the area of custom software development (new projects, maintenance, audits, BDE migration, Delphi
Xe_n migrations, refactoring), Delphi Consulting and Delph
training. His web site features tutorials, technical papers about programming with full downloadable source code, and the description and calendar of forthcoming Delphi, FireBird, Tcp/IP, Web Services, OOP / UML, Design Patterns, Unit Testing training sessions.
|