|
Delphi DBX4 programming - Felix John COLIBRI. |
- abstract : the new dbExpress 4 framework for RAD Studio 2007 : the configuration files, how to connect, read and write data, using tracing and pooling delegates and metadata handling
- key words : dbx4 - dbExpress 4 - DBXCONNECTIONS.INI, tDbxConnection, tDbxCommand, tDbxReader, delegate drivers, tMetaDataReaders
- software used : Windows XP Home, RAD Studio 2007
- hardware used : Pentium 2.800Mhz, 512 M memory, 140 G hard disc
- scope : Delphi 2007, RAD Studio 2007
- level : Delphi developer
- plan :
1 - RAD Studio 2007 and the dbExpress 4 framework
With Delphi 2007, CodeGear introduced the Dbx4 driver framework. This is a major undertaking which will - bring the drivers in the Object Pascal world,
- allow single source driver development for the Win32 and .Net worlds which will reduce the driver development effort (for CodeGear and third party driver writers), and will benefit to us by allowing Codegear to concentrate
on other database areas, like tooling (the Data Explorer, for instance)
Dbx4 is at the driver level, and the data acess layer on top of it should not
be affected. So if you used dbExpress for instance, nearly nothing will change. Nevertheless, Dbx4 programming as such has lots of benefits, like: - writing our own tools (Data Explorers etc)
- allowing database tracing and pooling of your code
- writing Unit Tests
We will present here: - the .INI configuration files - connecting to a database
- reading and writing data using Dbx4
- tracing database calls using a tracing delegate driver
- pooling database connections using a pooling delegate driver
- handling database metadata
2 - Dbx4 .INI Configuration files 2.1 - DBXDRIVERS.INI and DBXCONNECTIONS.INI The driver parameters and the connection parameters are kept in two .INI files, located under
c:\Shared Documents\Rad Studio\dbExpress\ 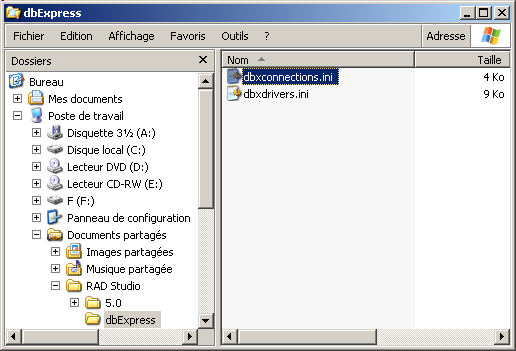
Those .INI files can be displayed and modified using NOTEPAD (simply click on them), or by a Delphi program.
Since we are going to do some modifications of the DBXCONNECTIONS.INI, I would
strongly recommend that you save your original .INI files before running our examples. Simply copy and paste them in any other directory.
We can retrieve the .INI locations from the Windows Registry with the
following functions:
function f_connections_ini_file_name: String;
var l_c_registry: TRegistry;
begin
Result:= TDBXConnectionFile;
l_c_registry:= TRegistry.Create;
try
l_c_registry.RootKey:= HKEY_CURRENT_USER;
if l_c_registry.OpenKeyReadOnly(TDBXRegistryKey)
then Result:= l_c_registry.ReadString(TDBXRegistryConnectionValue);
finally
l_c_registry.Free;
end;
end; // f_connections_ini_file_name
function f_drivers_ini_file_name: String;
var l_c_registry: TRegistry;
begin
Result:= TDBXDriverFile;
l_c_registry:= TRegistry.Create;
try
l_c_registry.RootKey:= HKEY_CURRENT_USER;
if l_c_registry.OpenKeyReadOnly(TDBXRegistryKey)
then Result:= l_c_registry.ReadString(TDBXRegistryDriverValue);
finally
l_c_registry.Free;
end;
end; // f_drivers_ini_file_name
|
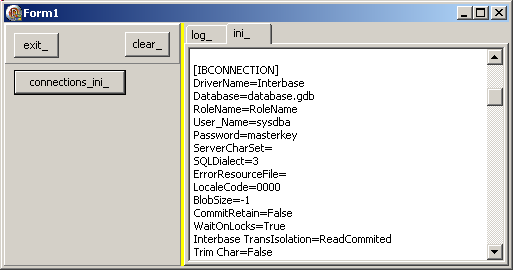
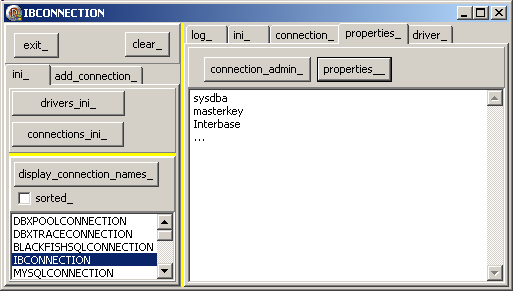
2.2 - Displaying the .INI in a Delphi project We can load those .INI files in any tStrings. In our case, we used a tMemo.Lines
So let's start the Delphi project
Displaying the DBXDRIVERS.INI is just as simple.
2.3 - Displaying the connection names We can display all the connection names using the
tDbxConnectionFactory.GetConnectionItems method. In our case  |
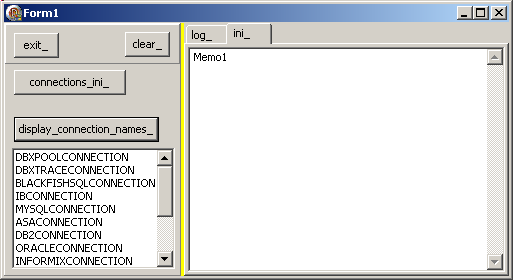
drop a tListBox on your tForm, and a tButton which loads the connection names:
procedure TForm1.display_connection_names_Click(Sender: TObject);
begin
TDBXConnectionFactory.GetConnectionFactory.
GetConnectionItems(connection_listbox_.Items);
end; // display_connection_names_Click
| | | |
compile, run, click "display_connection_names_"
|  | the list of all connection names is displayed:
|
2.4 - Get connection parameters Once we have a connection name, we can read the corresponding .INI section.
Several possibilities are available: - use a tIni file and read the section
- use the tDbxAdmin CLASS to
- use the tDbxProperties CLASS
2.4.1 - Read the tIni section
This is the most "classic" way of handling .INIs: | | drop a tButton, drop a tMemo, and, using the selected connection name,
display the section for this connection:
procedure TForm1.connection_listbox_Click(Sender: TObject);
var l_c_ini_file: TMemIniFile;
l_selected_connection_name: String;
begin
PageControl1.ActivePage:= connection_;
l_c_ini_file:= TMemIniFile.Create(f_connections_ini_file_name);
with connection_listbox_ do
l_selected_connection_name:= Items[ItemIndex];
Caption:= l_selected_connection_name;
l_c_ini_file.ReadSectionValues(l_selected_connection_name,
connection_memo_.Lines);
l_c_ini_file.Free;
end; // connection_listbox_Click
| | | |
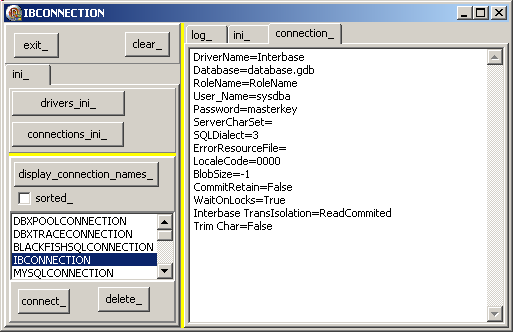
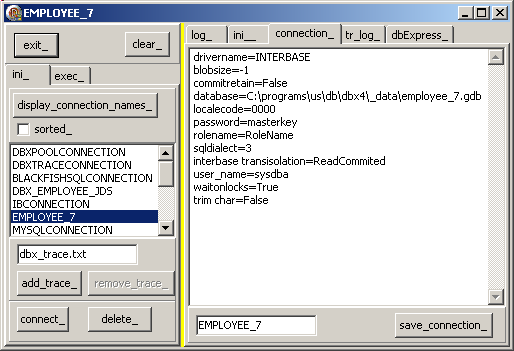
run and click "display_connection_names_" and then "IBCONNECTION"
| | | the list of all connection parameters is displayed:
|
2.4.2 - Using IConnectionAdmin
To make the handling of DBXCONNECTIONS.INI easier, the Dbx4 framework offers the IConnectionAdmin, which is located at C:\Program Files\CodeGear\RAD Studio\5.0\source\database\src\pas\dbx\vcl
Looking at the sources, you will see that it simply uses tIni files. It contains - an IConnectionAdmin INTERFACE, with methods like GetConnectionParams,
GetDriverNames, ModifyConnection, AddConnection etc
- a tConnectionAdmin CLASS, which implements this INTERFACE
- a singleton GetConnectionAdmin which retrieves an IConnectionAdmin
So here is an simple example: | | drop a tButton and another tMemo. In the OnClick of the tButton,
retrieve the IConnectionAdmin singleton and use it to display the parameters:
procedure TForm1.connection_admin_Click(Sender: TObject);
var l_selected_connection_name: String;
l_i_connection_admin: IConnectionAdmin;
l_c_connection_params: tStrings;
begin
with connection_listbox_ do
l_selected_connection_name:= Items[ItemIndex];
l_c_connection_params:= tStringList.Create;
l_i_connection_admin:= GetConnectionAdmin;
with l_i_connection_admin do
GetConnectionParams(l_selected_connection_name,
tWideStrings(l_c_connection_params));
properties_memo_.Lines.Assign(l_c_connection_params);
l_c_connection_params.Free;
end; // connection_admin_Click
|
|
2.4.3 - Using tDbxProperties We can also use the tDbxProperties CLASS which has been created to handle
the connection parameters as a CLASS. Such objects can be used in many Dbx4 methods, instead of sending several separate parameters. As usual with object parameters, it will enable future modification of the attribute list, without
having to change the methods which use this object. Among the attributes, you will find User, Password, DriverName. To display those values:
To recap, we can get the user name with the following code snippet:
var my_dbx_connection_factory: TDBXConnectionFactory;
my_dbx_connection_properties: TDBXProperties;
my_user: String;
my_dbx_connection_factory:= TDBXConnectionFactory.GetConnectionFactory;
my_dbx_connection_properties:=
my_dbx_connection_factory.GetConnectionProperties(p_connection_name);
with my_dbx_connection_properties do
my_user:= Values[TDBXPropertyNames.UserName];
|
And here is our example: | | add another tButton and display a couple of properties in the tMemo already used by IConnectionAdmin, for instance:
procedure display_connection_properties(p_connection_name: String);
var l_selected_connection_name: String;
l_c_dbx_connection_factory: TDBXConnectionFactory;
l_c_dbx_connection_properties: TDBXProperties;
begin
with connection_listbox_ do
l_selected_connection_name:= Items[ItemIndex];
l_c_dbx_connection_factory:= TDBXConnectionFactory.GetConnectionFactory;
l_c_dbx_connection_properties:=
l_c_dbx_connection_factory.GetConnectionProperties(p_connection_name);
properties_memo_.Lines.Clear;
with l_c_dbx_connection_properties do
begin
Form1.properties_memo_.Lines.Add(Values[TDBXPropertyNames.UserName]);
Form1.properties_memo_.Lines.Add(Values[TDBXPropertyNames.Password]);
Form1.properties_memo_.Lines.Add(Values[TDBXPropertyNames.DriverName]);
// ...
end; // with l_c_dbx_connection_properties
end; // display_connection_properties
| | | |
run and click "display_connection_names_", "IBCONNECTION" and then "properties_"
| | | the list of all connection parameters is displayed:
|
Please note that - do not be put off by the apparent complexity of this example. We only
presented it to show some of the Pascal Object Oriented techniques which were systematically used in order to build a solid, reusable, expansible framework. We are here at miles away from the traditional C pointer and
blind casting techniques usually present in database driver code
- the tDbxProperties can also be used to handle driver properties, and therefore the TDBXPropertyNames also contains litteral names useful only
for drivers, like VendorLib or Port, which have no meaning for connections
- we did not display all properties. So this display is not as complete as simply dumping the .INI section
2.5 - Creating a new connection When you install RAD Studio 2007, DBXCONNECTIONS.INI already contains some default connections, with some reasonable values. The DatabaseName for
instance, "DATABASE.GDB" does not correspond to any existing database. To be able to connect to our own databases, we need either to modify the default connections, or, better, add our own new connections.
Entering a new connection can be performed in several ways - we can use NOTEPAD, copy the complete default connection section, say [IBCONNECTION], paste it and modify the parameters to fit our own database.
This naturally works, but is tedious and error prone
- use the Data Explorer
- create the connection by code
2.5.1 - Create a connection with the Data Explorer
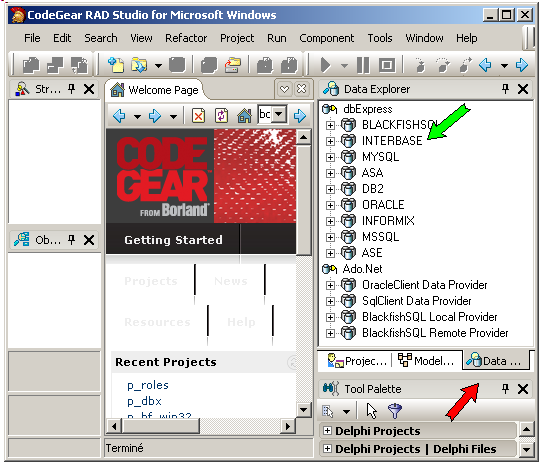
The Data Explorer is the third tab (red arrow) in the top-right Notebook pane:
and: - there are 2 categories of drivers
- dbExpress drivers, with the usual BlackfishSql, Interbase (the green
arrow), MySql, Oracle, SqlServer, etc
- Ado.Net drivers, with Oracle, SqlServer, and BlackfishSql "in process" and "out of process"
To add a new connection, the technique has not changed since Delphi 2005: - we select a driver node in the Data Explorer
- then "right-click | Add new connection" opens a connection editor, which we
use to enter the connection name and parameters
Here is how we create a new EMPLOYEE_7 connection | |
we copied the EMPLOYEE.GDB sample database to one of our directories (to avoid modifying this sample database) and rename it EMPLOYEE_7.GDB
| | |
select "dbExpress | Interbase" and "right click | Add New Connection"
| | | the connection name dialog is presented
| |
| type the connection name. For Instance dbx_employee_jds 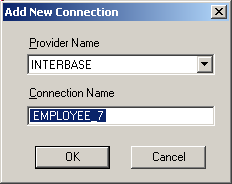 and click "Ok"
| | | the new "dbExpress | Interbase | employee_7" node is added to the Data Explorer | |
| to initialize the connection parameters, select this EMPLOYEE_7 node, and "right click | modify connection" | |
| a connection dialog is displayed with the default IBCONNECTION values: 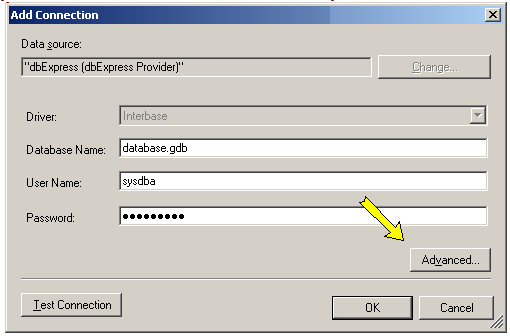 |
| | enter
and click "Ok" to save those settings | | | to test the connection, select this connection again, and "right click |
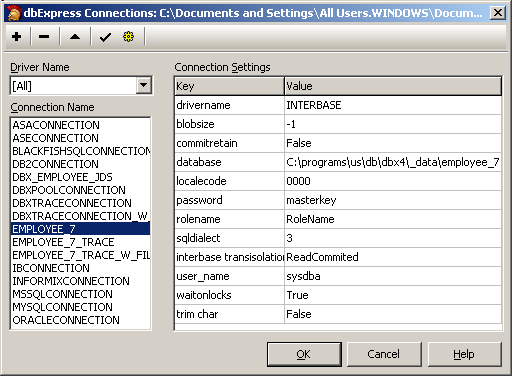
modify connection | Test Connection" | | | the connection succeeds: 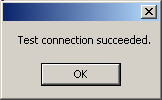 Click "Ok" | | | you may also modify other connection parameters, using the "connection
dialog | Advanced" button (the yellow arrow): | | | all the properties are displayed 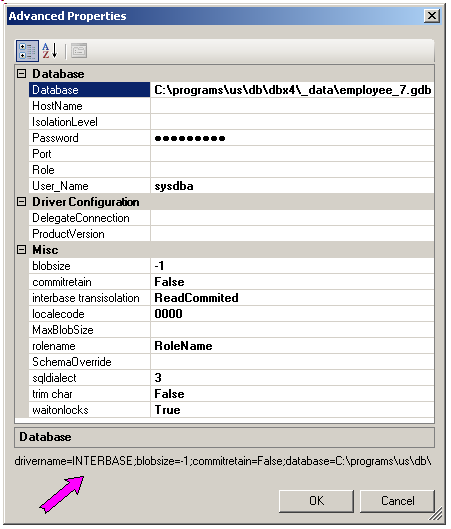 and - the connection string is displayed at the bottom (purple arrow). You may copy and paste this connection in some occasions
click "Ok", "Ok"
|
2.5.2 - New connection by modifying a clone To create a connection by code, we can copy the values of some of the properties. An easy solution is to use the tMemo where we displayed any connection
parameter, let the user modify some of them, and overwrite or add this modified parameter list. So basically this amounts to tIni hacking.
Here is the code: |
| in the Tabsheet with the parameter display, add a tEdit which will by default contain the selected connection name, but can be modified by the user
|
| | add a tButton which will
- overwrite the previous connection if the edit contains the same name as the tListbox selected Item
- append another connection if this is not the case
Here is this simple code:
procedure TForm1.save_connection_Click(Sender: TObject);
var l_c_dbxconnection_list: tStringList;
procedure append_connection(p_new_connection_name: String);
var l_key_index: Integer;
l_the_line: String;
begin
with l_c_dbxconnection_list do
begin
Add('['+ p_new_connection_name+ ']');
with connection_memo_ do
for l_key_index:= 0 to Lines.Count- 1 do
begin
l_the_line:= Lines[l_key_index];
if Trim(Lines[l_key_index])<> ''
then begin
Add(l_the_line);
display(l_the_line);
end;
end; // with connection_memo_, for l_key_index
end; // with l_c_dbxconnection_list
end; // append_connection
procedure modify_connection(p_selected_connection_name: String);
var l_connection_position: Integer;
l_list_index: Integer;
l_the_line: String;
l_key_index: Integer;
begin
with l_c_dbxconnection_list do
begin
l_connection_position:= IndexOf('['+ p_selected_connection_name+ ']');
l_list_index:= l_connection_position+ 1;
while l_list_index< Count do
begin
l_the_line:= Strings[l_list_index];
if (Length(l_the_line)> 0) and (l_the_line[1]= '[')
then Break
else Delete(l_list_index);
end; // while l_connection_position
with connection_memo_ do
for l_key_index:= 0 to Lines.Count- 1 do
begin
l_the_line:= Lines[l_key_index];
if Trim(Lines[l_key_index])<> ''
then begin
Insert(l_list_index, l_the_line);
Inc(l_list_index);
end;
end; // with connection_memo_, for l_key_index
end; // with l_c_dbxconnection_list
end; // modify_connection
var l_key_index: Integer;
l_selected_connection_name, l_edit_connection_name: String;
begin // save_connection_Click
with connection_memo_ do
with connection_listbox_ do
l_selected_connection_name:= Items[ItemIndex];
l_edit_connection_name:= connection_name_edit_.Text;
Caption:= l_selected_connection_name;
l_c_dbxconnection_list:= tStringList.Create;
with l_c_dbxconnection_list do
begin
LoadFromFile(f_connections_ini_file_name);
if l_edit_connection_name<> l_selected_connection_name
then append_connection(l_edit_connection_name)
else modify_connection(l_selected_connection_name);
SaveToFile(f_connections_ini_file_name);
Free;
end; // with l_c_dbxconnection_list
end; // save_connection_Click
| | | |
run and click "display_connection_names_"
| | | you will notice that our new EMPLOYEE_7 is displayed in the connection name listbox
|
| | select "EMPLOYEE_7"
| | |
its parameters are displayed in the Memo, and the new connection edit contains this default name
| | |
modify the new connection name. For instance NEW_EMPLOYEE_7
| | | change some parameters. For instance change the password to "my_pass"
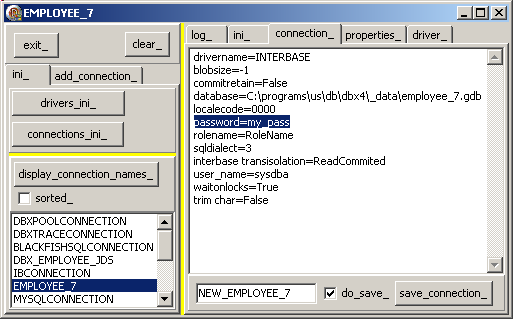
|
Note that - in the .ZIP attached source code, we also performed some sanity checks
before writing into the .INI (checking that all lines contain "=" or start with ";" etc)
- we will not be able to see the new connection in the connection name listbox, because this list is cached in memory. Do refresh the name list, we
must open and close the tDbxConnectionFactory, which will be shown below
- CAUTION: our updating of the .INI somehow removed comment lines. In .DBXCONNECTIONS.INI files, a comment line starts with a semi-colon.
So please do SAVE YOUR ORIGINAL .INI before running our examples
2.5.3 - New Connection with iConnectionAdmin We can also build a new connection by calling
iConnectionAdmin.AddConnection(my_driver). Since the parameter is a driver name, we will load them in a tListBox. Here is the code: | |
drop another tListbox on the form, and an tButton. In the tButton.OnClick, load the driver names:
procedure TForm1.driver_names_Click(Sender: TObject);
var l_i_connection_admin: IConnectionAdmin;
begin
l_i_connection_admin:= tConnectionAdmin.Create;
l_i_connection_admin.GetDriverNames(driver_listbox_.Items);
// -- optional
with driver_listbox_ do
ItemIndex:= Items.IndexOf('interbase');
driver_listbox_Click(Nil);
end; // driver_names_Click
|
Note that the initialization of the ItemIndex to the Interbase name is, of course, optional | | |
optionally also, create the tListbox.OnClick and display the driver parameters:
procedure TForm1.driver_names_Click(Sender: TObject);
var l_i_connection_admin: IConnectionAdmin;
begin
l_i_connection_admin:= tConnectionAdmin.Create;
l_i_connection_admin.GetDriverNames(driver_listbox_.Items);
// -- optional
with driver_listbox_ do
ItemIndex:= Items.IndexOf('interbase');
driver_listbox_Click(Nil);
end; // driver_names_Click
|
| | | add a tEdit to let the user enter the new connection name
| |
| add a tButton, and in its OnClick create the new connection:
procedure TForm1.create_connection_entry_Click(Sender: TObject);
var l_selected_driver_name: String;
l_i_connection_admin: IConnectionAdmin;
l_new_connection_name: String;
begin
with driver_listbox_ do
l_selected_driver_name:= Items[ItemIndex];
l_new_connection_name:= new_connection_edit_.Text;
l_i_connection_admin:= tConnectionAdmin.Create;
with l_i_connection_admin do
// -- (p_connection, p_driver)
AddConnection(l_new_connection_name, l_selected_driver_name);
end; // create_connection_entry_Click
| | | |
run and click "driver_names_"
| | | the driver properties are displayed | | | click "create_connection_entry_"
| |
| an entry with the default driver parameters is added
|
2.6 - Testing a connection - tDbxConnection The simplest way to test the connection is to open it.
We certainly could use any data access component (tIbDatabase, tSqlConnection, tAdoConnection etc). However, Dbx4 also offers its own set for opening a connection, reading and writing data from and to the database.
A tDbxConnection instance is created much in the same way as the tDbxProperties instance: - we retrieve a tDbxConnectionFactory instance
- this tDbxConnectionFactory is used to call
GetConnection(my_connection_name)
Here is a code snippet:
var my_dbx_connection_factory: TDBXConnectionFactory;
my_dbx_connection_properties: TDBXProperties;
my_dbx_connection: tDbxConnection;
my_dbx_connection_factory:= TDBXConnectionFactory.GetConnectionFactory;
my_dbx_connection_properties:=
my_dbx_connection_factory.GetConnectionProperties(my_connection_name);
my_dbx_connection:=
my_dbx_connection_factory.GetConnection(my_dbx_connection_properties);
| And the code:
| | add a tButton a the bottom of the connection name list, and in its OnClick event, open the connection using a tDbxConnection instance:
procedure TForm1.connect_Click(Sender: TObject);
var l_selected_connection_name: String;
l_c_dbx_connection_factory: TDBXConnectionFactory;
l_c_dbx_connection_properties: TDBXProperties;
l_c_dbx_connection: tDbxConnection;
begin
with connection_listbox_ do
l_selected_connection_name:= Items[ItemIndex];
l_c_dbx_connection_factory:=
TDBXConnectionFactory.GetConnectionFactory;
l_c_dbx_connection_properties:=
l_c_dbx_connection_factory.GetConnectionProperties(l_selected_connection_name);
Try
l_c_dbx_connection:=
l_c_dbx_connection_factory.GetConnection(l_c_dbx_connection_properties);
finally
l_c_dbx_connection.Free;
end; // try ... finally
end; // connect_Click
|
| | | run and click "display_connection_names_ | EMPLOYEE_7" and "connect_"
| |
| the connection is opened (we colored the tPanel in green when the connection suceeds) 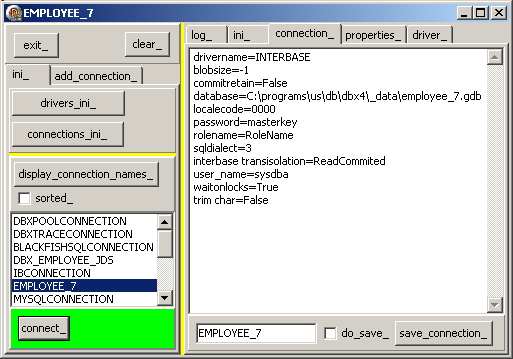
|
Please note
2.7 - Deleting a connection To remove a connection, we can - use the Data Explorer, select the connection in the TreeView and "right click | Delete Connection"
- use the iConnectionAdmin which has a DeleteConnection method
- load the DBXCONNECTIONS.INI and erase the section
Here is the code using the tIni.EraseSection technique: |
| near the "connect_" button, add a "delete_" button, and in its OnClick event, load the .INI, erase the section, and flush the .INI back to disc:
procedure TForm1.delete_Click(Sender: TObject);
var l_selected_connection_name: String;
l_c_ini_file: TMemIniFile;
l_c_dbx_connection_factory: TDBXConnectionFactory;
begin
with connection_listbox_ do
l_selected_connection_name:= Items[ItemIndex];
l_c_ini_file:= TMemIniFile.Create(f_connections_ini_file_name);
l_c_ini_file.EraseSection(l_selected_connection_name);
l_c_ini_file.UpdateFile;
l_c_ini_file.Free;
// -- update the connection list
l_c_dbx_connection_factory:=
TDBXConnectionFactory.GetConnectionFactory;
l_c_dbx_connection_factory.Close;
l_c_dbx_connection_factory.Open;
display_connection_names_Click(nil);
end; // delete_Click
|
| | | run and click "display_connection_names_ | OTHER_EMPLOYEE_7" and "delete_"
| |
| the connection is removed and the connection list refreshed
|
Note that
3 - Reading and Writing data: tDbxCommand, tDbxReader 3.1 - tDbxConnection, tDbxCommand, tDbxReader
The tDbxConnection allows us to establish a connection. After connecting, we can also execute Sql requests by creating a tDbxCommand:
var my_dbx_command: TDBXCommand;
my_dbx_command:= g_c_dbx_connection.CreateCommand;
| To read Table rows
- Using this command, we initialize the tDbxCommand.Text property with any SELECT request
- a call to tDbxCommand.ExecuteQuery will return a tDbxReader object
- we can read the rows with calls to the boolean tDbxReader.Next FUNCTION: the first call fetches the first row, and the boolean becomes False when Next is called after all rows have been fetched
- column values are accesses by indexing the tDbxReader.Values object, and eventually converting this value object into a more convenient type, for instance using GetAnsiString
Here is a code snippet:
var my_dbx_reader: TDBXReader;
my_column_index: Integer;
my_column_value: String;
my_dbx_command.Text:= 'SELECT * FROM country';
my_dbx_reader:= my_dbx_command.ExecuteQuery;
while my_dbx_reader.Next do
for my_column_index:= 0 to my_dbx_reader.ColumnCount - 1 do
begin
my_column_value:=
my_dbx_reader.Value[m_column_index].GetAnsiString;
// ... ooo do something with the column value
end;
|
Here is the code sample. First let's We will start a new project: | | create a new project: "Files | New | Vcl Forms Application Win32" and rename it "dbx_connect"
| | | to allow the user to select his connection, drop a tButton and a tListBox
on the tForm and duplicate the connection selection code from the previous project
| | |
add a tButton which will open the connection and initialize a global tDbxConnection variable
|
Now we will display the COUNTRY Table (this is the most easy, least constrained
table in the EMPLOYEE.GDB database: no CHECKs, no TRIGGERs, no CONSTRAINTs etc, just the first column as a PRIMARY KEY): | |
drop a tButton on the Form, create its OnClick event which will use a tDbxCommand to get a tDbxReader:
procedure read_table(p_sql_request: WideString);
var l_c_dbx_transaction: TDBXTransaction;
l_c_dbx_command: TDBXCommand;
l_c_dbx_reader: TDBXReader;
l_row_string: String;
l_column_index: Integer;
begin
l_c_dbx_transaction:=
g_c_dbx_connection.BeginTransaction();
l_c_dbx_command:= g_c_dbx_connection.CreateCommand;
try
l_c_dbx_command.Text:= p_sql_request;
l_c_dbx_reader:= l_c_dbx_command.ExecuteQuery;
while l_c_dbx_reader.Next do
begin
l_row_string:= '';
for l_column_index:= 0 to l_c_dbx_reader.ColumnCount - 1 do
begin
if l_row_string<> ''
then l_row_string:= l_row_string+ ' | ';
l_row_string:= l_row_string
+ l_c_dbx_reader.Value[l_column_index].GetAnsiString;
end; // for l_column_index
display(l_row_string);
end; // while l_c_dbx_reader.Next
finally
g_c_dbx_connection.CommitFreeAndNil(l_c_dbx_transaction);
l_c_dbx_command.Free;
l_c_dbx_reader.Free;
end; // try ... finally
end; // read_table
procedure TForm1.select_from_country_Click(Sender: TObject);
begin
read_table('SELECT * FROM country');
end; // select_from_country_Click
| | | |
run, select the connection (if the default is not appropriate, click "connect_", click "select_from_country_"
| | | the snapshot is the following:

|
3.2 - Parametrized Queries We can also use parametrized Queries
- we build a SQL request string using the question mark ( "?" ) for parameter tokens in the WHERE clause
- we create a tDbxCommand, and
- for each "?", we create a tDbxParameter, filling its properties (mainly type, size)
- we add the parameters by calling tDbxCommand.AddParameter()
- we send this request to the server by calling my_dbx_command.Prepare
- once the values of the parameters are known, we can
- set the value of the parameters, using a
tDbxParameter.Value.Set_xxx(my_value)
- call tDbxCommand.ExecuteQuery to retrieve a tDbxReader which can be used for displaying the result
The preparation should look like this:
var my_dbx_command: TDBXCommand;
my_dbx_parameter: tDbxParameter;
my_dbx_command:= my_dbx_connection.CreateCommand;
my_dbx_command.Text:= 'SELECT * FROM country WHERE currency= ?';
my_dbx_parameter:= my_dbx_parametrized_command.CreateParameter;
with my_dbx_parameter do
begin
DataType:= TDBXDataTypes.AnsiStringType;
// -- ... ooo ... eventually Size, Precision, Scale etvc
end; // with my_dbx_parameter
my_dbx_parametrized_command.Parameters.AddParameter(my_dbx_parameter);
my_dbx_parametrized_command.Prepare;
| and the execution:
var my_dbx_reader: TDBXReader;
my_dbx_parameter.Value.SetAnsiString(parameter_edit_.Text);
my_dbx_reader:= my_dbx_parametrized_command.ExecuteQuery;
// -- ... ooo ... use the reader
|
And for the code: | |
add a tButton which prepares the request, with, for instance, a one parameter request:
const k_parametrized_select=
'SELECT *'
+ ' FROM country'
+ ' WHERE currency= ?';
var g_c_dbx_parametrized_command: tDbxCommand= Nil;
g_c_dbx_parameter: TDBXParameter= Nil;
procedure TForm1.prepare_Click(Sender: TObject);
begin
g_c_dbx_parametrized_command:= g_c_dbx_connection.CreateCommand;
g_c_dbx_parametrized_command.Text:= k_parametrized_select;
g_c_dbx_parameter:= g_c_dbx_parametrized_command.CreateParameter;
with g_c_dbx_parameter do
begin
DataType:= TDBXDataTypes.AnsiStringType;
Value.SetAnsiString('aha');
end; // with g_c_dbx_parameter
g_c_dbx_parametrized_command.Parameters.AddParameter(g_c_dbx_parameter);
g_c_dbx_parametrized_command.Prepare;
end; // prepare_Click
|
| | | add a tEdit for the unknown value and a tButton which will initialize the
parameter value, send the request, and display the result:
procedure TForm1.execute_Click(Sender: TObject);
var l_c_dbx_reader: TDBXReader;
l_row_string: String;
l_column_index: Integer;
l_c_dbx_transaction: TDBXTransaction;
begin
g_c_dbx_parameter.Value.SetAnsiString(parameter_edit_.Text);
Try
l_c_dbx_transaction:= g_c_dbx_connection.BeginTransaction();
try
l_c_dbx_reader:= g_c_dbx_parametrized_command.ExecuteQuery;
Except
on e: Exception do
display_bug_stop(e.Message);
end;
while l_c_dbx_reader.Next do
begin
l_row_string:= '';
for l_column_index:= 0 to l_c_dbx_reader.ColumnCount - 1 do
begin
if l_row_string<> ''
then l_row_string:= l_row_string+ ' | ';
l_row_string:= l_row_string
+ l_c_dbx_reader.Value[l_column_index].GetAnsiString;
end; // for l_column_index
display(l_row_string);
end; // while l_c_dbx_reader.Next
finally
g_c_dbx_connection.CommitFreeAndNil(l_c_dbx_transaction);
l_c_dbx_reader.Free;
end;
end; // execute_Click
| | | |
run, select the connection (if the default is not appropriateà, click "connect_", click "prepare_", enter a value and click "execute_"
| | |
the snapshot is the following: 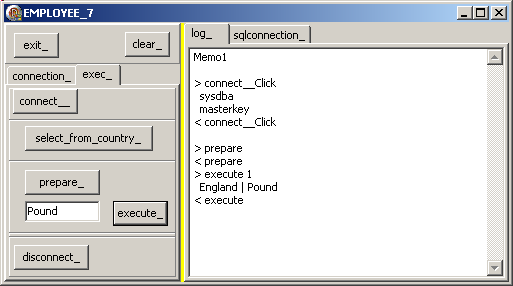
|
Note that - a this stage, we would naturally start factorizing some parts, like
displaying the tDbxDataReader values in some common code, possibly in a c_dbx_class, as we did in the BDP or Ado.Net tutorials
- instead of parametrized queries, we could also use "dynamic queries", where
we build the query request string by concatenating the values at runtime
- once we know how to use parametrized queries, we can also build master detail requests
- we should also take care of freeing the global variables
3.3 - Writing data We can execute any writing SQL request (data definition, like CREATE
TABLE or data manipulation like INSERT, DELETE or UPDATE by calling the very same tDbxCommand.ExecuteQuery
And: |
| Here is how we insert a new row into the COUNTRY Table, where we added an additional Rollback in the EXCEPT part:
procedure execute_sql_statement(p_sql_request: WideString);
var l_c_dbx_database_metadata: TDBXDatabaseMetaData;
l_c_dbx_transaction: TDBXTransaction;
l_c_dbx_command: TDBXCommand;
begin
try
l_c_dbx_transaction:= g_c_dbx_connection.BeginTransaction();
try
l_c_dbx_command:= g_c_dbx_connection.CreateCommand;
l_c_dbx_command.Text:= p_sql_request;
l_c_dbx_command.ExecuteQuery;
g_c_dbx_connection.CommitFreeAndNil(l_c_dbx_transaction);
finally
g_c_dbx_connection.RollbackIncompleteFreeAndNil(l_c_dbx_transaction);
if Assigned(l_c_dbx_command)
then l_c_dbx_command.Free;
end;
except
on E: Exception do
display_bug_stop('exception '+ e.Message);
end; // try except
end; // execute_sql_statement
procedure TForm1.insert_into_Click(Sender: TObject);
const k_insert_request= 'INSERT INTO %s (%s, %s) VALUES (%s, %s)';
var l_insert_request: String;
begin
l_insert_request:= Format(k_insert_request,
['COUNTRY', 'country', 'currency',
QuotedStr('Europe'), QuotedStr('Euro')]);
execute_sql_statement(l_insert_request);
end; // insert_into_Click
|
| | | the snapshot of inserting and displaying is: 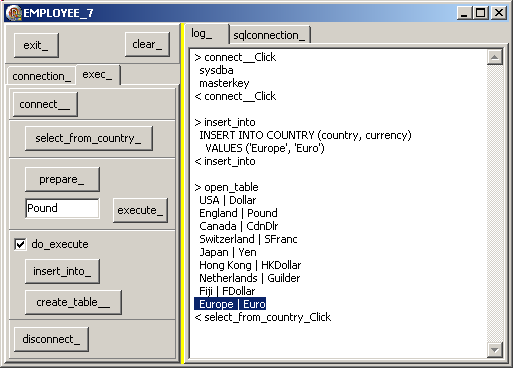
|
Note: - in the .ZIP code, we also added a CREATE TABLE example
- there also exists a tDbxCommand.ExecuteUpdate
4 - dbExpress 4 Delegate Drivers
4.1 - Tracing and Pooling Dbx4 allows us to very easy add tracing and connection pooling to our code.
This is done by chaining the usual Dbx4 driver with a tracing (or pooling) driver. This chaining, calling delegating, is performed by simply adding a line in the DBXCONNECTIONS.INI entry of our driver. Each call to any PROTECTED and
PUBLIC methods of the Dbx4 CLASSEs will then be derived to the delegate driver, which does some handling (displaying traces or managing a connection pool) before handing over the control to the usual method.
4.2 - Tracing our code 4.2.1 - The Default connections Looking at the DBXCONNECTIONS.INI, we will find the default DBXTRACECONNECTION tracing connection name:
[DBXTRACECONNECTION]
DriverName=DBXTrace
TraceFlags=NONE |
To be able to trace our Dbx4 activities, all we have to do is to add a reference to this connection name in our connection entry. Here is our EMPLOYEE_7 entry:
[EMPLOYEE_7]
drivername=INTERBASE
blobsize=-1
commitretain=False
database=C:\programs\us\db\dbx4\_data\employee_7.gdb
localecode=0000
password=masterkey
rolename=RoleName
sqldialect=3
interbase transisolation=ReadCommited
user_name=sysdba
waitonlocks=True
trim char=False |
If we want to add tracing, all we have to do is to add
[EMPLOYEE_7]
drivername=INTERBASE
blobsize=-1
commitretain=False
database=C:\programs\us\db\dbx4\_data\employee_7.gdb
localecode=0000
password=masterkey
rolename=RoleName
sqldialect=3
interbase transisolation=ReadCommited
user_name=sysdba
waitonlocks=True
trim char=False
DelegateConnection=DBXTRACECONNECTION | To be able to toggle tracing, we can
- either clone the traceless connection, rename this new connection, for instance EMPLOYEE_7_TRACE, and add the "DelegateConnection=" line
- or add the "DelegateConnection=" to our original entry, and comment this
line out with a semi-colon when we do not want to trace
RAD Studio prepared all the connection entries with this tracing line. For instance, the Oracle connection name looks like:
[OracleConnection]
;DelegateConnection=DBXTraceConnection
DriverName=Oracle
DataBase=Database Name
User_Name=user
Password=password
RowsetSize=20
BlobSize=-1
ErrorResourceFile=
LocaleCode=0000
Oracle TransIsolation=ReadCommited
OS Authentication=False
Multiple Transaction=False
Trim Char=False
Decimal Separator=. | So RAD Studio allows you to easily switch between tracing or not tracing by editing the .INI with NOTEPAD, and removing or inserting this ";".
In our example, we prefer to use separate connection names, but this is not an obligation.
4.2.2 - Trace result in a log file By default, the output of the log will be redirected to a CONSOLE window.
We can save the trace in a file, by delegating our driver to a file-tracing driver:
4.2.3 - The Tracing example We will start a new project to experiment this tracing capability. So let's prepare this new project: | |
create a new project: "Files | New | Vcl Forms Application Win32" and rename it "dbx_tracing"
| | |
to allow the user to select his connection, drop a tButton and a tListBox on the tForm and duplicate the connection selection code from the previous project
| |
| add a tButton which will open the connection and initialize a global tDbxConnection variable
| |
| also add the "connect_" button, as well as the "delete_" connection entry button, and the tMemo with the connection entry updating handling (see our previous example)
|
This is of course already prepared in our tracing .ZIP source code We also added the possibility to create the _TRACE and _TRACE_W_FILE connection
entries with a simple button click. Since those are, again, boring .INI manipulation, we will not detail them in the paper. Please refer to the source code.
Here is the snapshot of this _TRACE possibility:
You may notice however that to avoid duplication in the main project, we added two helper units:
- the U_C_DBX4_INI unit contains all the Dbx4 .INI handling
const k_default_trace_file_name= 'dbx_trace.txt';
type c_dbx4_connections_ini=
class(c_basic_object)
m_c_readonly_connection_name_list: tStringList;
Constructor create_dbx4_connections_ini(p_name: String);
function f_is_readonly_connection(p_connection_name: String): Boolean;
function f_delete_section(p_connection_name: String): Boolean;
function f_append_new_section(p_connection_name: String;
p_c_connection_parameters: tStrings): Boolean;
function f_update_section(p_connection_name: String;
p_c_connection_parameters: tStrings): Boolean;
function f_update_or_append_section(p_connection_name: String;
p_c_connection_parameters: tStrings): Boolean;
procedure append_dbx4_file_trace_connection(
p_file_delegation_connection_name: String);
procedure write_string(p_section, p_key, p_value: String);
Destructor Destroy; Override;
end; // c_dbx4_connections_ini
function f_connections_ini_file_name: String;
function f_drivers_ini_file_name: String;
procedure refresh_connection_factory;
procedure get_connection_parameter_list(p_connection_name: String;
p_c_strings: tStrings);
function f_is_valid_parameter_list(
p_c_connection_parameters: tStrings): Integer;
|
- the U_C_DBX4 somehow factorizes the DbxCommand handling:
procedure read_and_display_table(p_c_dbx_connection: tDbxConnection;
p_select_request: String;
p_c_strings: tStrings);
procedure execute_sql_statement(p_c_dbx_connection: tDbxConnection;
p_sql_request: WideString);
|
If you do not want to use our .INI handling, you could copy the entries
presented above and paste them in the DBXCONNECTIONS.INI file.
Now the tracing part: | |
add a tCheckBox which allows the user to select tracing or not
| | | add a tButton "connect__" which will select the EMPLOYEE_7 or
EMPLOYEE_7_W_FILE connection and will open this connection
var g_connection_name: String= 'EMPLOYEE_7';
g_c_dbx_connection: tDbxConnection= Nil;
function f_s_connection_name: String;
begin
Result:= g_connection_name;
if Form1.trace_.Checked
then
if f_end_is_equal_to(g_connection_name, '_TRACE')
or
f_end_is_equal_to(g_connection_name, '_TRACE_W_FILE')
then
else begin
if Trim(Form1.log_file_name_edit_.Text)= ''
then Result:= g_connection_name+ '_TRACE'
else Result:= g_connection_name+ '_TRACE_W_FILE';
end;
end; // f_w_connection_name
function f_c_dbx_connection(p_connection_name: String): tDbxConnection;
var l_c_dbx_connection_factory: TDBXConnectionFactory;
l_c_dbx_connection_properties: TDBXProperties;
begin
l_c_dbx_connection_factory:= TDBXConnectionFactory.GetConnectionFactory;
l_c_dbx_connection_properties:= l_c_dbx_connection_factory.GetConnectionProperties(p_connection_name);
Result:= Nil;
Result:= l_c_dbx_connection_factory.GetConnection(l_c_dbx_connection_properties);
end; // do_connect
procedure TForm1.connect__Click(Sender: TObject);
begin
g_c_dbx_connection.Free;
g_c_dbx_connection:= f_c_dbx_connection(f_s_connection_name);
display('< connect__Click');
end; // connect_Click
|
| | | add
- a tButton which will open a Table using a tDbxCommand and a
tDbxDataReader, as explained in the previous example
- a tButton which disconnects the tDbxConnection
- another tButton which loads the .TXT trace file in a tMemo
| |
| compile and run
| | | if you click "connect__", "dbx_select_table_", you will have the same
behaviour as in the previous example.
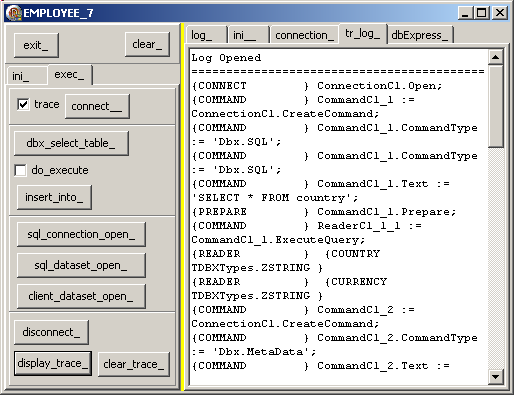
| | | if you check "trace_", click "connect__", "dbx_select_table_", Dbx4 will
generate a .TXT with the trace on disc. To load this file, click "disconnect_" and "display_trace_"
| | | here is a snapshot:
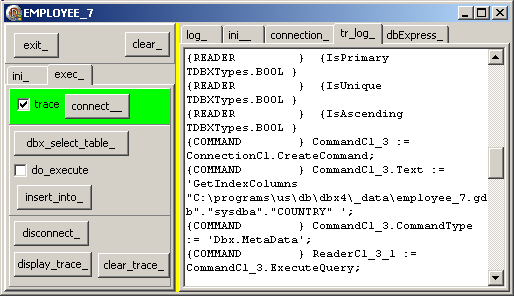
|
A complete listing of this trace is:
Log Opened ==========================================
{CONNECT } ConnectionC1.Open;
{COMMAND } CommandC1_1 := ConnectionC1.CreateCommand;
{COMMAND } CommandC1_1.CommandType := 'Dbx.SQL';
{COMMAND } CommandC1_1.CommandType := 'Dbx.SQL';
{COMMAND } CommandC1_1.Text := 'SELECT * FROM country';
{PREPARE } CommandC1_1.Prepare;
{COMMAND } ReaderC1_1_1 := CommandC1_1.ExecuteQuery;
{READER } {COUNTRY TDBXTypes.ZSTRING }
{READER } {CURRENCY TDBXTypes.ZSTRING }
{COMMAND } CommandC1_2 := ConnectionC1.CreateCommand;
{COMMAND } CommandC1_2.CommandType := 'Dbx.MetaData';
{COMMAND } CommandC1_2.Text := 'GetIndexes
"C:\programs\us\db\dbx4\_data\employee_7.gdb"."sysdba"."COUNTRY" ';
{COMMAND } ReaderC1_2_1 := CommandC1_2.ExecuteQuery;
{READER } {CatalogName TDBXTypes.WIDESTRING }
{READER } {SchemaName TDBXTypes.WIDESTRING }
{READER } {TableName TDBXTypes.WIDESTRING }
{READER } {IndexName TDBXTypes.WIDESTRING }
{READER } {ConstraintName TDBXTypes.WIDESTRING }
{READER } {IsPrimary TDBXTypes.BOOL }
{READER } {IsUnique TDBXTypes.BOOL }
{READER } {IsAscending TDBXTypes.BOOL }
{COMMAND } CommandC1_3 := ConnectionC1.CreateCommand;
{COMMAND } CommandC1_3.Text :=
'GetIndexColumns "C:\programs\us\db\dbx4\_data\employee_7.gdb"."sysdba"."COUNTRY" ';
{COMMAND } CommandC1_3.CommandType := 'Dbx.MetaData';
{COMMAND } ReaderC1_3_1 := CommandC1_3.ExecuteQuery;
{READER } {CatalogName TDBXTypes.WIDESTRING }
{READER } {SchemaName TDBXTypes.WIDESTRING }
{READER } {TableName TDBXTypes.WIDESTRING }
{READER } {IndexName TDBXTypes.WIDESTRING }
{READER } {ColumnName TDBXTypes.WIDESTRING }
{READER } {Ordinal TDBXTypes.INT32 }
{READER } {IsAscending TDBXTypes.BOOL }
{READER } { ReaderC1_3_1 closed. 1 row(s) read }
{COMMAND } FreeAndNil(CommandC1_3);
{READER } FreeAndNil(ReaderC1_3_1);
{READER } { ReaderC1_2_1 closed. 1 row(s) read }
{READER } FreeAndNil(ReaderC1_2_1);
{COMMAND } FreeAndNil(CommandC1_2);
{READER } { ReaderC1_1_1 closed. 15 row(s) read }
{READER } FreeAndNil(ReaderC1_1_1);
{COMMAND } FreeAndNil(CommandC1_1); |
4.2.4 - Tracing dbExpress activity
So far we have only used Dbx4 components. However, the Dbx4 layer is a "driver layer", below the usual component access layers. For instance the standard DbExpress components, like SqlConnection,
SqlDataset, DataProvider, ClientDataSet are still available with the new Dbx4 framework.
Lets first set up the standard dbExpress suite: |
| from the "Tools Palette | dbExpress" tab drop an tSqlConnection on the Form
To make sure that your connection entries are correct
- double click on SqlConnection1 and select one of the connections. In our case, EMPLOYEE_7:
 and click "Ok"
- in the Object Inspector, toggle LoginPrompt to False, LoadParamsOnConnect to True and Connected to True. If this does not work, check your connection and start again
|
| | from the "Tools Palette | dbExpress" drop a tSqlDataSet, and
| | |
from the "Tools Palette | Data Access" tab, drop a tDataSetProvider and initialize DataSet to SqlDataSet1 | | |
from the "Tools Palette | Data Access" tab, drop a tClientDataSet and initialize ProviderName tDataSetProvider1 To check all links, toggle Active to True | |
| from the "Tools Palette | Data Access" tab, drop a tDataSource and initialize DataSet to ClientDataSet1 | |
| finally, from the "Tools Palette | Data Controls" tab, drop a tDbGrid, and initialize DataSource to DataSource1 | |
| the data should be displayed in DbGrid1: 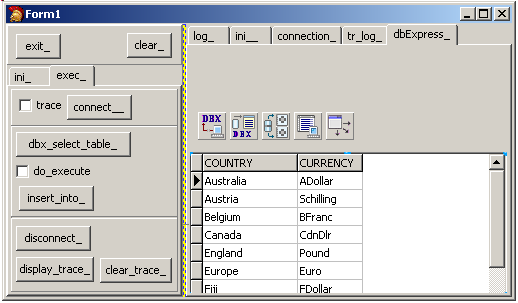
|
All we have achieved so far is to demonstrate the dbExpress works with the new Dbx4 framework. Fine. Now the tracing part: | |
drop a tButton and set the tSqlConnection to whatever connection was selected at runtime (EMPLOYEE_7, EMPLOYEE_7_TRACE or, better, EMPLOYEE_7_TRACE_W_FILE). Here is the code:
procedure TForm1.sql_connection_open_Click(Sender: TObject);
begin
with SqlConnection1 do
begin
Close;
ConnectionName:= f_s_connection_name;
Open;
end; // with SqlConnection1
end; // sql_connection_open_Click
| where the f_s_connection_name returns whatever connection was selected (see above)
| | | drop a tButton, and open the tSqlDataSet with whatever connection was open:
procedure TForm1.sql_dataset_open_Click(Sender: TObject);
begin
with SqlConnection1 do
begin
Close;
ConnectionName:= f_s_connection_name;
end; // with SqlConnection1
SqlDataset1.Open;
end; // sql_dataset_open_Click
| | | |
and do the same for the tClientDataSet:
procedure TForm1.client_dataset_open_Click(Sender: TObject);
begin
with SqlConnection1 do
begin
Close;
ConnectionName:= f_s_connection_name;
end; // with SqlConnection1
SqlDataSet1.Close;
ClientDataSet1.Close;
ClientDataset1.Open;
end; // client_dataset_open_Click(
| | | |
compile and run
| | | check "trace_", and, clicking "sql_dataset_open" will produce a trace, that you can display by clicking "disconnect_" and "display_trace_":
|
The detailed trace is:
Log Opened ==========================================
{CONNECT } ConnectionC1.Open;
{COMMAND } CommandC1_1 := ConnectionC1.CreateCommand;
{COMMAND } CommandC1_1.CommandType := 'Dbx.SQL';
{COMMAND } CommandC1_1.CommandType := 'Dbx.SQL';
{COMMAND } CommandC1_1.Text := 'SELECT * FROM country';
{PREPARE } CommandC1_1.Prepare;
{COMMAND } ReaderC1_1_1 := CommandC1_1.ExecuteQuery;
{READER } {COUNTRY TDBXTypes.ZSTRING }
{READER } {CURRENCY TDBXTypes.ZSTRING }
{COMMAND } CommandC1_2 := ConnectionC1.CreateCommand;
{COMMAND } CommandC1_2.CommandType := 'Dbx.MetaData';
{COMMAND } CommandC1_2.Text :=
'GetIndexes"C:\programs\us\db\dbx4\_data\employee_7.gdb". "sysdba"."COUNTRY" ';
{COMMAND } ReaderC1_2_1 := CommandC1_2.ExecuteQuery;
{READER } {CatalogName TDBXTypes.WIDESTRING }
{READER } {SchemaName TDBXTypes.WIDESTRING }
{READER } {TableName TDBXTypes.WIDESTRING }
{READER } {IndexName TDBXTypes.WIDESTRING }
{READER } {ConstraintName TDBXTypes.WIDESTRING }
{READER } {IsPrimary TDBXTypes.BOOL }
{READER } {IsUnique TDBXTypes.BOOL }
{READER } {IsAscending TDBXTypes.BOOL }
{COMMAND } CommandC1_3 := ConnectionC1.CreateCommand;
{COMMAND } CommandC1_3.Text := 'GetIndexColumns "C:\programs\us\db\dbx4\_data\employee_7.gdb"."sysdba"."COUNTRY" ';
{COMMAND } CommandC1_3.CommandType := 'Dbx.MetaData';
{COMMAND } ReaderC1_3_1 := CommandC1_3.ExecuteQuery;
{READER } {CatalogName TDBXTypes.WIDESTRING }
{READER } {SchemaName TDBXTypes.WIDESTRING }
{READER } {TableName TDBXTypes.WIDESTRING }
{READER } {IndexName TDBXTypes.WIDESTRING }
{READER } {ColumnName TDBXTypes.WIDESTRING }
{READER } {Ordinal TDBXTypes.INT32 }
{READER } {IsAscending TDBXTypes.BOOL }
{READER } { ReaderC1_3_1 closed. 1 row(s) read }
{COMMAND } FreeAndNil(CommandC1_3);
{READER } FreeAndNil(ReaderC1_3_1);
{READER } { ReaderC1_2_1 closed. 1 row(s) read }
{READER } FreeAndNil(ReaderC1_2_1);
{COMMAND } FreeAndNil(CommandC1_2);
{READER } { ReaderC1_1_1 closed. 1 row(s) read }
{READER } FreeAndNil(ReaderC1_1_1);
{COMMAND } FreeAndNil(CommandC1_1);
|
4.3 - Pooling 4.3.1 - Connection Pooling Pooling allows users to use any tDbxConnection contained in a pool - we prepare a pool of some size, say 20
- when new tDbxConnections are needed, they are created and added to the pool
- if more than 20 connections are required, the call is placed on hold
- if one of the 20 users closes the connection, the connection is made
available for a waiting user
This is how we can implement a pool - the default DBXCONNECTIONS.INI contains a DbxPool driver:
[DBXPoolConnection]
DriverName=DBXPool
MaxConnections=16
MinConnections=0
ConnectTimeout=0 | - let's take our EMPLOYEE_7 connection:
[EMPLOYEE_7]
drivername=INTERBASE
blobsize=-1
commitretain=False
database=C:\programs\us\db\dbx4\_data\employee_7.gdb
localecode=0000
password=masterkey
rolename=RoleName
sqldialect=3
interbase transisolation=ReadCommited
user_name=sysdba
waitonlocks=True
trim char=False |
- to use pooling, we simply delegate EMPLOYEE_7 to DBXPOOLCONNECTION:
[EMPLOYEE_7_POOL]
drivername=INTERBASE
blobsize=-1
commitretain=False
database=C:\programs\us\db\dbx4\_data\employee_7.gdb
localecode=0000
password=masterkey
rolename=RoleName
sqldialect=3
interbase transisolation=ReadCommited
user_name=sysdba
waitonlocks=True
trim char=False
delegateconnection=DBXPOOLCONNECTION |
4.3.2 - Dbx4 Pooling example We will start a new project for pooling:
| | create a new project: "Files | New | Vcl Forms Application Win32" and rename it "dbx_pooling"
| |
| add the connection handling similar to those used for tracing (connection display, addition of _POOL connection), or, alternately, add the
EMPLOYEE_7_POOL connection entry in the DBXCONNECTIONS.INI
|
To test the pool we first will open and close connection several times in a row:
- without pooling, the connection has to be built from scratch every time
- with pooling, we have to create the first connection, and this connection is then reused for the next connection requests
Here is the example
| | drop two tRadioButton which will allow the user to use a standard or a _POOLed connection
| |
| drop a tButton and name it "connect_disconnect_". In its OnClick event, write a FOR loop which connects and disconnects, and display the tick count of this operation
procedure TForm1.connect_disconnect_Click(Sender: TObject);
var l_iteration_max, l_iteration: Integer;
l_save_start_tick: Integer;
l_connection_name: String;
begin
l_iteration_max:= StrToInt(iteration_edit_.Text);
l_save_start_tick:= GetTickCount;
l_connection_name:= f_s_connection_name;
for l_iteration:= 0 to l_iteration_max - 1 do
with TDBXConnectionFactory
.GetConnectionFactory
.GetConnection(l_connection_name, '', '') do
Free;
display(l_connection_name+ ' '
+ IntToStr(GetTickCount - l_save_start_tick));
end; // connect_disconnect_Click
| | | |
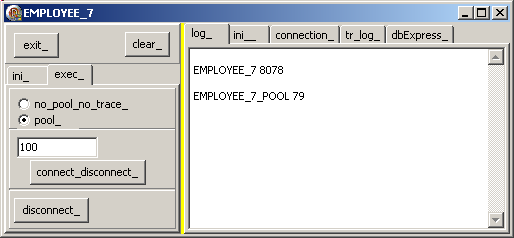
run, select "no_pooling_", click "connect_disconnect_"
| | | a tick count of 8078 is displayed
| |
| select "pool_" and click "connect_disconnect_"
| | | a tick count of 79 is displayed:
|
Note: - when we start the iteration, we see, at the bottom of the IDE. When we run
the benchmark from the disc .EXE, the figure are smaller. Notice that those figure are not too stable: running the test again will produce some different value. Nevertheless there nearly is a tenfold decrease in tick count with pooling
- having used Delphi 6 for Interbase 6, I must say that this speed of connection / disconnection is quite remarkable.
4.3.3 - Filling up a pool
In the previous example we used only one connection, recycling this connection at each iteration. We naturally can increase the connection requested by avoiding to close them
just after opening them. We simply call several tDbxConnection.Open in a row. Here is the example: | |
add a "fill_connection_list_" button, which creates a tList and adds several tDbxConnections (without closing them) to this list:
procedure TForm1.fill_connection_list_Click(Sender: TObject);
var l_connection_name: String;
l_c_connection_list: tList;
l_iteration_max, l_iteration: Integer;
l_save_start_tick: Integer;
begin
l_connection_name:= f_s_connection_name;
l_iteration_max:= StrToInt(iteration_edit_.Text);
if (Pos('ib', LowerCase(l_connection_name))>= 0)
and (l_iteration_max> 4)
then l_iteration_max:= 4
else
if (Pos('jds', LowerCase(l_connection_name))>= 0)
and (l_iteration_max> 20)
then l_iteration_max:= 20;
iteration_edit_.Text:= IntToStr(l_iteration_max);
l_c_connection_list:= tList.Create;
l_save_start_tick:= GetTickCount;
for l_iteration:= 0 to l_iteration_max - 1 do
l_c_connection_list.Add(TDBXConnectionFactory
.GetConnectionFactory
.GetConnection(l_connection_name, '', ''));
display(l_connection_name+ ' '
+ IntToStr(GetTickCount - l_save_start_tick));
for l_iteration:= 0 to l_iteration_max - 1 do
TDBXConnection(l_c_connection_list[l_iteration]).Free;
end; // fill_connection_list_Click
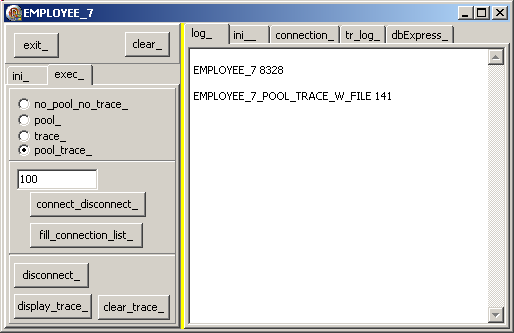
| | | |
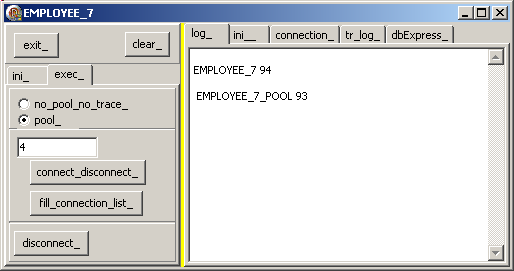
run, select "no_pooling_", click "connect_disconnect_" and then select "pool_" and click "connect_disconnect_"
| | | the tick count is displayed:
|
Please note - our original iteration count was 100, but the project raised an exception
when we reached 4, because this is our default license count for Interbase
- we then switched to BlackfichSql, and now hit the 20 license limit
- this explains our maximum connection count in our example. You may of course
remove this adjustment if you have more licenses
- because of the limited pool size, the tick difference is not very important. But building a bigger pool would obviously show the pooling benefit.
4.4 - Delegate chaining
4.4.1 - Chaining tracing and pooling We now can stack the delegates one upon the other, for instance use tracing AND pooling. To do so - first we create
[DBXPOOLTRACECONNECTION_W_FILE]
DriverName=DBXPool
MaxConnections=16
MinConnections=0
ConnectTimeout=0
DelegateConnection=DBXTRACECONNECTION_W_FILE | - then we delegate the Interbase driver to this pool / trace driver:
[EMPLOYEE_7_POOL_TRACE_W_FILE]
drivername=INTERBASE
blobsize=-1
commitretain=False
database=C:\programs\us\db\dbx4\_data\employee_7.gdb
localecode=0000
password=masterkey
rolename=RoleName
sqldialect=3
interbase transisolation=ReadCommited
user_name=sysdba
waitonlocks=True
trim char=False
delegateconnection=DBXPOOLTRACECONNECTION_W_FILE |
And here is the code:
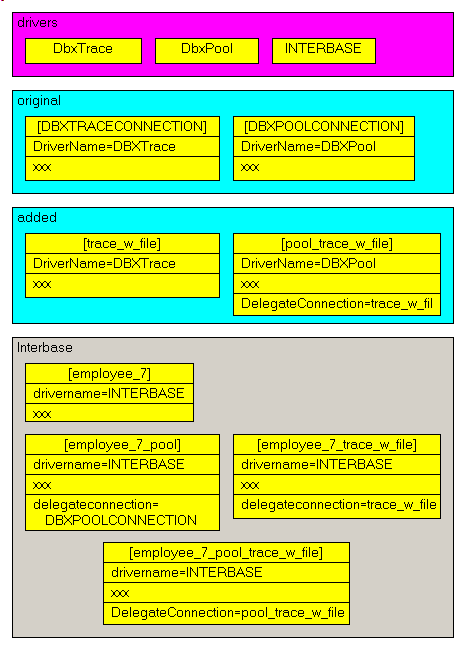
4.4.2 - Connection entries relations A connection entry in DBXCONNECTIONS.INI - always has a "drivername=" line. Those drivers are implemented by Delphi code
- might have a "delegateconnection=" to use delegation
Here is a presentation of those connection entries: And
- the drivers are not in DBXCONNECTIONS.INI, but we added them to understand the relations
- the blue part are intermediate entries
- at the bottom our four Interbase drivers
4.5 - Delegation
Delegation is a quite general mechanism. It somehow looks like interrupt chaining (long ago, under DOS) or COM interception: we redirect the control flow to our routines, which call the original handling before or after our own delegate handling
With Dbx4, we can also write our own delegates. We could, for instance, add a thread safety delegate which would use critical sections of whatever to enclose each thread-unsafe Dbx4 calls.
5 - Dbx4 Metadata
5.1 - The Metadata layer In order to implement the Dbx4 framework, some schema information had to be
retrieved from each database. Instead of nesting those information in each database specific driver, Dbx4 implements a generic metadata layer, which was enriched to fit each of the target databases. This represents nearly 25 % of
the driver writing effort. This metadata layer can then be used - by Delphi tools, like the Data Explorer
- for our own database utilities, like listing all tables, all stored procedures etc
- for unit test generation
5.2 - Displaying Database Schema information To initialize a tSqlDataset component, we must set the following PROPERTYes - Connection (to a tSqlConnection)
- the CommandType (to ctQuery, ctTable, ctStoredProcedure)
- the CommandText (with the Sql request, or the stored procedure name)
Dbx4 expanded this list with additional CommandTypes.
Basically, the different command types are defined in C:\Program Files\CodeGear\RAD Studio\5.0\source
\database\src\pas\dbx\driver\DbxCommon.PAS
where there are the command type string constants encapsulated in a CLASS: TDBXCommandTypes=
class
const
DbxSQL= 'Dbx.SQL';
DbxStoredProcedure= 'Dbx.StoredProcedure';
DbxTable= 'Dbx.Table';
DbxMetaData= 'Dbx.MetaData';
DbxCommand= 'Dbx.Command';
DbxPool= 'Dbx.Pool';
end; // TDBXCommandTypes
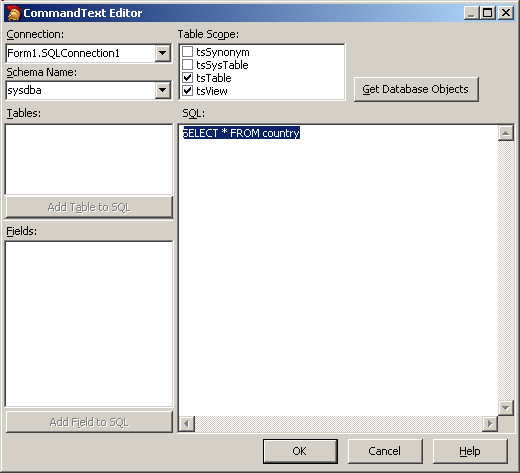
|
When we select specify the tSqlDataSet.CommandType ctQuery, the Delphi IDE also updates the tSqlDataSet.DbxCommandType with Dbx.Sql: 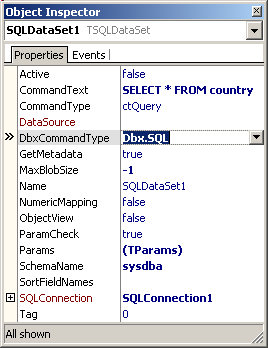 and, in fact, the .DFM only contains the DbxCommandType: OBJECT SQLDataSet1: TSQLDataSet
SchemaName = 'sysdba'
CommandText = 'SELECT * FROM country'
DbxCommandType = 'Dbx.SQL'
MaxBlobSize = -1
Params = <>
SQLConnection = SQLConnection1
Left = 224
Top = 88
END |
For a Dbx.MetaData command type, there are several commands: TDBXMetaDataCommands=
class
const
GetDatabase= 'GetDatabase';
GetDataTypes= 'GetDataTypes';
GetTables= 'GetTables';
GetColumns= 'GetColumns';
GetForeignKeys= 'GetForeignKeys';
GetForeignKeyColumns= 'GetForeignKeyColumns';
GetIndexes= 'GetIndexes';
GetIndexColumns= 'GetIndexColumns';
GetPackages= 'GetPackages';
GetProcedures= 'GetProcedures';
GetProcedureParameters= 'GetProcedureParameters';
GetUsers= 'GetUsers';
end;// TDBXMetaDataCommands
TDBXMetaDataCommandsEx=
class
const
GetViews= 'GetViews';
GetSynonyms= 'GetSynonyms';
GetCatalogs= 'GetCatalogs';
GetSchemas= 'GetSchemas';
GetProcedureSources= 'GetProcedureSources';
GetPackageProcedures= 'GetPackageProcedures';
GetPackageProcedureParameters= 'GetPackageProcedureParameters';
GetPackageSources= 'GetPackageSources';
GetRoles= 'GetRoles';
GetReservedWords= 'GetReservedWords';
end; // TDBXMetaDataCommandsEx
|
Finally, in order to display, as a Table, the metadata information, we can
- initialize a tSqlConnection to one of our connections
- initialize a tSqlDataSet, setting the following PROPERTYes
- SqlConnection to our tSqlConnection
- DbxCommandType to Sql.MetaData
- CommandText to one of the possible meta data command
And here comes the code: | |
create a new project: "Files | New | Vcl Forms Application Win32" and rename it "dbx_metadata"
| | |
add the connection initialization with the ListBox, or hard code your connection name
| | | add a "connect_" button
| |
| add a tListBox, rename it "command_type_listbox_", and a tButton which will fill the listbox with all available command types:
procedure TForm1.fill_types_Click(Sender: TObject);
begin
g_c_dbx_connection.GetCommandTypes(command_type_listbox_.Items);
end; // fill_types_Click
| | | |
drop a "commands_listbox_" tListbox, and in the OnClick display all available commands for the selected command type:
procedure TForm1.command_type_listbox_Click(Sender: TObject);
begin
with command_type_listbox_ do
g_command_type:= Items[ItemIndex];
commands_listbox_.Items.Clear;
g_c_dbx_connection.GetCommands(g_command_type,
commands_listbox_.Items);
end; // command_type_listbox_Click
| | | |
drop the standard tSqlConnection, tSqlDataSet, tDataProvider, tClientDataset, tDataSource, tDbGrid, and happily link all those fellers together
| |
| create the commands_listbox_ OnClick event, which will update a tSqlDataset with both DbxCommandType and CommandText:
procedure TForm1.commands_listbox_Click(Sender: TObject);
var l_command: String;
begin
with commands_listbox_ do
l_command:= Items[ItemIndex];
ClientDataSet1.Active:= False;
SQLConnection1.ConnectionName:= g_connection_name;
SqlConnection1.LoginPrompt:= False;
// -- don't forget this one !!!
SQLConnection1.LoadParamsOnConnect:= True;
SQLConnection1.Connected:= true;
SQLDataSet1.DbxCommandType:= g_command_type;
SQLDataSet1.CommandText:= l_command;
ClientDataSet1.Active:= true;
end; // commands_listbox_Click
| | | |
run, click "connect_", "fill_dbx_command_types_", select Sql.Metadata, and in the commands listbox, select one of the metadata, for instance "Table"
| | |
here is the snapshot: 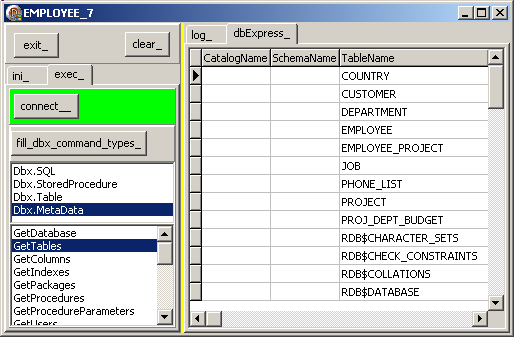
| 5.3 - Other Metadata use
The Dbx4 metadata information can be used any time we need some schema information. For instance, to check whether a database can handle transactions, we could write:
procedure execute_sql_statement(p_c_dbx_connection: tDbxConnection;
p_sql_request: WideString);
var l_c_dbx_database_metadata: TDBXDatabaseMetaData;
l_c_dbx_transaction: TDBXTransaction;
l_c_dbx_command: TDBXCommand;
begin
if p_c_dbx_connection.IsOpen
then
begin
l_c_dbx_command:= Nil;
try
l_c_dbx_database_metadata:=
p_c_dbx_connection.DatabaseMetaData;
if l_c_dbx_database_metadata.SupportsTransactions
then l_c_dbx_transaction:=
p_c_dbx_connection.BeginTransaction();
try
l_c_dbx_command:= p_c_dbx_connection.CreateCommand;
l_c_dbx_command.Text:= p_sql_request;
l_c_dbx_command.ExecuteQuery;
if l_c_dbx_database_metadata.SupportsTransactions
then p_c_dbx_connection.CommitFreeAndNil(l_c_dbx_transaction);
finally
if l_c_dbx_database_metadata.SupportsTransactions
then p_c_dbx_connection.
RollbackIncompleteFreeAndNil(l_c_dbx_transaction);
if Assigned(l_c_dbx_command)
then l_c_dbx_command.Free;
end;
except
on E: Exception do
display_bug_stop('exception '+ e.Message);
end; // try except
end // IsOpen
end; // execute_sql_statement
|
5.4 - Writing Metadata
In the Dbx4 framework, reading and writing metadata have been separated: - reading is for schema retrieval
- writing is used to create new database object.
Writing could be used to create items for testing purposes, for instance. This includes table creation and parametrized queries initialization. However, at this date (17 september 2007), this metadata writing capability is
only available for the Vcl. Net personality (not the Win32 personality)
5.5 - Unit Testing Unit testing has been extensively used by CodeGear to check the framework. For
the database part, essentially dUnit was used, since this unit testing is available both for Vcl. Net personality and Win32 personality. To improve this unit testing, some database extensions were added to the dUnit
framework, including: - DropTable
- FreeOnTearDown, which will trigger freeing the object when the TearDown dUnit method is called
And to test the Table values, DataGenerators were added as well.
Download the DbExpress 4 demos sources Here are the source code files:
The .ZIP file(s) contain: - the main program (.DPR, .DOF, .RES), the main form (.PAS, .DFM), and any other auxiliary form
- any .TXT for parameters, samples, test data
- all units (.PAS) for units
Those .ZIP - are self-contained: you will not need any other product (unless expressly mentioned).
- will not modify your PC in any way beyond the path where you placed the .ZIP (no registry changes, no path creation etc).
To use the .ZIP: - create a C:\PROGRAMS\US\DB\ folder and unzip them there. You can also
unzip them in another directory, but you will have to change the search pathes
- unzip the downloaded file
- using Delphi, compile and execute
To remove the .ZIP simply delete the folder.
The Pascal code uses the Alsacian notation, which prefixes identifier by program area: K_onstant, T_ype, G_lobal, L_ocal, P_arametre, F_unction, C_lass etc. This notation is presented in the Alsacian Notation paper.
As usual:
- please tell us at fcolibri@felix-colibri.com if you found some errors, mistakes, bugs, broken links or had some problem downloading the file. Resulting corrections will
be helpful for other readers
- we welcome any comment, criticism, enhancement, other sources or reference suggestion. Just send an e-mail to fcolibri@felix-colibri.com.
- or more simply, enter your (anonymous or with your e-mail if you want an answer) comments below and clic the "send" button
- and if you liked this article, talk about this site to your fellow developpers, add a link to your links page ou mention our articles in your blog or newsgroup posts when relevant. That's the way we operate:
the more traffic and Google references we get, the more articles we will write.
7 - References and documentation on the Web Among the available resources on the Web:
8 - The author Felix John COLIBRI works at the Pascal Institute. Starting with Pascal in 1979, he then became involved with Object
Oriented Programming, Delphi, Sql, Tcp/Ip, Html, UML. Currently, he is mainly active in the area of custom software
development (new projects, maintenance, audits, BDE migration, Delphi Xe_n migrations, refactoring), Delphi Consulting and Delph training. His web site features tutorials, technical papers about programming with full downloadable source
code, and the description and calendar of forthcoming Delphi, FireBird, Tcp/IP, Web Services, OOP / UML, Design Patterns, Unit Testing training sessions.
|