|
ECO Tutorial - Felix John COLIBRI. |
- abstract : Writing a simple ECO application: the UML model, the in memory objects and the GUI presentation. We also will show how to evaluate OCL expressions
- key words : ECO - Enterprise Core Objects - UML - EcoSpace - OCL - Object Constraint Language - ExpressionHandle - UML class diagram
- software used : Windows XP Home, Delphi 2006
- hardware used : Pentium 2.800Mhz, 512 M memory, 140 G hard disc
- scope : Delphi 2006, Turbo Delphi for .Net
- level : Delphi developer
- plan :
1 - ECO modeling and coding ECO is a Delphi modeling tool: the developer draws the model of his application, and the ECO framework builds an in-memory structure of this model
using objects. This representation is used to implement the model in order to add a visual interface to our application (Forms, Buttons etc) and transfer the data to disc (.XML files or Sql Database).
The overall objective is to let the developer work at a high model level, letting the ECO machinery take care of many of the low-level coding tasks (writing Sql requests, synchronizing the visual GUI with the Tables, handling
master / detail navigation etc). This tutorial will present how to write a simple, application with ECO.
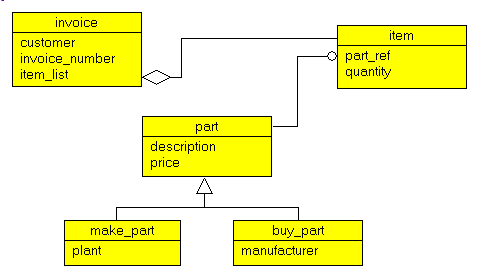
2 - An Invoicing example 2.1 - The Goal
We will build a tiny invoicing application with INVOICEs and ITEMs. Each ITEM corresponds to a PART, which can be either manufactured by our company, or purchased outside. This corresponds to the following diagram:
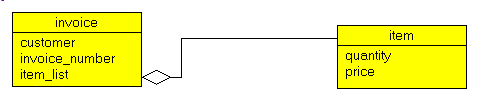
In this paper, we are only going to use the invoice / item CLASSEs:
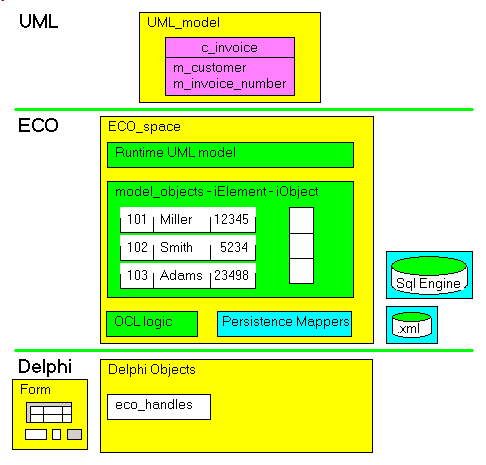
2.2 - The ECO architecture Building and ECO application involves 2 basic steps - create the UML model for this application
- generate the Delphi code corresponding to this model, and write some code
This can be represented by the following figure: and - we draw the UML Class diagram using any kind of UML editor (Rational Rose, Model Maker, Together)
- this "picture" is converted into a code structure. This is the EcoSpace which contains:
- the classes from the UML Class diagram (in the UMLRt, which is the Run Time representation of the diagram)
- the objects which are instances of those UML Classes which will contain the values of our Database
- we can access those EcoSpace objects (for creation, reading, writing) using
EcoHandles. Those handles are used for displaying the values in GUI controls
2.3 - Create the UML model To create the ECO model, we will start an ECO project. This can be done using
the Delphi Wizard. So let's start a new Windows Forms ECO application:  |
load Delphi 2006 (or Delphi 2006, Windows Forms personality, or Turbo Delphi for .Net)
| | | select "File | New | 0ther"
|
 | Delphi displays the "other" files: 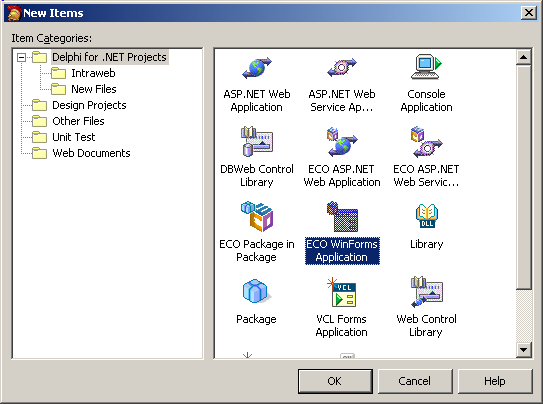
Note that the menu used to reach this dialog, the specific menu treeview item (the root "Delphi for .Net Project" in our case) and the content of this dialog may be different, depending on the Delphi version). We simply
must locate the "ECO WinForms Application" wizard somewhere. | | | select "Eco WinForms Application" | |
| Delphi presents the path and project dialog: 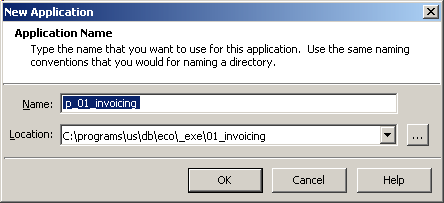 | |
| type your path and project name, and click "Ok" | | |
Delphi create the new "ECO Windows Forms Application"
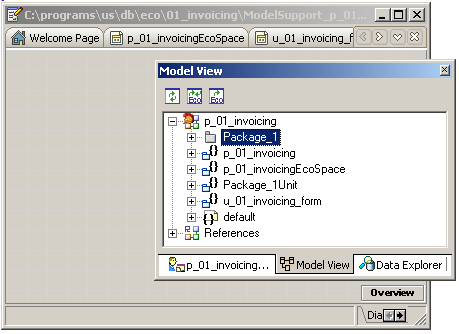
| | | rename the main unit WINFORMS.PAS by selecting the Project Manager tab from
the top-right notebook, then select "WINFORM.PAS | right click | Rename" and type U_01_INVOICING_FORM.PAS | | | the Project Manager displays the following files:
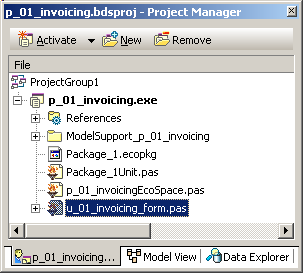 where: - PACKAGE_1UNIT.PAS will contain the CLASSes corresponding to our model
(a c_invoice CLASS, a c_item CLASS etc). At this stage, there is only an empty Package_1 CLASS (an "UML package" meaning a set of UML things, not the "Delphi .DLL / package")
- P_01_INVOICINGECOSPACE.PAS contains the Tp_01_invoicingEcoSpace CLASS which represents the ECO engine and all its properties and methods.
This CLASS will represent the model as objects in memory, and allow
communication with the visual GUI components, as well as the disc data. It will have access to our custom application-dependent CLASSes defined in the PACKAGE_1UNIT.PAS UNIT
- U_01_INVOICING_FORM.PAS is the usual Windows Form. The tWinForm CLASS contains an EcoSpace PROPERTY of type Tp_01_invoiceEcoSpace which is a reference to the eco space
By selecting the "Design" tab at the bottom of the central notebook, the tWinForm's design surface with the component tray is displayed: 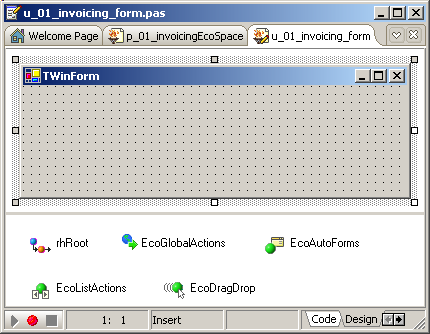
You can also remove all the components (EcoGlobalActions, EcoAutoForms, EcoListActions and EcoDragDrop) other than the rhRoot, since they are not required and we will not use them in this tutorial.
But do keep the rhRoot component.
|
2.4 - Building the Model Let's create the basic UML model with the 3 CLASSes. The diagrams are created on the modeling surface, which must be displayed:
To create the diagram for our INVOICE CLASS | | unfold the Tools Palette (by clicking on the "+"), and select the "ECO Class" element:
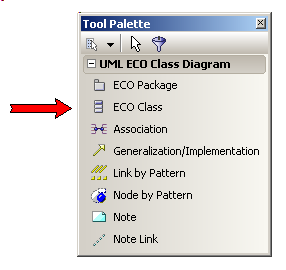 and drop it on the modeling surface | | | the Class_1 is displayed
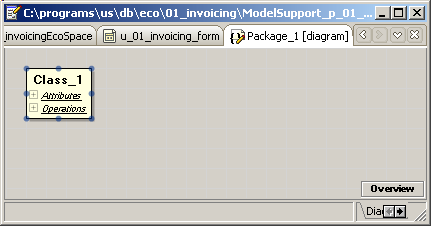 | | | type the name of the CLASS, for instance c_invoice
|
| | the CLASS name is updated. Also notice that the diagram attributes are displayed in the Object Inspector:
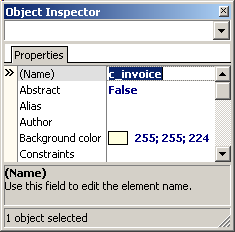 Those properties are graphic properties (background color, border size etc) | |
| to add the customer field, select the c_invoice CLASS, right click on the "Attributes" element, to display the contextual menu, and select the "Add | Attribute" menu item:
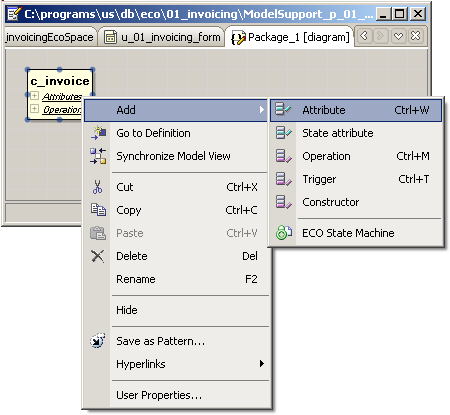 | | | a new attribute is created with a default "Attribute_1: Integer" definition
| | | type the name and type of your attribute. In our case "m_customer: String" 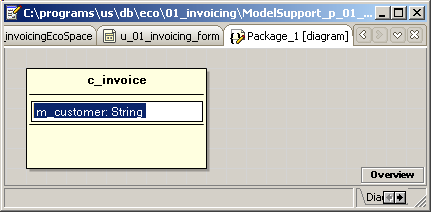
| | | add the other attribute "m_invoice_number: Integer" | | |
this is our c_invoice CLASS diagram so far: 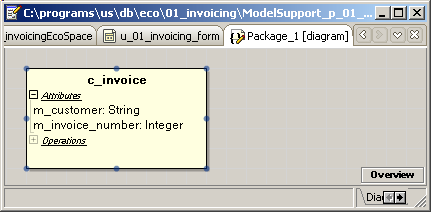
|
A this stage, compile the project, in order to synchronize the model (the UML
drawings) with the EcoSpace (the object representation of those drawings). So: | | compile the project
|
This compilation is required, since the Delphi IDE will use the in-memory representation of the UML drawing. So compiling is often required, as well as clicking on the "Regenerate Eco Source Code" - like icons a the top of the model view notebook.
You may look at the PACKAGE_1UNIT.PAS, which now contains 2 more definitions - the c_invoice CLASS
- a Ic_invoiceList INTERFACE which is used to represent the list of
invoices (the in-memory representation of our future disc data content)
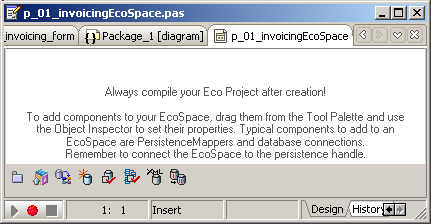
Note that - compiling from time to time seems to be a good idea. The p_01_invoicingEcoSpace design surface even reminds you to compile each time
you load the project in the Delphi IDE.
2.5 - Adding Invoices To add invoices, we have to call a c_invoice CONSTRUCTOR and initialize the attributes:
- one of the c_invoice CONSTRUCTORs uses the tWinForm.EcoSpace as its parameter. This allows the object to be added to the invoice list contained in the EcoSpace
- the c_invoice CLASS contains the m_customer and m_invoice_number members which can be used to initialize the object
Therefore | |
select the main Windows Forms designer by selecting the "Project Manager" tab from the top-right notebook, and the U_01_INVOICING_FORM.PAS item (caution: there is also a U_01_INVOICING_FORM element nested inside the
"ModelSupport_p_01_invoice" summary element, but it is not a .PAS element. Our treeview item is, usually, at the bottom of the treeview).
| | |
the traditional Delphi grey dotted designer surface is displayed
| | |
from the Tools Palette, select a Button an drop it on the Form, rename it "create_invoices_". Create its Click event, and type the code which will add some c_invoice objects:
procedure TWinForm.create_invoices__Click(sender: System.Object;
e: System.EventArgs);
procedure add_invoice(p_customer: String; p_invoice_number: Integer);
begin
with c_invoice.Create(EcoSpace) do
begin
m_customer:= p_customer;
m_invoice_number:= p_invoice_number;
end; // with c_customer
end; // add_invoice
begin // create_invoices_
add_invoice('Miller', 12345);
add_invoice('Smith', 5234);
add_invoice('Adams', 5234);
end; // create_invoices_
|
| | | compile the project
|
2.6 - Saving the Result in an .XML file
To save the objects to disc, we can place them in .XML files or into some Sql Database. To avoid mixing ADO .Net components in our tutorial, we chose to use the more simple .XML files.
Persisting the data in an .XML file only requires a PersistencMapperXML component which takes all data objects contained in the EcoSpace and saves it to (or reads it from) an .XML file. That's quite easy: |
| from the top-right notebook, select the "project manager" tab, and select P_01_INVOICINGECOSPACE.PAS 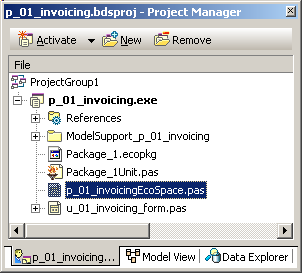
and in the central notebook, select the "Design" tab | | | an empty EcoSpace designer is displayed
 | | | from the Tool Palette, select a PersistencMapperXML:
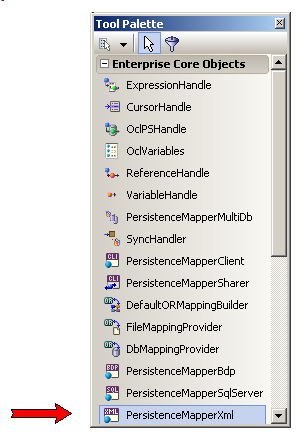 and drop it on the EcoSpace designer | | |
in the Object Inspector, set the FileName property, for instance save_invoicing.xml | | |
select the main Form, and add a Button, rename it "save_xml_", create its Click event, and add the updating code: | | | compile and run
Click "create_invoices_" and then "save_xml_"
| | | the result is a 4K .XML file (in the .EXE folder). The format is SOAP envelope, and it contains
- informations about the CLASSes
- information about the attributes (2 auto generated keys and our two attributes)
- information about the invoices list
- the values of our objects
Here is an partial dump of this file:
<SOAP-ENV:Envelope xmlns="http://www.w3.org/" ...ooo...>
<SOAP-ENV:Body>
<a1:Datablock id="ref-1" xmlns=" ...ooo... Eco.Interfaces">
...ooo...
<a2:Hashtable id="ref-3" xmlns=" ...ooo... System.Collections">
...ooo...
<SOAP-ENC:Array id="ref-4" SOAP="xsd:anyType[3]">
<item href="#ref-6"/>
<item href="#ref-7"/>
<item href="#ref-8"/>
</SOAP-ENC:Array>
<SOAP-ENC:Array id="ref-5" SOAP="xsd:anyType[3]">
<item href="#ref-9"/>
<item href="#ref-10"/>
<item href="#ref-11"/>
</SOAP-ENC:Array>
<a1:DefaultId id="ref-6" xmlns=" ...ooo... Eco.Interfaces">
<ObjectId_x002B_key xsi="xsd:int">
308242888
</ObjectId_x002B_key>
<ObjectId_x002B_classId>
0
</ObjectId_x002B_classId>
</a1:DefaultId>
...ooo...
<a1:ObjectContents id="ref-9" xmlns=" ...ooo... Eco.Interfaces">
<objectId href="#ref-6"/>
<existenceState>
New
</existenceState>
<members href="#ref-12"/>
<isReadOnly>
false
</isReadOnly>
<timestamp>
-1
</timestamp>
</a1:ObjectContents>
...ooo...
<a2:ArrayList id="ref-12" xmlns="...ooo... System.Collections">
<_items href="#ref-15"/>
<_size>
2
</_size>
<_version>
4
</_version>
</a2:ArrayList>
...ooo...
<SOAP-ENC:Array id="ref-15" SOAP="xsd:anyType[16]">
<item id="ref-18" xsi="SOAP-ENC:string">
Miller
</item>
<item xsi="xsd:int">
12345
</item>
</SOAP-ENC:Array>
<SOAP-ENC:Array id="ref-16" SOAP="xsd:anyType[16]">
<item id="ref-19" xsi="SOAP-ENC:string">
Smith
</item>
<item xsi="xsd:int">
5234
</item>
</SOAP-ENC:Array>
<SOAP-ENC:Array id="ref-17" SOAP="xsd:anyType[16]">
<item id="ref-20" xsi="SOAP-ENC:string">
Adams
</item>
<item xsi="xsd:int">
5234
</item>
</SOAP-ENC:Array>
</SOAP-ENV:Body>
</SOAP-ENV:Envelope>
|
|
Once the .XML file has been created, the data will automatically be loaded in
the EcoSpace at each run. This is similar to the tClientDataSet briefcase saving. Of course, if you remove the file name from the PersistentMapper, this will not happen.
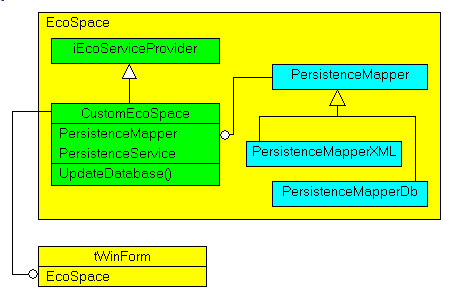
From an architectural point of view, we have the following (partial) diagram: and: - our tWinForm contains an EcoSpace attribute
- the EcoSpace CLASS contains a PersistenceMapper attribute
- there is a whole hierarchy of persistence mappers. We used the .XML mapper, but we could have chosen a PersistencMapperBDP, or
PersistenceMapperSqlServer
At this stage, I would suggest that you start looking into the Help. Clicking F1 and navigating to the ECO Framework, you will find all the Assemblies involved (partial view):
 The main Assemblies are: - Borland.ECO.UmlRt where all the CLASSES and INTERFACES for the in-memory
object representation of the UML graphic are located
- Borland.ECO.ObjectRepresentation which contains all the objects containing our data (the values of our invoices)
- Borland.ECO.Services, for all the ECO services. We will not present them in detail, but they are at the heart of the ECO machinery
- Borland.ECO.Handles, which contains our EcoSpace, as well as the
ReferenceHandle and ExpressionHandle that we will use shortly to display the objects in a DataGrid
- Borland.ECO.Persistence for all disc handling
2.7 - Displaying the invoices
We will now display the values of our invoices in a TextBox. To list the in-memory invoices, we need to use an ExpressionHandle. The handles are a way to read or write the EcoSpace elements. Handles can return
values, objects or object lists. What will be returned depends on the ExpressionHandle.Expression, and this Expression is written in some special
language called OCL (Object Constraint Language). In our case, we want all the invoice objects, and the OCL expression is ExpressionHandles can be chained: we can reach a list of objects using a first
expression, and add a chain another ExpressionHandle to do some filtering, for instance. The ExpressionHandle chains must have a starting point, which is specified in the ExpressionHandle.RootHandle property.
In our case we will use the rhRoot Handle. And we must initialize the rhRoot.EcoSpaceType property with the Tp_01_invoicingEcoSpace.
So : |
| select the main form designer
| | |
select the rhRoot object that was created by the Wizard
In the Object Inspector, select the EcoSpaceType property and set its property to
p_01_invoicingEcoSpace.Tp_01_invoicingEcoSpace | | | in the Tools Palette, select an ExpressionHandle:
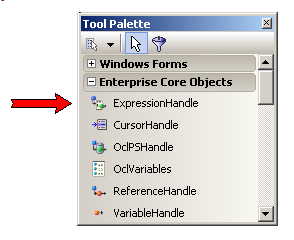 Drop it ON THE FORM In the Object Inspector - change its (Name) property to "invoice_list_expression_handle"
- select the RootHandle and select rhRoot
- select the Expression property and type
c_object.AllInstances
| |
| from the Tools Palette, select a TextBox, drop in on the Form, and set its MultiLine property to True | |
| from the Tools Palette, select a Button, drop it on the Form, rename it "list_invoices", create its Click event and type the code which displays
the values of the invoices in the TextBox1
procedure TWinForm.list_invoices__Click(sender: System.Object;
e: System.EventArgs);
var l_c_invoice_list: Borland.Eco.ObjectRepresentation.iObjectList;
l_invoice_index: Integer;
l_c_invoice: c_invoice;
begin
l_c_invoice_list:= invoice_list_expression_handle.Element
as Borland.Eco.ObjectRepresentation.iObjectList;
for l_invoice_index:= 0 to l_c_invoice_list.Count- 1 do
begin
l_c_invoice:= l_c_invoice_list[l_invoice_index].AsObject as c_invoice;
with l_c_invoice do
display(m_customer+ ' '+ m_invoice_number.ToString);
end; // for l_invoice_index
end; // list_invoices__Click
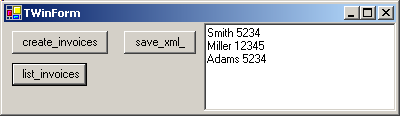
| where display is our standard procedure for adding text to the TextBox1.Text String. | | |
compile, execute and click "list_invoices"
| | | here is the display of our invoices
|
Note that - OCL might be case sensitive (it seems Bold was, maybe ECO I, ECO II and ECO III are not)
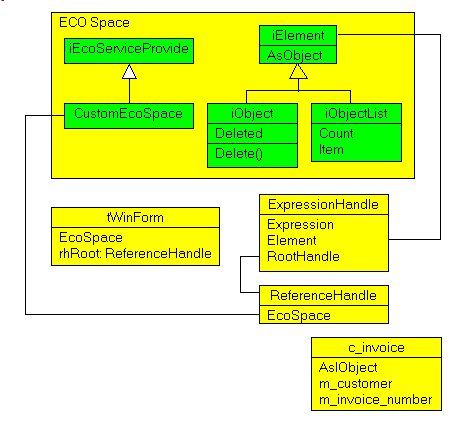
To put those handles into perspective, here is a (partial) UML Class diagram: and: - we start the access chain with a ReferenceHandle. This handle is used to
reach into the EcoSpace. Usually we use the rhRoot handle which was generated by the Wizard. We simply must check that this rhRoot has been initialized with some EcoSpace, and that has been done after the first
project compilation by setting the rhRoot.EcoSpaceType to p_01_invoicingEcoSpace.Tp_01_invoicingEcoSpacepoint
- we use an ExpressionHandle linked to this ReferenceHandle
- now the ExpressionHandle has two basic functionalities :
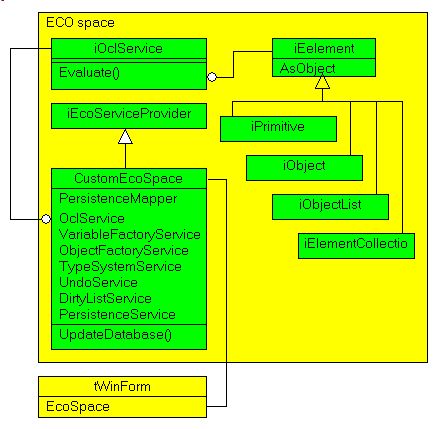
- it allows us to write an OCL Expression, which will yield in the ExpressionHandle.Element some iElement descendent. In our case an
iObjectList.
We cannot directly display an iElement. It lives in the outer EcoSpace there, some kind of Walhalla filled with thunder and lightning. So we
first have to cast it using iElement.AsObject. More seriously, it seems that the EcoSpace has a fragmented representation of our c_invoice CLASS, and AsObject brings all the parts back together, yielding a
nice tObject with all the attributes and methods. And since we know that this object is a c_invoice, we cast it into a c_invoice and can then use the c_invoice.m_customer members.
- the ExpressionHandles are mainly used as visual control DataSource, since ExpressionHandles implement the iBindingList INTERFACE. This will be presented below
2.8 - Implementing ToString If we want a general display of our classes, we can implement the VIRTUAL ToString FUNCTION in our CLASS. To do so |
| select the model view, select the c_invoice diagram, and select the "Operations" compartment. Right click to find "Add Operation" and type the function name |
| | here is the diagram: 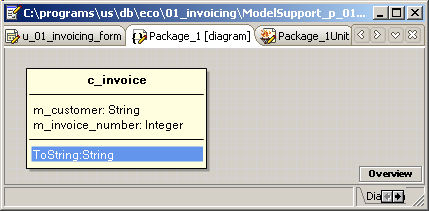 | |
| on the ToString operation, right click and select "Go to Definition" (or somehow direclty display the PACKAG1_1UNIT.PAS text in the central editor)
| |
| this brings you into the PACKAG1_1UNIT.PAS UNIT, at the position of this definition: 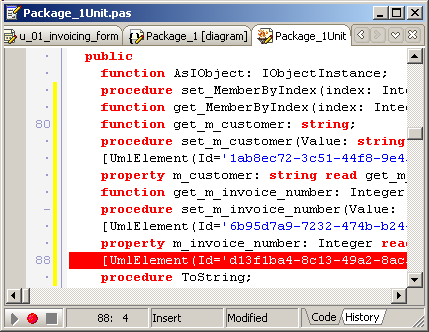
Notice that despite the Result Type, this was generated as a PROCEDURE and not as a FUNCTION | | |
change the PROCEDURE into FUNCTION, add OVERRIDE
function ToString: String; Override;
|
and go to the IMPLEMENTATION to write the body:
function c_invoice.ToString: String;
begin
Result:= m_customer+ m_invoice_number.ToString;
end; // ToString
| | | |
drop a Button, rename it "to_string_", create its Click event, and display the invoices:
procedure TWinForm.to_string__Click(sender: System.Object;
e: System.EventArgs);
var l_c_invoice_list: Borland.Eco.ObjectRepresentation.iObjectList;
l_invoice_index: Integer;
begin
l_c_invoice_list:= invoice_list_expression_handle.Element
as Borland.Eco.ObjectRepresentation.iObjectList;
with l_c_invoice_list do
for l_invoice_index:= 0 to Count- 1 do
display(Item[l_invoice_index].AsObject.ToString);
end; // to_string__Click
| | | |
compile and run
|
2.9 - Deleting an invoice To remove an invoice from the invoice list, we mark it as "deleted". The next saving to the persistent media will physically remove this invoice when
UpdateDataBase is called (by removing it in the new .XML file version, or by generating an DELETE Sql request). Here is an example which deletes the second invoice (index 1): |
| add a Button to the Form, rename it "delete_1_" and create its Click event, and type the following code:
procedure TWinForm.delete_1__Click(sender: System.Object;
e: System.EventArgs);
var l_c_invoice_list: Borland.Eco.ObjectRepresentation.iObjectList;
l_c_invoice: c_invoice;
begin
l_c_invoice_list:= invoice_list_expression_handle.Element
as Borland.Eco.ObjectRepresentation.iObjectList;
if l_c_invoice_list.Count< 1
then display('no_[1]_invoice')
else begin
l_c_invoice:= l_c_invoice_list[1].AsObject as c_invoice;
l_c_invoice.AsIObject.Delete;
end;
end; // delete_1__Click
| |
| | compile, execute and click "list_invoices_", "delete_1_", "list_invoices_"
| | |
here is the display of our invoices 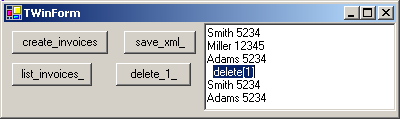
|
Note that - you should NOT remove the object with Free or Destroy, since the
in-memory list will no longer contain any information about this object, and it will not be deleted from the disc files (.XML or Sql Database)
- the Delete method is part of the iObject (see the UML diagram above). To
call this method, we first must cast the c_invoice object into an iObject object, and this casting is available in c_invoice (as represented in the UML diagram above)
2.10 - Display in a DataGrid
Instead of manually dumping the invoices values in a TextBox, we can display them in visual controls, using the Windows Forms binding mechanism (see the
Ado .Net tutorial for more details about binding). Here is how to display the invoices in a DataGrid: |
| from the Tools Palette, select the "Data Controls" tab, and then the DataGrid Control: 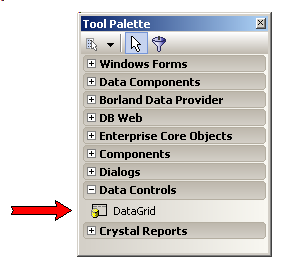
and drop it on the Form In the Object Inspector, set the following properties - (Name) to invoice_datagrid
- DataSource property to invoice_list_expression_handle
|
| | the attributes of the c_invoice CLASS are displayed in the DataGrid 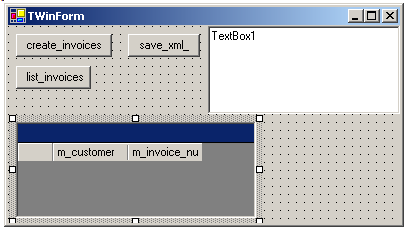
| | | compile and run
| | |
the invoice_datagrid is displayed with the invoices values 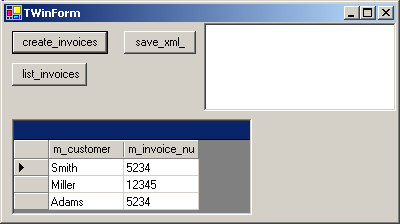
|
Note that
- in usual ECO applications, you will go directly from the UML diagram to the DataGrid, without the creation and listing steps. All that is required is
- some kind of PersistentMapper to get the data
- an initialized rhRoot
- an ExpressionHandle with the relevant OCL Expression
- and, of course, a DataGrid
You can change the values in the DataGrid, but cannot insert new invoices. To do so, you must first create the c_invoice object, and you can then set the values in the DataGrid. Here is an example: |
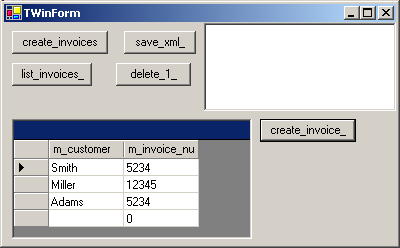
| add a Button to your Form, rename it "create_invoice_", and in its Click event create a new c_invoice object:
procedure TWinForm.create_invoice__Click(sender: System.Object;
e: System.EventArgs);
begin
c_invoice.Create(EcoSpace);
end; // create_invoice__Click
| | | |
compile and run. Click on "create_invoice_"
| | | the DataGrid displays a NULL initialized new invoice:
|
The DataGrid can be used to navigate the invoice list. If we want to perform
some action on the current invoice, we must find a way to find which invoice is the selected invoice in the DataGrid. This can be achieved using a Windows Forms CurrencyManager-like component
(see the Ado .Net tutorial for more details about the CurrencyManager). Therefore: | |
select the main designer
| | | from the Tools Palette, select the ECO tab and then the CurrencyManagerHandle:
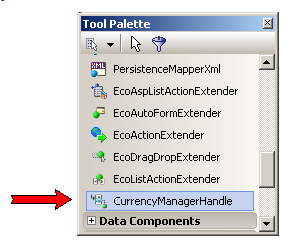 and drop it on the Form and from the Object Inspector, set the following properties:
- (Name) to invoice_currency_manager_handle
- RootHandle to invoice_list_expression_handle (not to rhRoot)
- BindingCOntext to invoice_datagrid
| |
| drop a Button on the Form, rename it "delete_current_" and in its Click event, type the code which deletes the invoice selected in the invoice_datagrid:
procedure TWinForm.delete_current__Click(sender: System.Object;
e: System.EventArgs);
var l_c_selected_invoice: c_invoice;
begin
if invoice_currency_manager_handle.Element.AsObject is c_invoice
then begin
l_c_selected_invoice:=
c_invoice(invoice_currency_manager_handle.Element.AsObject);
l_c_selected_invoice.AsIObject.Delete;
end;
end; // delete_current__Click
| |
| | compile, run, in the invoice_datagrid navigate to the second row and click "delete_current_"
| |
| the second row object is deleted (and the DataGrid updated): 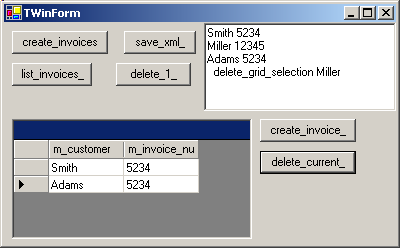
If you save the result (EcoSpace.UpdateDataBase) the disc data will no longer contain this second row
|
3 - Handling Related Classes
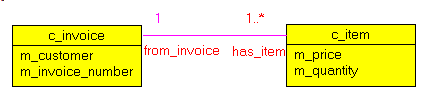
3.1 - Master Detail relation We want to add invoice items: each invoice contains several items with price and quantity. This is done using the following steps - we add a new c_item class to the UML class diagram
- we add an association between the c_invoice and the c_item classes. We must specify on both ends of this association
- the multiplicity (1 on the c_invoice side, 1..* on the c_item side,
meaning that any item MUST belong to a single invoice, and any invoice has at least 1 item, possibly many more)
- the name of the association end.
- on the c_item end, we chose has_item, which can be read from left
to right "a invoice has_item the items'
- on the c_invoice end we chose from_invoice, which means "an item comes from_invoice an invoice"
The class diagram looks like this:
- now the important part: we want to add an invoice with 2 items
- we create the my_c_invoice object, as explained above
my_c_invoice:= c_invoice.Create(EcoSpace);
my_c_invoice.m_customer:= 'Miller';
my_c_invoice.m_invoice_number:= 1234;
|
- for each item
- we create the item
my_c_item:= c_item.Create(EcoSpace);
my_c_item.m_price:= 765.33;
my_c_item.m_quantity:= 18;
|
- we add this item to the invoice's item list:
| my_c_invoice.has_item.Add(m_c_item);
| This is the crux: we use the has_item relation-end name as a COLLECTION of c_item objects We could also have worked the other way around, by specifying to which
c_invoice the newly created c_item belongs: |
m_c_item.from_invoice:= my_c_invoice; |
Note that - this use of the relation end names is called OCL navigation
- we did not include any key in the c_invoice table. There is an underlying key, but is is automatically managed by the ECO framework
- using the my_c_invoice.has_item collection is similar to a tObjectList
nested inside each c_invoice. But OCL navigation is more general then simple containerpart relations
3.2 - Add the invoice_items So let's implement this relation in our code.
You may use the previous project, but for this presentation, we will start a new project. Here are the steps to create the invoices part (everything here has been explained above): |
| create a new ECO Windows Forms project, rename it p_02_invoicing_relation / u_02_invoice_relation
| | |
compile to generate the UML runtime model, and close the running project
| | | from the project manager, select the u_02_invoice_relation.PAS, select the
center "design" tab, and remove all components but rhRoot.
Select rhRoot and in the Object Inspector set its EcoSpaceType to p_02_invoicing_relationEcoSpace.Tp_02_invoicing_EcoSpace |
| | create the c_invoice class diagram, as explained above (select the "Model View", click on the grey "Package_1" icon, drop an "Eco Class" and fill it) |
| | add a Button to populate the c_invoice list and type the code which adds a couple of invoices
| |
| on the p_02_invoicing_relationEcoSpace designer surface drop an PersistenceManagerXML, initialize its file name, then switch back to the
main form designer, add a "save_xml" button which updates the EcoSpace
| | | compile and run
|
We will now add the c_item CLASS: | | select the "Model View", click on the greay "Package_1" icon, drop an "Eco
Class", rename it c_item class diagram, and fill it with an m_price and an m_quantity attribute.
| | |
from the Tools Palette, select the "Association" shape, click on the c_item class diagram and drag to the c_invoice class diagram In the Object Inspector
- select the End1 property, expand it, and
- set its Multiplicity to "1"
- and set its Name to from_invoice. This name IS IMPORTANT since it will be used for navigation
- select the End2 property, expand it, and set its Multiplicity to "1..*" and its Name to has_item
| | |
The UML class diagram should look like this: 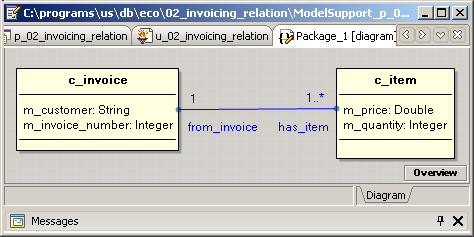 | | | compile the project
|
If you look at the c_invoice CLASS (in PACKAGE_1UNIT.PAS) you will notice that the CLASS now contains a has_item PROPERTY (the code has been heavily changed):
unit Package_1Unit;
interface
type
Ic_invoiceList=
interface(ICollection)
function Add(value: c_invoice): Integer;
// -- ..ooo...
end; // ic_invoiceList
Ic_itemList=
interface(ICollection)
// -- ..ooo...
end; // ic_itemList
c_invoice=
class(System.Object, ILoopBack)
// -- ...ooo...
public
function AsIObject: IObjectInstance;
property m_customer: string read get_m_customer
write set_m_customer;
property m_invoice_number: Integer read get_m_invoice_number
write set_m_invoice_number;
property has_item: Ic_itemList read get_has_item;
constructor Create(serviceProvider: IEcoServiceProvider); overload;
end; // c_invoice
|
Here is how to add a couple of items to our first invoice:
| | select the main form designer
| | |
drop a Button on the Form, create its Click event and type the following code which creates three c_items and links them to the first c_invoice:
procedure TWinForm.add_first_invoice_items__Click(sender: System.Object;
e: System.EventArgs);
procedure add_item_to_invoice(p_price: Double; p_quantity: Integer;
p_c_invoice: c_invoice);
begin
with c_item.Create(EcoSpace) do
begin
m_price:= p_price;
m_quantity:= p_quantity;
from_invoice:= p_c_invoice;
end; // with c_invoice.Create
end; // add_item_to_invoice
var l_c_invoice_list: Borland.Eco.ObjectRepresentation.iObjectList;
l_c_invoice: c_invoice;
begin // create_items__Click
l_c_invoice_list:= invoice_list_expression_handle.Element
as Borland.Eco.ObjectRepresentation.iObjectList;
// -- use any c_invoice
l_c_invoice:= l_c_invoice_list[0].AsObject as c_invoice;
add_item_to_invoice(1245.45, 12, l_c_invoice);
add_item_to_invoice(452.33, 7, l_c_invoice);
add_item_to_invoice(5832.55, 19, l_c_invoice);
end; // add_first_invoice_items__Click
|
|
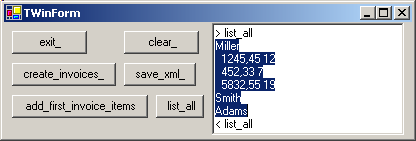
To check that the invoices and the items are correctly linked, we can display them in a TextBox | |
drop a Button on the Form and in its Click event, enumerate the elements of the c_invoice list, and for each c_invoice, enumerate the c_items:
procedure TWinForm.list_all__Click(sender: System.Object;
e: System.EventArgs);
var l_c_invoice_list: Borland.Eco.ObjectRepresentation.iObjectList;
l_invoice_index: Integer;
l_c_invoice: c_invoice;
l_item_index: Integer;
begin
display('> list_all');
l_c_invoice_list:= invoice_list_expression_handle.Element
as Borland.Eco.ObjectRepresentation.iObjectList;
for l_invoice_index:= 0 to l_c_invoice_list.Count- 1 do
begin
l_c_invoice:= l_c_invoice_list[l_invoice_index].AsObject as c_invoice;
display(l_c_invoice.m_customer);
for l_item_index:= 0 to l_c_invoice.has_item.Count- 1 do
display(' '+ l_c_invoice.has_item[l_item_index].m_price.ToString
+ ' '+ l_c_invoice.has_item[l_item_index].m_quantity.ToString);
end; // for l_invoice_index
display('< list_all');
end; // list_all__Click
| | | |
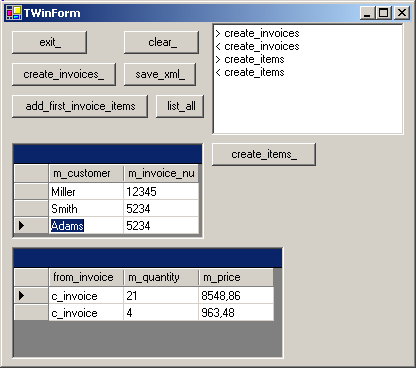
compile, run, click "add_first_invoice_items_" and then "list_all_"
| | | here is the snapshot of the application:
|
Using the same technique, we added a couple of items to the other invoices (the
"create_items_" Button which is in the .ZIP sources).
To add the item DataGrid display, we follow those steps:
Note that
- we could not impose the attribute order in the c_item UML class diagram. We first chose (m_price, m_quantity) and then tried to change it to (m_quantity, m_price) but could'nt succeed
- for the (m_price, m_quantity) first trial, the invoice_grid had a last "has_item" column in the invoice_datagrid. After trying to switch to
(m_quantity, m_price) we have a first "from_invoice" column.
By the same token, we could not increase the size of the invoice_datagrid last column width. There must be a way to do those things, but since this is
not the most important part, we
In a way similar to how we deleted an invoice, we can add some items to the current invoice using the CurrencyManagerHandle component |
| drop a Button on the Form, a in it Click event, create an new empty item to the currently selected invoice: | |
| compile, run, click "add_item_to_invoice_"
procedure TWinForm.add_item_to_invoice__Click(sender: System.Object;
e: System.EventArgs);
var l_c_selected_invoice: c_invoice;
l_c_new_item: c_item;
begin
if invoice_currency_manager_handle.Element.AsObject is c_invoice
then begin
l_c_selected_invoice:=
c_invoice(invoice_currency_manager_handle.Element.AsObject);
l_c_new_item:= c_item.Create(EcoSpace);
l_c_selected_invoice.has_item.Add(l_c_new_item);
// -- or
// l_c_new_item.from_invoice:= l_c_selected_invoice;
end;
end; // add_item_to_invoice__Click
| | | |
here is a snapshot of this addition: 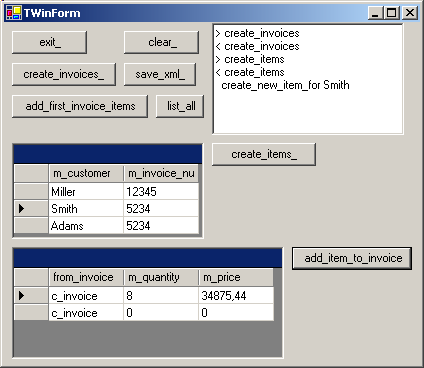
|
4 - OCL: the Object Constraint Language
4.1 - OCL for navigation and for modeling OCL at the start was created to impose pre and post-conditions, similar to the pre and post-condition that the Eiffel language introduced to implement "Design
by Contract". For a bank withdraw() method, you require that at the start of the method, just after BEGIN, the balance should be greater then the amount taken out, and after the withdrawal, just before the END of the method, the
balance must be equal to the starting amount less the amount taken out. It basically is an expression language allowing to specify in a non procedural way how the methods of our CLASSes are changing the state of our system. In other
words specifying the behaviour of the model. Since the methods of one CLASS often uses other CLASSes, OCL also formalized navigation, allowing for instance to specify that the total of the c_item amounts of a c_invoice
should be greater than $100:
Self.has_item.AllInstances->collect(m_price* m_quantity)->sum > 100
|
In our projects above, we already used OCL expressions to navigate the model. For instance, to be able to visualize the invoice collection in a DataGrid, we used:
my_c_expression_handle.Expression:= 'c_invoice.AllInstances'; We now are going to investigate some other OCL expressions.
4.2 - Evaluating OCL expression by Code
So lets start with the expression that we already used, c_invoice.AllInstances. This expression computes the list of all c_invoice objects. The result of this computation is some kind of list. To be more
accurate, it is an iObjectList. To compute this list we call the EcoSpace.OclService.Evaluate function, which returns the iObjectList:
VAR my_c_ielement: iElement;
my_c_ielement:=
EcoSpace.OclService.Evaluate(Nil, 'c_invoice.AllInstances', Nil);
| This iObjectList has a Count and an Item property. Each Item[nnn] is an iElement. So to display it we have to cast it back into our Delphi object
world, using AsObject:
with iObjectList(my_c_ielement) do
for l_index:= 0 to Count- 1 do
display( Item[l_index].AsObject.ToString );
|
Since our objects (c_invoice and c_item) implement the ToString FUNCTION, we will see the values displayed.
This is how we implemented this evaluation |
| we started a new project, but you can of course use your current project (or, alternately, use the source code from the downloadable .ZIP below).
Our project contains simply the 2 classes with the association, the ToString implementation in each CLASS, and a Button for initializing the values | |
| drop a Button, call it "all_instances_", and in it Click event, call our iObjectList method:
procedure TWinForm.all_instances__Click(sender: System.Object;
e: System.EventArgs);
begin
evaluate_iobjectlist('c_invoice.AllInstances');
end; // all_instances__Click
| | | | in the tWinForm CLASS define the evaluation method:
unit u_03_invoicing_ocl;
interface
type TWinForm=
class(System.Windows.Forms.Form)
// -- ...ooo...
public
procedure evaluate_iobjectlist(p_ocl_expression: String);
end; // TWinForm
| | | |
type the code of this method:
procedure TWinForm.evaluate_iobjectlist(p_ocl_expression: String);
var l_c_ielement: iElement;
l_index: Integer;
begin
l_c_ielement:= EcoSpace.OclService.Evaluate(Nil, p_ocl_expression, Nil);
if l_c_ielement is iObjectList
then begin
with iObjectList(l_c_ielement) do
for l_index:= 0 to Count- 1 do
display(' '+ Item[l_index].AsObject.ToString);
end
else display('not_iObjectList ');
end; // evaluate_iobjectlist
| | | |
compile, run, create the values, click "all_instances_"
| | | here is the snapshot of our project
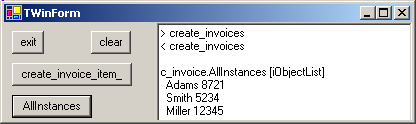
|
Here is an UML Class diagram of this evaluation: and:
- our tWinForm contains the EcoSpace attribute, this EcoSpace containing the OclService member
- the OclService.Evaluate returns one of the iElement descendents
4.3 - Evaluating different iElement expressions How do we know that the type of the AllInstances is iObjectList ? Well OCL expressions compute values in the EcoSpace world. The object kinds in this
outer world are all descendents of iElement, and the iElement CLASS has a ContentType enumeration, which tells us which descendent of iElement should
be used. So while spelunking in this EcoSpace world, we used the following FUNCTION which displays the iElement descendent that should be used Here is the function (which is in the downloadable .ZIP):
function TWinForm.f_content_type_name(p_content_type: ContentType): String;
begin
case p_content_type of
ContentType.Primitive : Result:= 'Primitive';
ContentType.Collection : Result:= 'Collection';
ContentType.Tuple : Result:= 'Tuple';
ContentType.Object : Result:= 'Object';
ContentType.ObjectList : Result:= 'ObjectList';
ContentType.ConstraintCheck : Result:= 'ConstraintCheck';
else Result:= '???_unknown';
end; // case
end; // f_content_type_name
|
Note that - since ContentType is defined in the Borland.Eco.ObjectRepresentation Namespace, we also had to move this USES from the IMPLEMENTATION to the INTERFACE level
To be able to display other iElement descendent expression, we then implemented the other evaluation methods. Here are all our OCL expression evaluation and display methods:
procedure TWinForm.evaluate_iprimitive(p_ocl_expression: String);
var l_c_ielement: iElement;
begin
l_c_ielement:= EcoSpace.OclService.Evaluate(Nil, p_ocl_expression, Nil);
if l_c_ielement is iPrimitive
then display(' '+ iPrimitive(l_c_ielement).AsObject.ToString )
else display(' not_iPrimitive_but '
+ f_content_type_name(l_c_ielement.ContentType));
end; // evaluate_iprimitive
procedure TWinForm.evaluate_iobject(p_ocl_expression: String);
var l_c_ielement: iElement;
begin
l_c_ielement:= EcoSpace.OclService.Evaluate(Nil, p_ocl_expression, Nil);
if l_c_ielement is iObject
then display(' '+ iObject(l_c_ielement).AsObject.ToString )
else display(' not_iObject_but '
+ f_content_type_name(l_c_ielement.ContentType));
end; // evaluate_iobject
procedure TWinForm.evaluate_ielementcollection(p_ocl_expression: String);
var l_c_ielement: iElement;
l_index: Integer;
begin
l_c_ielement:= EcoSpace.OclService.Evaluate(Nil, p_ocl_expression, Nil);
if l_c_ielement is iElementCollection
then
with iElementCollection(l_c_ielement) do
for l_index:= 0 to Count- 1 do
display(' '+ Item[l_index].AsObject.ToString)
else display(' not_iCollection_but '
+ f_content_type_name(l_c_ielement.ContentType));
end; // evaluate_ielementcollection
procedure TWinForm.evaluate_iobjectlist(p_ocl_expression: String);
var l_c_ielement: iElement;
l_index: Integer;
begin
l_c_ielement:= EcoSpace.OclService.Evaluate(Nil, p_ocl_expression, Nil);
if l_c_ielement is iObjectList
then
with iObjectList(l_c_ielement) do
for l_index:= 0 to Count- 1 do
display(' '+ Item[l_index].AsObject.ToString)
else display('not_iObjectList_but '
+ f_content_type_name(l_c_ielement.ContentType));
end; // evaluate_iobjectlist
| At the start of the method we also display the expression string (this is not shown here)
4.4 - OCL expression gallore 4.4.1 - Class member collection We can request to evaluate the values of the members of a CLASS. For instance, to get the list of all customer names, we can use:
c_invoice.AllInstances.m_customer
|
The result of this expression is a collection, with the iElementCollection TYPE. So we called:
evaluate_ielementcollection('c_invoice.AllInstances.m_customer');
|
4.4.2 - OCL operators
OCL contains some predefined functions, like Size. We can call this on any iObjectList or iElementCollection values. To avoid some conflict with any CLASS attribute which could be named "Size", OCL decided to use the "->"
symbol to specify a FUNCTION call, like this:
c_invoice.AllInstances->Size
|
The result of Size is an iPrimitive Integer value, so we called:
evaluate_iprimitive('c_invoice.AllInstances->Size');
| Also not that those functions are called "operators" (like UML methods)
4.4.3 - ForAll To check that some condition is true for all members of a list, we can call the ForAll function:
c_invoice.AllInstances->forAll(my_invoice | my_invoice.m_invoice_number> 100
| The result of Size is an iPrimitive Boolean value, so we called:
evaluate_iprimitive('c_invoice.AllInstances'
+ '->forAll(my_invoice | my_invoice.m_invoice_number> 100)');
|
4.4.4 - Select and Self
The Select FUNCTION allows us to extract a list of iElements from a list:
c_invoice.AllInstances->select(m_invoice_number= 12345)
| The result of Size is an iObjectList, so we called:
evaluate_iobjectlist('c_invoice.AllInstances'
+ '->select(m_invoice_number= 12345)');
|
We used this Select to specify a single c_invoice object. All OCL expressions
are evaluated in some context. In our case, we used the global EcoSpace context. But if some expression is in the context of one object (say the invoice object of Mr Miller) we could use the Self OCL specifier. Like this:
4.4.5 - Navigating to a related object
To navigate to another object, we use the relation end names. For instance, to display the items of some invoice:
c_invoice.AllInstances->select(m_invoice_number= 12345).has_item'
| And to display the iObjectList values: The result of Size is an iObjectList, so we called:
evaluate_iobjectlist('c_invoice.AllInstances'
+ '->select(m_invoice_number= 12345).has_item');
|
s
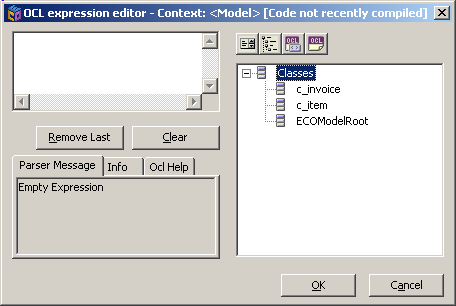
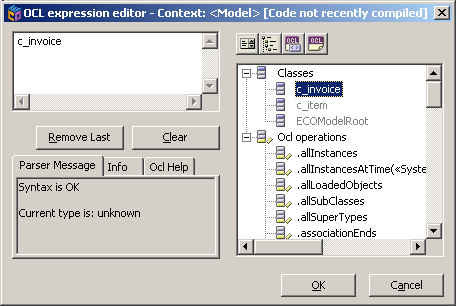
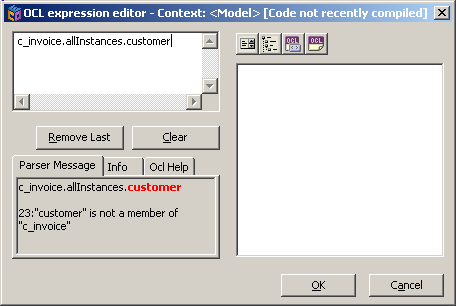
Checking the OCL expression
To make sure that our OCL expression is correct, we can use the OCL Editor. This is accessible from the ExpressionHandle.Expression property in the Object Inspector. So:
5 - Comments on this ECO III with Delphi 2006 tutorial
5.1 - What's Next ? Among the many things that were not presented, we can list - the use of Sql Database persistence. Since we already presented many papers about ADO .Net, the connection should be easy. However, ECO has also some
specific parts for handling transactions and tweaking the generated Sql requests
- the uses of ASP .Net Web pages, and Web Services. There are published papers in this area (see the references)
- the creation of "derived attributes", which in Delphi language means calculated fields
- the creation of "ECO Variables", which are the equivalent in OCL world of the parameters in parametrized Sql requests
- the creation of custom OCL operations (adding new OCL function, in addition to Size etc)
- using OCL constraints at the UML model level
- the possibility to execute the UML state diagram, and in ECO III to use an
Action Language (wich can change the state of the objects, whereas OCL only evaluates expressions, without side effects)
5.2 - OCL for modeling My primary motivation to look at the ECO framework was to try the OCL language.
To be able to code at a more abstract level than Pascal code, UML (or any other modeling language) looks like a very good choice for structural modeling (Class diagram). On the behavioral side, things get more complicated.
First of all you have two schools: - one trying to work at the UML model level only, and the framework will blindly generate the Pascal code. The same jump from model to Pascal as
from Pascal to Assembler. This is the MDA approach, with Action Languages, implemented by Kennedy Carter, PathFinder or xtUML and MELLOR at Bridgepoint. Quite heavy machinery, with many marketing enthusiatic
presentations, and very few real life examples, if any. In addition these models generate the code from State Diagrams, since those frameworks are anchored in the telecom world (the phone is "on hook", "ringing", etc)
- one trying to use the UML model as a starting point, this model being used to generate some stub code that the developer has to fine tune. This is the "round trip" approach.
In this area you find both generation from State Diagram or from Activity Diagram (or Object Diagrams). The Activity Diagram approach focuses more on chunks of work, than state. This is obviously more in line with business
thinking ("process the order", "manufacture the product" etc), and somehow gave birth to the Workflow models.
At the end of this ECO trial, we now know how to use some specification
language at the UML model level, like OCL, to navigate the different Classes of the model, and this was our main target at this point. And ECO is the only implementation we have, with State Diagram execution and Action Language.
6 - Download the Sources Here are the source code files: The .ZIP file(s) contain: - the main program (.DPR, .DOF, .RES), the main form (.PAS, .DFM), and any other auxiliary form
- any .TXT for parameters, samples, test data
- all units (.PAS) for units
Those .ZIP
- are self-contained: you will not need any other product (unless expressly mentioned).
- for Delphi 6 projects, can be used from any folder (the pathes are RELATIVE)
- will not modify your PC in any way beyond the path where you placed the .ZIP (no registry changes, no path creation etc).
To use the .ZIP: - create or select any folder of your choice
- unzip the downloaded file
- using Delphi, compile and execute
To remove the .ZIP simply delete the folder. The Pascal code uses the Alsacian notation, which prefixes identifier by
program area: K_onstant, T_ype, G_lobal, L_ocal, P_arametre, F_unction, C_lasse etc. This notation is presented in the Alsacian Notation paper.
As usual:
- please tell us at fcolibri@felix-colibri.com if you found some errors, mistakes, bugs, broken links or had some problem downloading the file. Resulting corrections will
be helpful for other readers
- we welcome any comment, criticism, enhancement, other sources or reference suggestion. Just send an e-mail to fcolibri@felix-colibri.com.
- or more simply, enter your (anonymous or with your e-mail if you want an answer) comments below and clic the "send" button
- and if you liked this article, talk about this site to your fellow developpers, add a link to your links page ou mention our articles in your blog or newsgroup posts when relevant. That's the way we operate:
the more traffic and Google references we get, the more articles we will write.
7 - ECO documentation We are not overhelmed with documentation, but here is what I found:
- the basic tutorials are those from Anthony RICHARDSON
- there are a couple of slides (use Google to find the links)
- Jason VOKES, Gerard VAN DER POL (marketing slides)
- Peter MORRIS, did some presentations, and also has a blog (see below)
- Tim JARVIS
- some blogs will keep you up to date
- there is a book:
- Alois SCHMID who wrote a book in german, which seems to have been translated in English
- Peter MORRIS has several interesting places:
- there is a Eco Community page on the CodeGear site
- also there is a Wiki page at CogeGear with very nice
tutorials on some detailed points of ECO II or ECO III. Exactly what a Borland tutorial should have looked like in the first place (but for the whole framework, not for some specific points only)
- ECO Wikia a wiki about ECO. And there are other Wiki pages about ECO
- projects
- Delphi_Unleashing_enterprise_models_with_Delphi_8_Architect_for_.NET.pdf"
- by Christoph FLOURY - A Whitepaper with a Project Mangement example, and the most complete Class diagram about the ECO Framework
-
BLOGGING WITH DELPHI is a 4 part paper from Bob SWART explaining how to build a blog application with ECO and ASP.Net
- Real life complexity with
ECOII by Hans KARLSEN, is a time keeping application
- using Tamaracka to search the Eco newsgroup, you will find many ECO questions, and, what is very nice, is that
the ECO developer often directly answer to the questions
Overall, I feel a little bit disapointed that ECO changed so often, and that the official documentation (manuals or Help) are so thin. But all those
resources should get you started in this brave new ECO world.
8 - The author Felix John COLIBRI works at the Pascal
Institute. Starting with Pascal in 1979, he then became involved with Object Oriented Programming, Delphi, Sql, Tcp/Ip, Html, UML. Currently, he is mainly
active in the area of custom software development (new projects, maintenance, audits, BDE migration, Delphi
Xe_n migrations, refactoring), Delphi Consulting and Delph
training. His web site features tutorials, technical papers about programming with full downloadable source code, and the description and calendar of forthcoming Delphi, FireBird, Tcp/IP, Web Services, OOP / UML, Design Patterns, Unit Testing training sessions.
|