|
Embarcadero ER Studio and Delphi - Felix John COLIBRI. |
- abstract : a quick tour of ER/Studio from Embarcadero, an Entity Relationship designer. How to create a new E/R studio model, reverse engineer a database, create sub-models, generate reports, import metadata, switch to Dimensional Model
- key words : Entity RelationShip, Database Design, Dimensional Model, Embarcadero, quick tutorial
- software used : Windows XP Home, Embarcadero 7.5.1, trial version
- hardware used : Pentium 2.800Mhz, 512 M memory, 140 G hard disc
- scope : database designers, Delphi developers
- plan :
1 - Embarcadero Product Range Embarcadero purchased Codegear the 7th of May. As we understand it, Embarcadero is offering a range of database tools for design (entity relation), development
(Sql IDE) and managment (dba tool, optimization, monitoring), "used by over 90 of the Fortune 100". We will present here a very short introduction to ER Studio
2 - Embarcadero ER/STUDIO Installation 2.1 - Entity Relation Design Tool ER Studio is an Entity / Relation Database Design tool
ER tools are similar to UML tools. For UML, we try to organize our CLASSEs, by grouping attributes and methods and showing relations between those CLASSes. For database design, we try to group the data attributes into
Tables, making relations between those tables explicit.
2.2 - Download and Installation The download is simple and no-nonsense: we just entered our name, phone,
country and click. We could even save the page (which is usually not possible for Forms with ActiveX components). 9 minutes announced. It took us 35 minutes, because we are using a slow ADSL line (62K/sec).
125 Meg .ZIP which contains the ER Studio setup (as well as the "repository" tool, used for group design, which we did not install) A 37 page .PDF installation guide (mainly for upgrades, licenses and for the
group design product which requires details about the Sql Engine you select)
Installing ER Studio is very quick - InstallShield starts
- you only have to answer to a single questions (do you already have a licence or not)
- clicking "Ok" to the other dialogs installs the product
- 2 minutes later the product was installed.
A 21 Meg .EXE, a 44 pages QuickStart guide. Uninstall is also easy.
Well, if they only could convince CodeGear to replace InstallAware by the previous Installshield, this alone would be a huge reason to cellebrate ! And since InstallShield now also belongs to Thoma Cressey Bravo (the owner of
Embarcadero), there might be some motivations to convince CodeGear ...
2.3 - The Main IDE The main IDE looks like this (Ed: reduced 50 %): 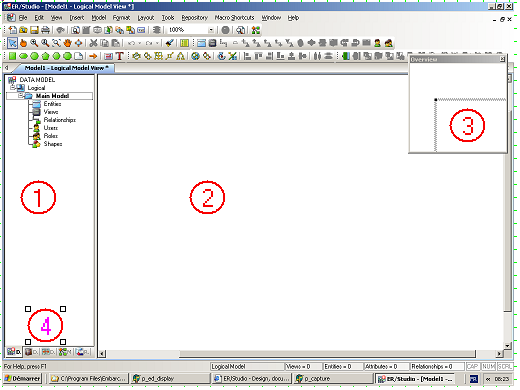 and - (1) is the Diagram Explorer
- (2) is the Diagram Window
- (3) is the Overview Window (a panning and zooming tool)
- (5) a zoom window (not displayed on our figure) where the area underneath the cursor in the Diagram Explorer is displayed
- (6) several toolbars which can be reorganized and docked anywhere (at the
bottom of the window, or vertically at the right, for instance)
The Diagram Explorer (1) contains 5 tabs - the Data Model tab displays the model structure (logical, physical and sub-models)
- the other tabs ( at the bottom (4) of the Diagram Explorer) are
- Data Dictionary tab (Domains, Rules, Defaults ...)
- Data Lineage: used to convert data sources to a target (physical)
model. Used to build data warehouse targets by mapping for instance source columns to data warehouse columns
- Macros, which allow you to automate design tasks (naming, coloring ...).
Those macro are written in the "Sax Basic" language, and this tab allows you to use predefined macros and write your own
- Repository for developer group work and storing objects for later reuse
3 - Creating a new model from scratch 3.1 - simple Customer / Invoice base Lets build a simplified model, say a customer / invoice system.
3.2 - Adding Attributes Now lets add the Customer entity:  |
from the "entity / relation / user" toolbar, select the Entity: 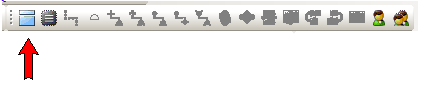 and click in the Diagram Window |
 | the new entity box is displayed (Ed: resized) 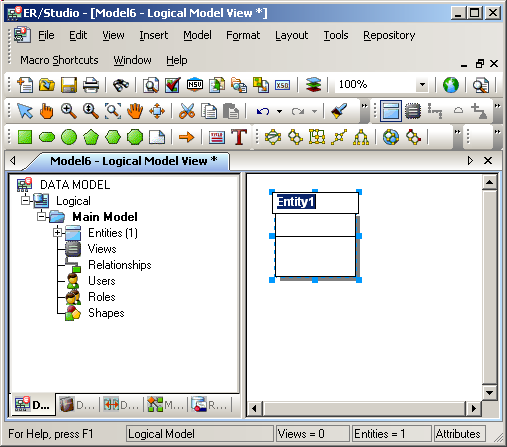 | |
| since the entity name is in edit mode, type the name of our entity, Customer | | |
click the "selection arrow" to avoid adding a new entity at each click in the Diagram Window 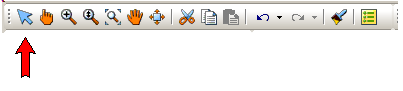 | |
| to add a key to our Customer entity, right click on the Customer entity
| | |
the Entity Editor is displayed (Ed: scaled 75 %) 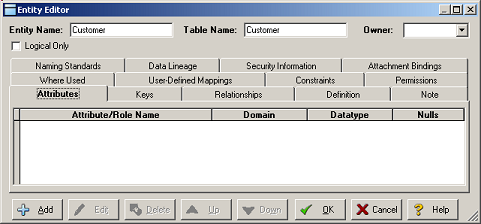 | |
| click on the bottom left "Add" button
Fill the attribute name ("CustomerId") type ("Counter") and check the "Primary Key" checkbox | | |
a new attribute is created 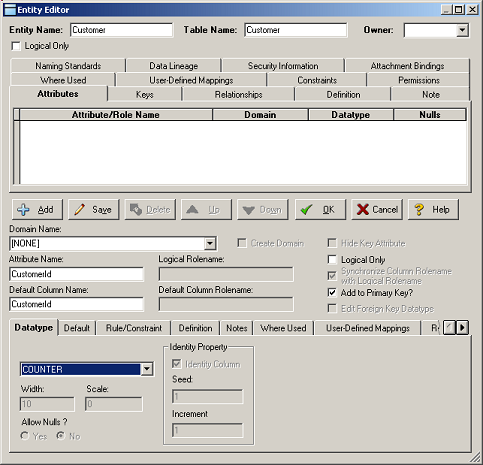 | | | click "Ok"
|
| | the new key is displayed in the second part of the entity box: | | |
add other attributes like "Name", "Address", "Phone" to this entity 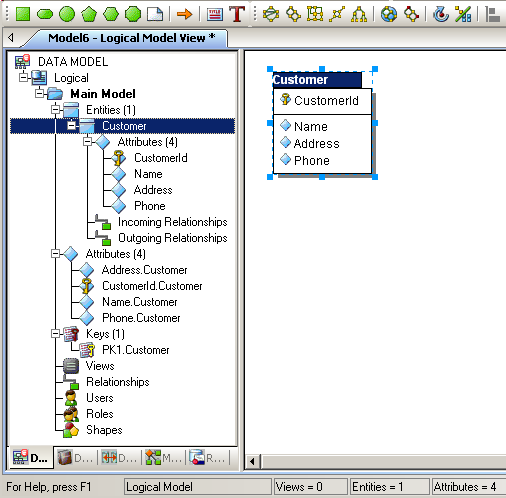
|
Please note that
- the Entity Editor has many many possibilities to add constraints, checks, definition (some textual comment) etc
Before adding a relationship, we add the "Invoice" entity, whith "InvoiceId"
(primary key), "InvoiceNumber", and "InvoiceDate" attributes.
3.3 - Adding Relationships To add a relation between the "Invoice" and the "Customer" entities: |
| from the "entity relationship" toolbar, select the "Identifying Relationship" icon 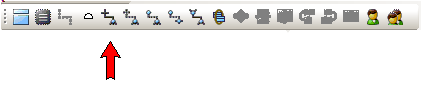
and click on the "Customer" entity box and on the "Invoice" box | | | the relationship is displayed
|
Note that - we had first included a "CustomerRef" attribute in the "Invoice" entity,
only to see that ER/Studio automatically adds the foreign key. So we removed our "CustomerRef" attribute
- you cannot remove the "CustomerId (FK)" attribute, unless you first remove the relationship, which is quite sensible
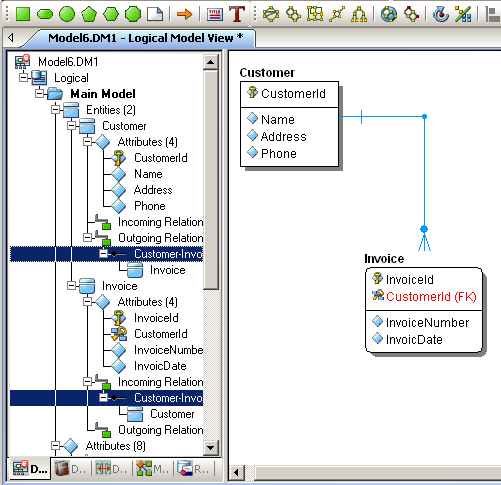
3.4 - Changing the Presentation There are many many display properties we can change. First we will change the layout of the entities and relationships. Of course, with two lonely entities this is not going to make big modifications, but,
anyway | | from the "layout and alignment toolbar", select the "Orthogonal Layout" Icon 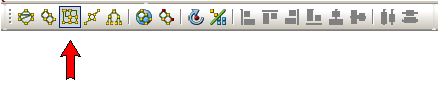 and click this icon | | | here is the result 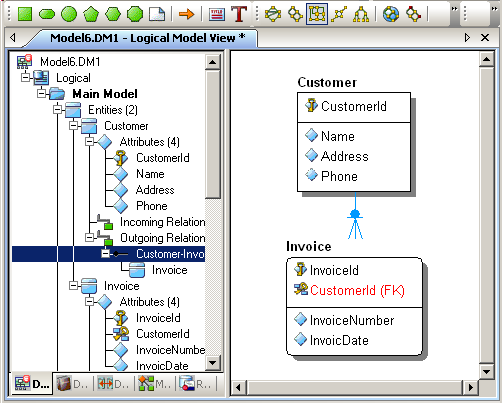
| Note that - by resizing the Diagram Window before selecting the layout, the layout selection will resize and position the diagram according to this new size
For big designs, the presentation of the detailed attributes of all entities would quickly make the picture unreadable. So we can reduce the entity just to the name: | |
from the "selection" toolbar, select the "change display option" icon: 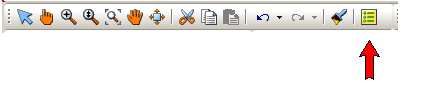 | |
| ER/Studio warns us that the undo history will thereby be cleared: 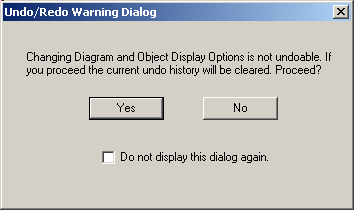
| | | click "Yes" | | |
the "Diagram and Object Display Options" dialog is displayed | | | select the "Entity" tab, and then the "Entity" radiobutton:
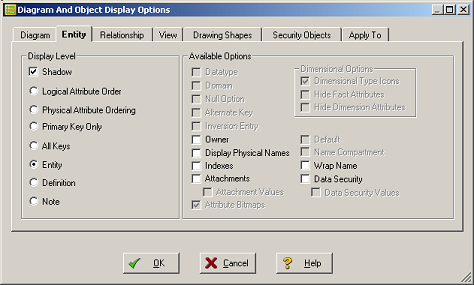 and then click "Ok" | | |
the diagram is displayed only with the entity names: 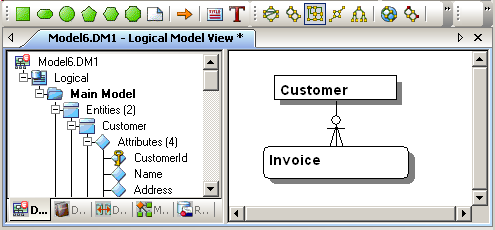
|
3.5 - First design impression Please not that
4 - Reverse Engineering databases with ER Studio 4.1 - Target Sql Engines
Instead creating a model from scratch, we can build a model by analyzing an actual Database. The accepted databases are: - native connection for
- Oracle
- Sql Server
- Sybase
- Db2
- ODBC connection for
- Access
- Informix
- Interbase
We do not have an ODBC driver for Interbase. There certainly are some available
by looking at Google, but since we have the native Delphi connection, we have not looked at it.
4.2 - Reverse Engineering DBDEMO.MDB So let's try to use an Access example. We will reverse the only Access database
we have ever seen, which is the DBDEMO.MDB database shipped with Delphi. To build the ER diagram from Access, there are two steps - define an ODBC for Access
- create a "reverse engineered project" using this connection
4.3 - Creating the ODBC DataSource For the first point, ER/Studio has a wizard which loads the ODBC manager which is used to define the ODBC datasource: |
| start ER/Studio
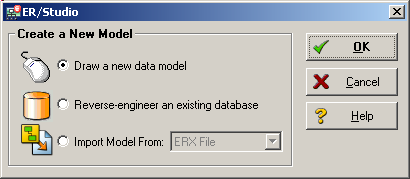
| | | select "File | New" and in the "Create New Model" dialog select "Reverse Engineer an Existing Database" and click "Login"
| | | the Reverse Engineer Wizard is displayed (Ed: scale .90): 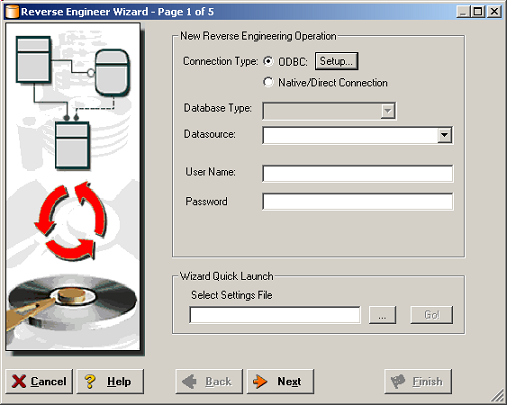 | | | select "ODBC" and clic "Setup..." | |
| the Windows Odbc Manager is displayed | | | click "Add"
| |
| a dialog asks which driver we want to use
| | | select "Microsoft Access (*.mdb)"
|
| | a dialog "Install ODBC for Microsoft Access" is displayed
| | |
give a name to the ODBC source (say "my_access_odbc") and click "Select"
| | | an old Windows 3 "open dialog" window is presented
|
| | navigate to the folder containing the .MDB. In in our case it is located in c:\program files\shared files\borland shared\data\` and select "DbDemos.Mdb"
and click "Ok", "Ok", "Ok" | | | we are back to the Reverse Engineer Wizard | |
| in the "DataSource" combo, select our new "my_access_odbc" datasource and click "Next" | | |
the second page of the Wizard asks us which objects should be extracted : user Tables, System Tables, triggers etc  |
| | Apparently Access has not much to offer, which is no surprise. But anyway, select "User Tables" | |
| at this stage you can go to page 3 to 5 of the Wizard. In our case we decided to click "Finish" | |
| after a couple of seconds, a dialog tell us that the diagram has been extracted: 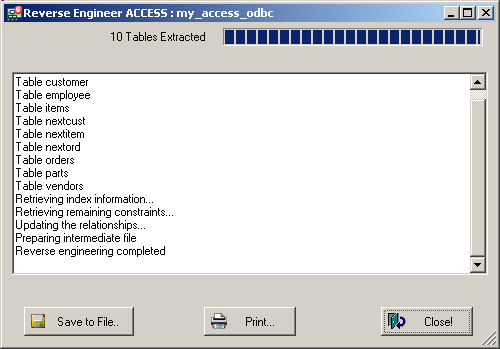 | |
| click "Close" | | | the Diagram Window displays the DbDemos Access schema:
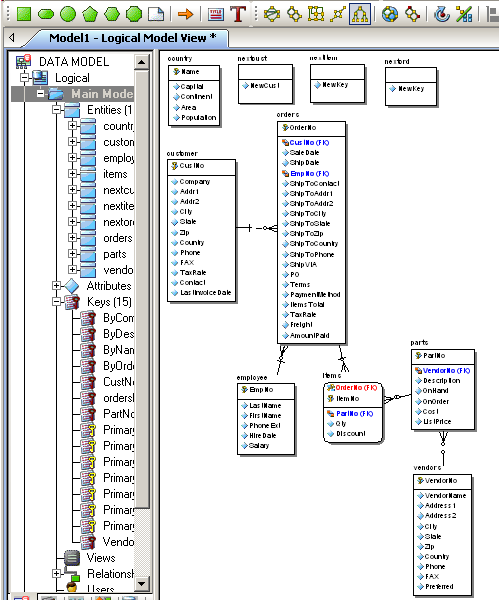
|
As expected, displaying all the attributes makes this diagram difficult to
read. We could restrict the display to the entity name only, as we explained previously. But then we would have to toggle between the simplified and the full diagram. There is a much better solution, which is to create sub-models.
5 - Creating Sub Models Sub-models are made of selected objects of the main model. We can work on the sub-model, but the neat part is that the modifications are synchronized with the main model.
Here is how to build a sub-model with the "connected" parts of DbDemo: | | in the Diagram Window push the Control key, and click on each of the
entities you want to include in your sub-model: 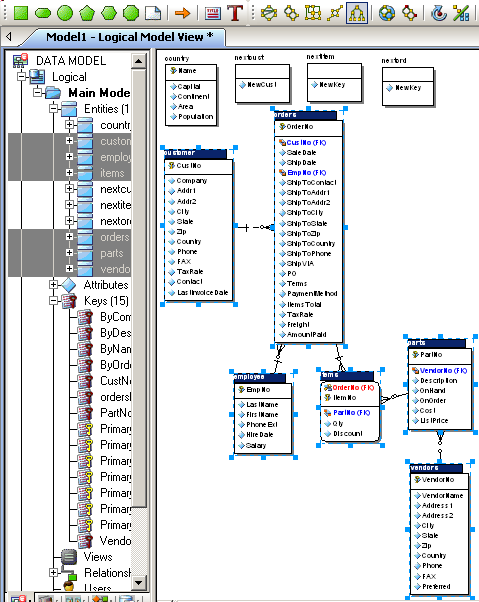 | | |
create the sub-model by selecting "Model | Create Sub Model" | | | a dialog is displayed asking for the name | |
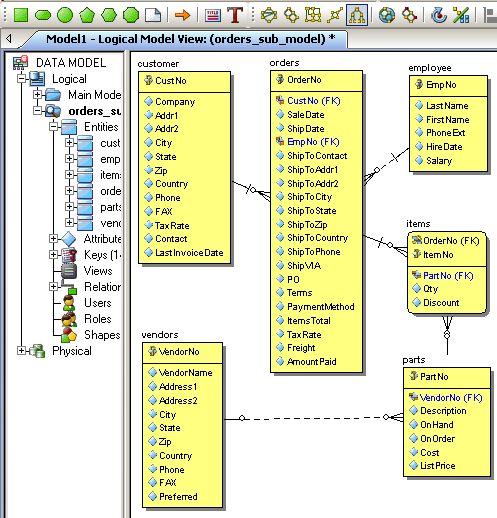
| type the sub-model name, say "orders_sub_model" | | |
the selected items are included in the sub-model
|
While we are at it, let's also add some colors to this sub-model:
5.1 - Generate the Physical Model The models we handled so far were "logical models". Details specific to some specific database were not taken into account.
ER/Studio can generate physical models, which are used to fine tune and optimize the design for some specific Sql Engine. We will generate an Interbase physical model from our previous DbDemo model:
6 - Generate Documentation We can document the model and create either .RTF or .HTML files. To do so | |
select "Tools | Generate Reports"
| | | the "Report Wizard" is displayed: 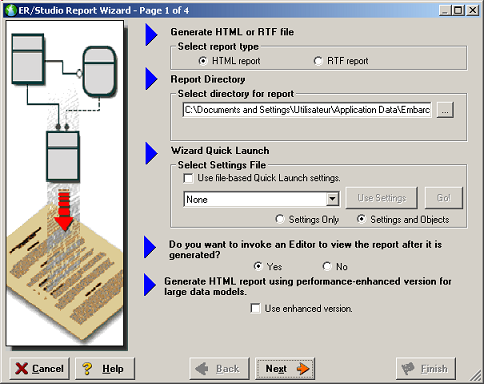
| | | set the directory, select the type of report (.HTML in our case) and click "Next"
| |
| the page 2 of the Wizard asks which parts of the model should be documented: 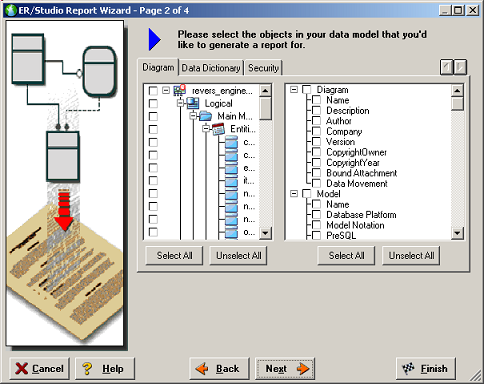
| | | select the objects you want documented. In our case we clicked BOTH "Select All" buttons | |
| you can select other options, or like we did, click "Finish" | | |
the reports are generated, and the success confirmed: 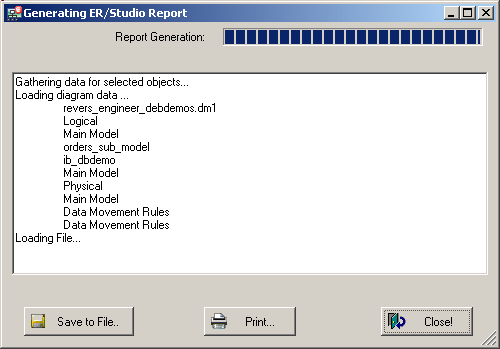 Since we accepted to see the first report page, this page is displayed.
Navigating in the report we can display the model's information: 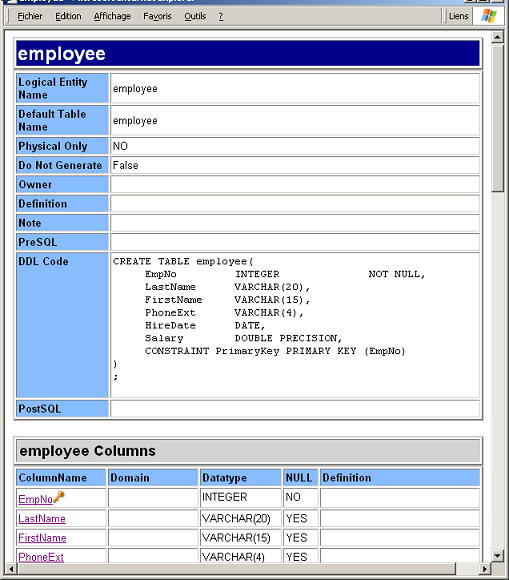 The report includes the attributes, indices, Sql script, where used etc.
|
7 - Importing a Meta Data Exporting or importing meta data is quite easy, and with many possible meta data formats. The demos "c:\Documents and Settings\User\My
documents\ERStudio7.5\OrangeMart (XMI).XML". Here is the start of this file (Ed: formatted, partial) :
<?xml version=1.0 encoding=UTF-8 ?>
<XMI xmi="1.1" timestamp="Apr 12 2004 08:44:22"
xmlns="org.omg.CWM1.0" xmlns="org.omg.CWM1.0/Relational">
<!-- <!DOCTYPE XMI SYSTEM cwm.dtd> -->
<XMI.header>
<XMI.documentation>
<XMI.exporter> MITI </XMI.exporter>
<XMI.exporterVersion> VersionNo </XMI.exporterVersion>
</XMI.documentation>
<XMI.metamodel xmi="CWM" xmi="1.0"/>
</XMI.header>
<XMI.content>
<CWMRDB:Catalog xmi="_1" name="OrangeMart (XMI)"
visibility="public">
<CWM:Namespace.ownedElement>
<CWMRDB:Schema xmi="_2" name="dbo"
visibility="public" namespace="_1">
<CWM:Namespace.ownedElement>
<CWMRDB:Table xmi="_3" name="Product_Patent"
isSystem="false" isTemporary="false"
visibility="public" namespace="_2">
<CWM:Classifier.feature>
<CWMRDB:Column xmi="_4" name="Product_Patent_ID"
isNullable="columnNoNulls"
visibility="public"
type="_5"
owner="_3"/>
|
This partial figure displays the start of the Product_Patent Table.
To import this meta-data: | | select "File | Import File | From External Metadata"
| | | the "Import External Metadata" wizard is displayed: 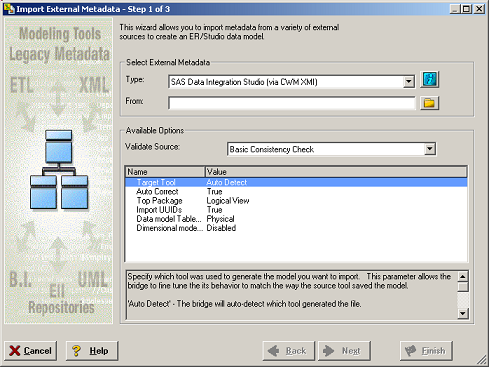
the import list contains a great number of formats, like Business Objects, CA, Cognos, Ibm DB2, Microsoft Sql Server, Oracle etc. Even Together ! | | |
select "OMG CWM 1.x XMI 1.x"
| | | an import informations dialog is displayed: 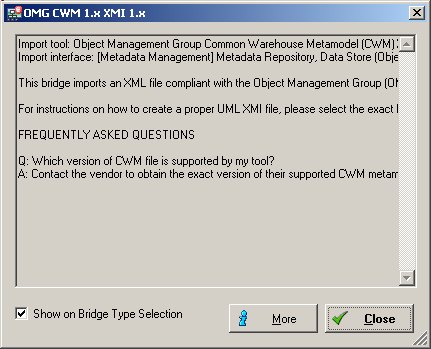 | | | click "Close"
Then click the "Open dialog" icon, and select "OrangeMart (XMI).XML"
Click "Next" (ER Studio version), "Next" (import log) and "Finish" | | | the data is imported, the Diagram Explorer is at the root of the Treeview
| | | select the bottom "OrangeMart (XMI)" icon, then "Main Model" (the green icon of the physical model, not the blue icon of the logical model) |
| | all the objects are displayed in the top left corner. It also includes an Overview Window and a Zoom Window | |
| select one of the layout icons, say "hierarchical layout" 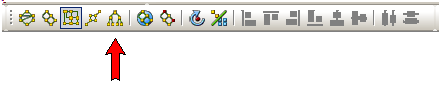 | |
| here is the result. We placed the cursor on the central Approved_Produce_Table, and this part of the model has been magnified in the bottom right Zoom Window:
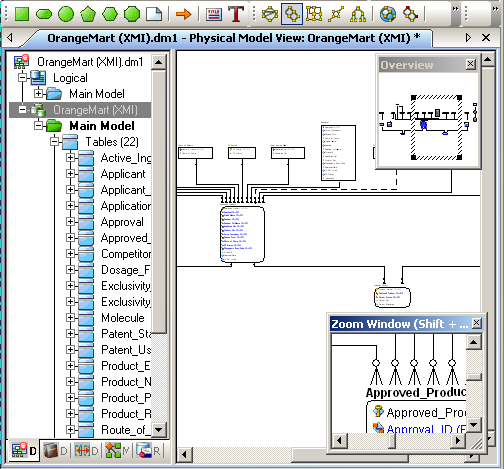
|
8 - Switching to Dimensional Modeling
8.1 - The Dimensional Model In Entity Relationship models, all entities are born equal. No Table looks more important, in some sense, than other Tables. Therefore, the diagram often looks confusing to the user.
The Dimensional Model tries to shift to a more user oriented view. In the model, the user is interested to view, analyze, understand some figures. Say sales dollars, production quantities, market shares etc. Those numeric values
can be broken down by country, product line, salesman etc. According to this dimensional model, you organize the Tables into - fact tables, which contain the quantities you want to examine
- the dimension tables, which contain the criteria which will allow the breakdowns (the "explanations" for the facts).
There are some constraints on this Table classification (the facts must be
numeric, the dimension tables must be linked to the fact tables by foreign keys), and also some freedom. In addition, the dimension Tables usually are not normalized. This is the "Star" model. And normalizing them will create a "Snowflake" model.
8.2 - Converting from Entity Relationship to Dimensional Model Using the rules about fact and dimension tables, ER Studio is able to convert an ER Model to a dimensional Model. Here is how to perform this conversion on
the previously imported OrangeMart physical model: | | select "Model | Model Options"
| |
| the "Physical Model Options" dialog is presented: 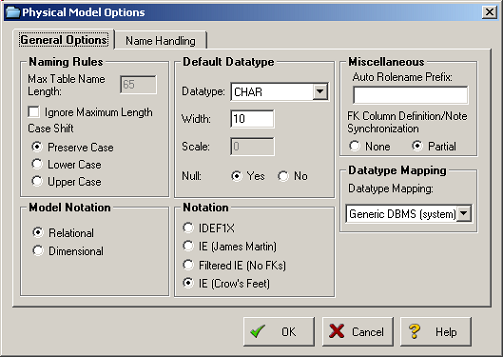 | |
| select then "Model Notation > Dimensional"
| | |
each Entity in the previous ER model contains now a category icon: Fact, Dimension, SnowFlake Since the frame of each Table now includes an icon for the Dimensional type, there is a bigger frame around each Tableon the display, and some of
the Table attributes have been hidden. You can display them by resizing the Table height. | | |
to concentrate at the central Tables of the diagram, we selected the "resize cursor" 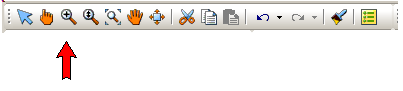 and "drag-and-dropped" it to select the central part of the figure |
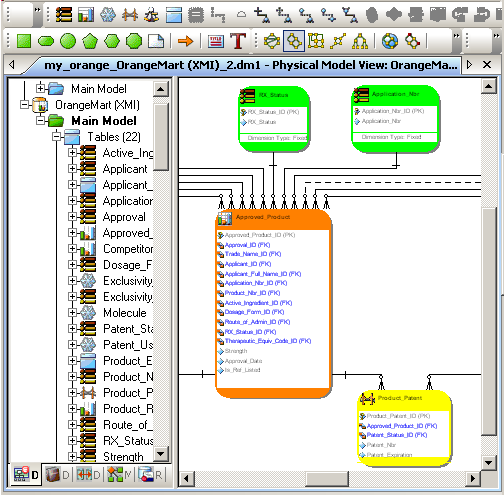
| | here is the result 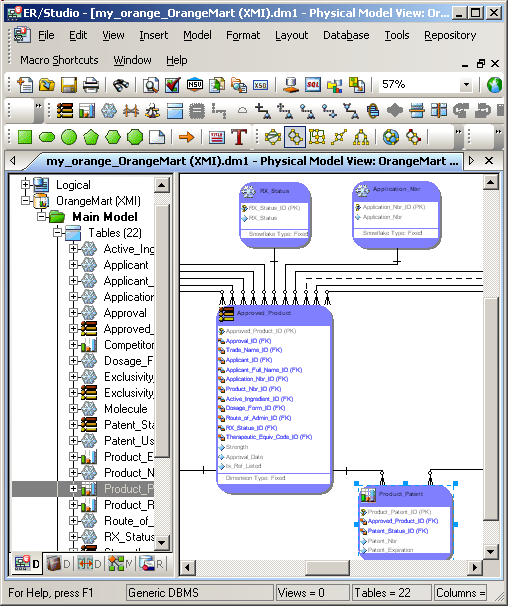 Notice that
- the bottom Table has been converted in a "Fact Table" (it has no child Table)
- the Fact Table has foreign keys for other Tables, which are therefore considered as "Dimension Tables"
- the other Tables are "SnowFlakes Tables"
|
The left Diagram Explorer shows that there are several Fact tables. From a structural point of view, this is caused by the fact that several Tables have no children.
It is also natural for a User to have serveral point of view. He might be interested in sales figures, but also in salaries, production quantities etc. To become a Fact Table, an Entity must conform to some rules (have numeric
quantities, have parent Tables etc). But when several options are available, the overriding deciding factor is the User. He knows best which information he wants to analyze and which are the dimensions for breaking this information down.
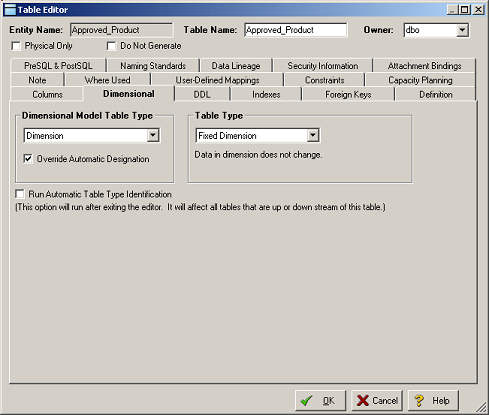
8.3 - Changing the Dimensional Table type Therefore we can change the dimensional type of any Table. Let's convert the central Approved_Product Table into a Fact Table:
This Dimensional Model could then be used to build Mutli Dimensional Cubes or pivot tables.
8.4 - ER or Dimensional ? According to Ralph KIMBALL, the Dimensional model is a model equivalent to the Entity / RelationShip model, but much more understandable to the database users.
ER/Studio can switch between both representations. So it can be viewed as an Entity RelationShip Designer as well as a Dimensional Modeling Designer.
9 - My two cents
9.1 - Some other possibilities The Quick Start Guide presents many other possibilities, among which: - add denormalization, which is a physical tuning option. For instance
breaking horizontally a table with many records in two separate tables. Or vertically split a Table with many columns into two Tables
- generate or import metadata
- use the SAX basic (ahem) language to automate some design tasks
- place some objects in a repository in order to share the work with other developers
9.2 - Overall Impression For this very small tour of the product, we read once the
QuickStart guide (half an hour), played with the Studio for about an hour, and then started to write this article, following the general plan of the QuickStart guide. We estimate that having thus spent half a
day with ER/Studio gives us a reasonable feel for the product (and the company having created it). If you sometime used Model Maker, Together, Sparx System, you will be in business in no time. You will luckily now belong to the "Database Designer"
folks, and are immediately entitled to a substantial salary raise ! If I had to give some advice, - read the QuickStart guide, and if you have installed the product, follow the steps
- if you are not familiar with Data Warehousing, Google around to find out about "Dimensional Modeling", "Star", "SnowFlake". It took us some time to understand that this is simply the concept underlying Cubes (and pivot tables)
9.3 - About ER/Studio For the IDE: - the design is logically organized
- all toolbars have a menu counterpart
- the graphical possibilities are very complete.
- the interface is also less clutterd than Model Maker (but we understand that ModelMaker is more a "Delphi Block Editor" for object oriented and Design Pattern development)
- some names are not the ones we are accustomed to in the Delphi world: "Diagram Structure" instead of "Object Treeview" (Db Model objects), "Diagram Window" instead of "Designer" (or "ER Designer") etc
On the functional side, we only scratched the surface, but there are already many possibilities we could use. The documentation is relevant and free - in the manual, we would have prefered to place the details of the different
import options (from other ER tools) in an appendix
- on the Help side, I now would prefer the H2Help system (the one used by Delphi 2006) because of its treeview-presentation structure
- the demos include nice models which can be imported to have a better feeling of how to handle bigger databases.
Also lets mention the "no nonsense" general feeling we had using the product:
- no hassle downloading the trial version (no e-mail for registering etc)
- an ultra fast install
- simple uninstall
9.4 - What about Delphi
Of course, it is not because Embarcadero purchased Codegear that there will be a compulsory need to use or incorporate Embarcadero's tools within Delphi. Our presentation was mainly to get a feeling of this new company.
Nevertheless, there still could be immediate benefits: - Together is an UML tool. We already stated that we feel that it is way too complicated:
- first it is a "full fledged UML tool"
- "designer / Object Inspector" way of operation makes adding attributes quite cumbersome
- with Delphi, it is mainly geared toward code generation and as ECO's first step.
For object or Db analysis and design, we prefer to use our own simpler UML / ER graphical editor (which is used in most of our programming articles).
So in the database design area, ER Studio could be a nice replacement. Right now, it is targeted toward big (many tables, big corporation) databases, but certainly can be used for less massive data volumes.
- using ER Studio for InterBase could also be a good possibility. They already somehow include InterBase in their target Sql Engines, but not yet as a "first citizen" native Sql Engine, like they do for Oracle or Sql Server.
- in the SQL generation area, some of Embarcadero's expertise could also be used to replace the Active Script Builder. This is an external product, and could be replaced. We all know that the "Data Explorer" part of Delphi needs
some cleanup: so many different ways of operation (whether you talk to dbExpress, Bdp, IbExpress, Ado, you have quite different dialogs and wizards, and in some areas, even the BDE data explorer had more functionalities !)
Schema documentation and query optimization are maybe other possibilities - Tiburon's roadmap first point stresses the drive toward improved database (dbExpress, DataSnap, multi tier). So design tools and Sql editors could become very handy.
9.5 - Feedback As usual: - please tell us at fcolibri@felix-colibri.com if you found some errors, mistakes, bugs, broken
links or had some problem downloading the file. Resulting corrections will be helpful for other readers
- we welcome any comment, criticism, enhancement, other sources or reference
suggestion. Just send an e-mail to fcolibri@felix-colibri.com.
- or more simply, enter your (anonymous or with your e-mail if you want an
answer) comments below and clic the "send" button
- and if you liked this article, talk about this site to your fellow
developpers, add a link to your links page ou mention our articles in your blog or newsgroup posts when relevant. That's the way we operate: the more traffic and Google references we get, the more articles we will write.
9.6 - John DOE's opinion about Codegear's Purchase Right after the announcement, there was a flurry of comments. Rumors said that Embarcadero's site was taken by a storm of visits (the home page was in fact
quite slow, but the product and technical pages very responsive). Of course, everybody wanted to have a better understanding about the company we were going to get into bed with.
Don't expect me do give my opinion commenting Marco's opinion (5/128) which comments such and such's opinion concerning Greg KELLER's blog post. Info about info about info, well that's no longer a scoop. So i suggest to
directly go to Greg KELLER's or David I's original posts
10 - Embarcadero Links So to get some information about the purchase, we would recommend:
- Embarcadero and CodeGear, the blog from Greg KELLER, Embarcadero VP-Products at Embarcadero. A person very
enthusiatic about the purchase. He and Nick HODGES (Codegear's Delphi Product Manager) were hunting the Web for comments about the purchase, and answering to many posts. Greg is also is a very responsive person. The sales
was announce On May 7, we published this paper the 9 th and he kindly blogged about our article the very same day. Thank you Greg !
- Borland News Release "Borland Reports First Quarter 2008 Financial Results and Announces Agreement for Sale of CodeGear Unit", the Borland side
announcement, with the first quarter Borland financial results. Well Borland, game over ...
- Sip From the Firehose Breaking news: Embarcadero Technologies agrees to acquire
CodeGear from Borland - by David INTESIMMONE, VP Developer Relations, Codegear.
- ISVs and MicroISVs: Youre not only covered ... - Michael SWINDELL, VP of
products, Codegear
About Embarcadero and ER/Studio
11 - The author
Felix John COLIBRI works at the Pascal Institute. Starting with Pascal in 1979, he then became involved with Object Oriented Programming, Delphi, Sql, Tcp/Ip, Html, UML. Currently, he is mainly
active in the area of custom software development (new projects, maintenance, audits, BDE migration, Delphi
Xe_n migrations, refactoring), Delphi Consulting and Delph
training. His web site features tutorials, technical papers about programming with full downloadable source code, and the description and calendar of forthcoming Delphi, FireBird, Tcp/IP, Web Services, OOP / UML, Design Patterns, Unit Testing training sessions.
|