|
ADO .Net Tutorial - Felix John COLIBRI. |
- abstract : developing ADO .Net applications, using the SQL Server database
- key words : ADO .Net - SQL Server - Delphi - Windows Forms
- software used : Windows XP, Delphi 2006
- hardware used : Pentium 1.400Mhz, 256 M memory, 160 G hard disc
- scope : Delphi 8, Delphi 2005, Delphi 2006, Turbo Delphi for Net
- level : Delphi developer, Windows .NET developer
- plan :
1 - ADO.NET Tutorial We will show how to develop database applications using SQL Server and the
ADO.NET components with Delphi. We will present: This tutorial will not cover all aspects of ADO.NET development. We will not
talk about: - stored procedures, triggers
- transactions and handling concurrency
- the detail of visual .NET controls (TreeView, ListView etc)
For those interested in more in depth coverage, we organize every month training classes about database development:
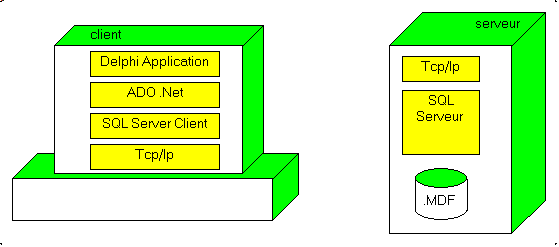
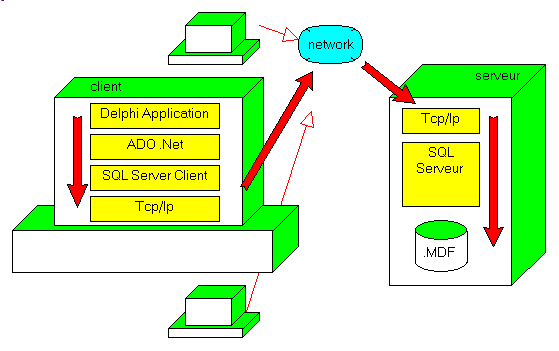
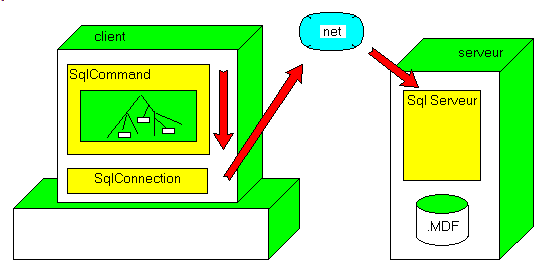
2 - The Client Server Architecture All major SQL engines (Oracle, Sql Server, Interbase, MySql) use a Client
Server architecture: - the Server code handles the data transfers between the Client applications and the hard disc
- the Client code sends requests to the Server which then provides the requested data.
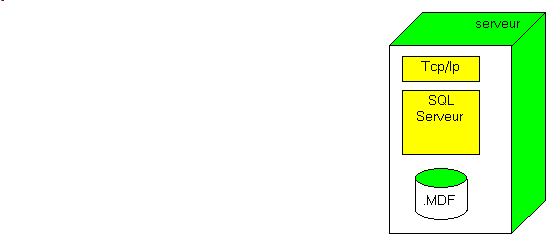
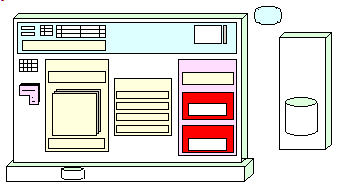
Usually the Server and the Clients are on different PCs, and communication between them is handled by network layers (TCP/IP or other). This can be represented as follows: - the Server includes
- the hard discs
- the Server code (SQL Server in our case)
- the network layers
- one or more Clients which include:
- the network layers (Tcp/Ip here)
- the Client layer (the Sql Server Client in our case)
- data base access components (ADO .Net)
- one or more software applications (an accounting project, a Web Portal
etc)
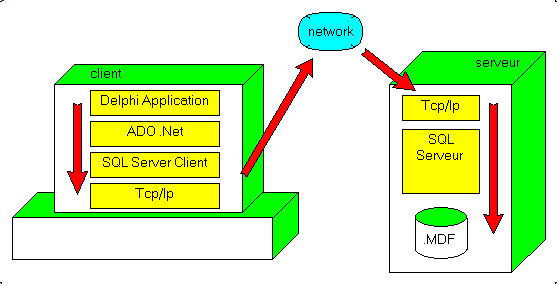
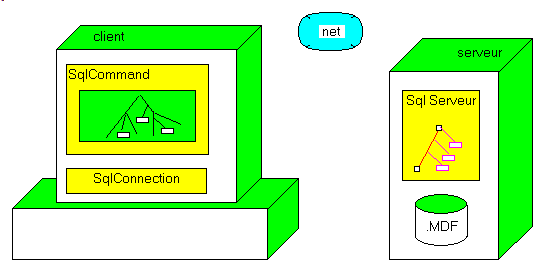
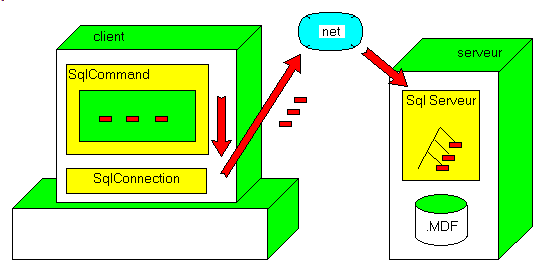
- the Server is put in listening mode. At some time, a Client sends a request:
- the Server analyzes the request, computes the answer and returns the complete answer set in one or more packages to the Client
- naturally, there are in general several Clients connected to the same Server:
To implement this scheme, we have to install:
- the Server part of SQL Server
- the Client part of SQL Server
- the Client data access components (the .NET Framework and its ADO.NET assembly)
- the development tool (Delphi 2006, or Turbo Delphi for .Net)
We already presented how to install the `free MSDE SQL Server part. To make a long story short: - use GOOGLE to find the MSDE Microsoft download page
- click on the setup
- use GOOGLE to find the Northwind Microsoft download page
- click on the .MSI file
If that does not work, use GOOGLE do locate the Colibri MSDE installation paper
which explains everything in detail, with snapshots and tests for every step. The .NET Framework is installed by the Delphi installer. The .NET Framework comes bundled with data access assemblies for handling SQL
Server and Oracle. So nothing else is required.
3 - ADO.NET Architecture We will present several Delphi projects that: - create and fill of database Tables
- fetch rows from the Server and display them in DataGrids
- let the user modify row values displayed in DataGrids, and update and reconcile those values with the Server data
Before using the data access components, let us first present the global ADO.NET architecture.
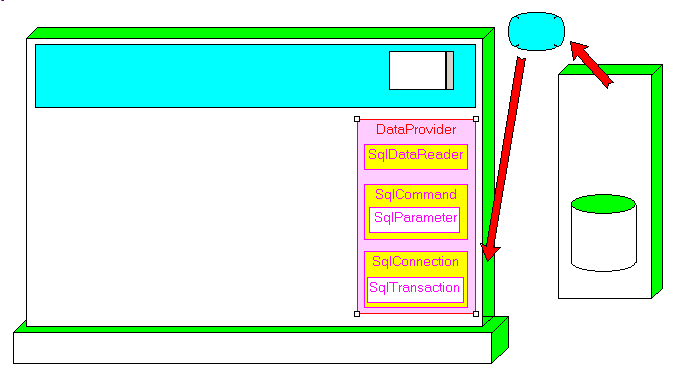
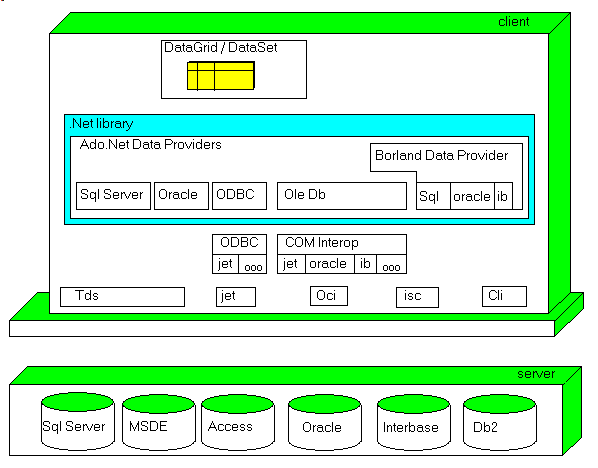
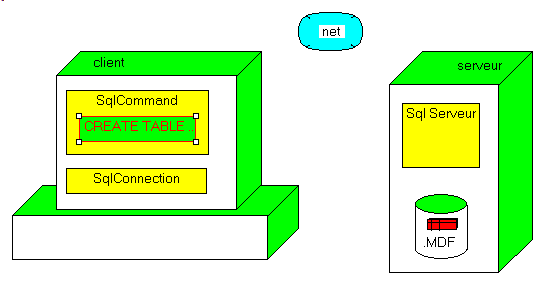
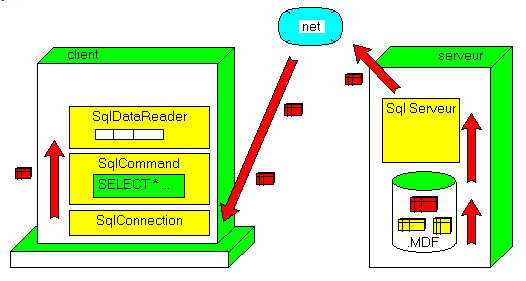
3.1 - Overall Architecture ADO.NET is made up of 4 component categories:
- the first layer directly talks to the data base and handles connection as well as request forwarding. These components are collectively called the DataProvider
and:
- SqlConnection connects to the Server (address, user name, password etc)
- SqlCommand is used to send requests (SELECT, CREATE, INSERT etc)
- SqlDataReader is used to fetch the result of SELECT requests. The rows received from the Server can be handled by our code (for computation or display purposes)
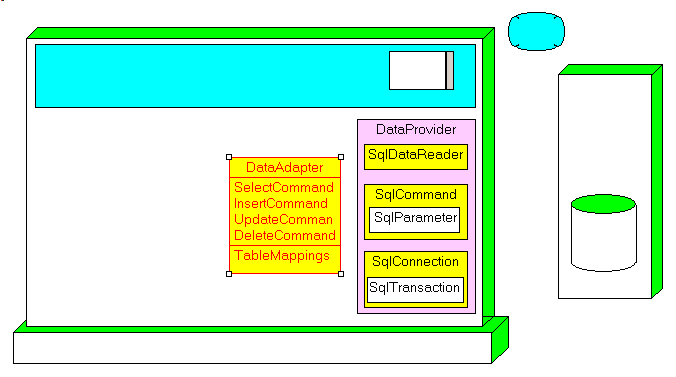
- an intermediate component transfers the data between the DataProvider and the components which store the data in memory: it is the DataAdapter. It contains:
- four SqlCommand components, one for each possible SQL request:
SELECT, INSERT, DELETE, UPDATE
- a TableMappings component, allowing to replace the syntactic table names
(Table1, Table2, ...) with semantic names (Invoice, Orders, ...)
We can represent the DataAdapter like this:
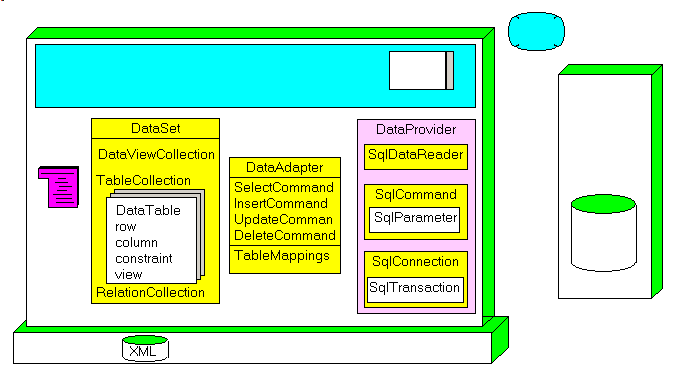
- the Table rows can be stored and handled in memory. Those rows are provided:
- by the DataAdapter
- by reading a disc file (XML for example)
- by Delphi code
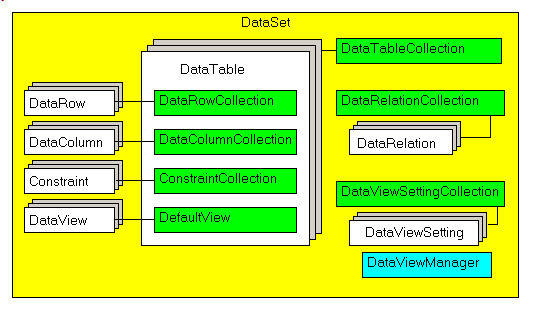
The memory storage components are called DataSet, and include: - a collection of DataTables
- constraints (NOT NULL etc)
- relations (foreign keys, cascading rules etc)
- views, used for filtering rows, projecting columns, sorting, aggregate computation, searching etc
Here are our memory components:
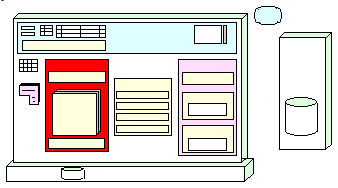
- finally, to display the rows and let the user modify them, we have
- controls, such as TextBox, ListBox or DataGrid
- DataBindings components which synchronize the modifications between the
visual controls and in memory data
Here is the visual part at the end of the chain: - as already mentioned, since the DataSet contains in-memory Tables, we can
- create the data by using Delphi code
- save and load the data from a file (XML or other)
- and the visual controls can also display data coming from other sources than some DataSet, for example an ARRAY or a tList:
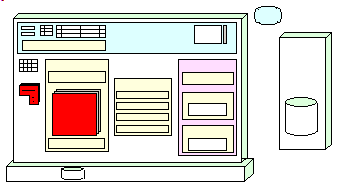
- the DataAdapter plays the role of a middle man:
The above figure show that the only Server dependent part is the DataProvider. In our case, which DataProvider should we use to handle SQL
Server tables ? Delphi is bundled with several DataProviders : - Sql Server and Oracle providers
- an ODBC provider, which can be used to handle ODBC drivers
- an OleDb provider. OleDb is the component set supposed to present a single interface for "all" data sources: SQL Servers, but also mail, Excel etc. So
there is an ADO.NET DataProvider allowing to handle OleDb sources
- a Borland Data Provider (BDP) which is a generalization of the ADO.NET DataProvider
ADO.NET DataProviders are specified by INTERFACEs. So any component set implementing those INTERFACEs can be used. In the case of SQL Server, we can use
- the SQL Server data provider (included in the .Net Framework)
- an ODBC data provider, if we have an ODBC driver for SQL Server
- an OleDb data provider (the OleDb provider is included in the .Net Framework),
- a BDP data provider, since Delphi has encapsulated the SQL Server OleDb provider in a BDP component
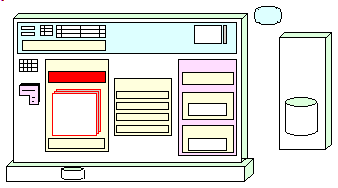
In red are all the routes available:
In this article, we will be interested in the direct programming ADO. Net, and will present the use of the the BDP for handling SQL Server Tables elsewhere.
4 - ADO.NET Programming
4.1 - Tasks We will present here: Our SQL Server parameters (specified when we installed SQL Server) are:
- server name : pol_1400_5\my_instance
- user: sa
- password: my_pass
You will use your own SQL Server parameters to establish the connection.
4.2 - Create Database
4.2.1 - Create Database request To create a database, we must: - open a connection to a system database called MASTER
- use the CREATE DATABASE request which will create at least 2 files
(the data file and a log file)
The syntax of the CREATE DATABASE request is:
CREATE DATABASE database_name
[ON
{ [PRIMARY]
(NAME = logical_name,
FILENAME ='physical_name'
[,SIZE = size]
[,MAXSIZE = max_size | UNLIMITED]
[,FILEGROWTH = growth_increment])
}[,...n]]
[LOG ON
{
(NAME = logical_name,
FILENAME = 'physical_name'
[,SIZE=size | UNLIMITED]
[,MAXSIZE = max_size | UNLIMITED]
[,FILEGROWTH = growth_increment])
}[,...n]]
[,COLLATE collation_name]
[FOR LOAD | FOR ATTACH]
|
We will use the minimal version of this request:
CREATE DATABASE invoice2
ON PRIMARY
(
NAME ='the_invoice_data'
, FILENAME = 'c:\programs\us\db\sql_server\_data\the_invoice_data.mdf'
)
LOG ON
(
NAME = 'the_invoice_log'
, FILENAME = 'c:\programs\us\db\sql_server\_data\the_invoice_log.ldf'
)
|
4.2.2 - Establish a connection to MASTER The steps are the following  | start Delphi
|
| | create a new Windows Forms application by selecting "file | New | Windows Forms Application" | |
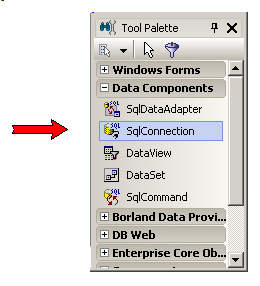
| collapse all parts of the Tool Palette, open the "DataComponent" tag, and select the SqlConnection component:
 | | | drag this component ON THE FORM |
 | Delphi will display SqlConnection1 in the nonvisual components area: 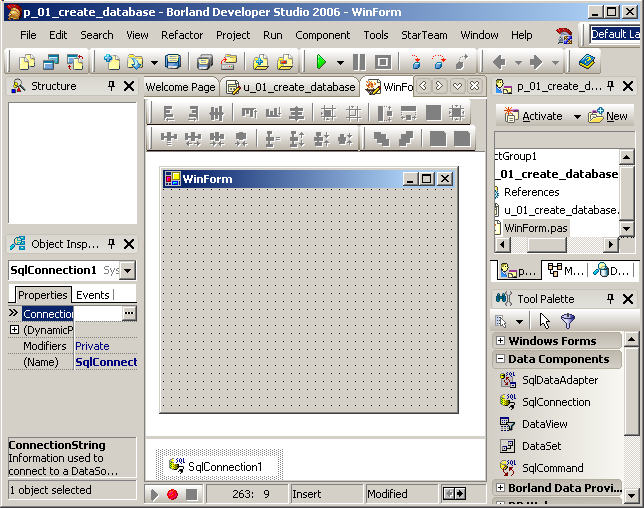
CAUTION: the SqlConnetction component must be dropped on the Form, and it will be displayed in the area below | | | click on SqlConnection1
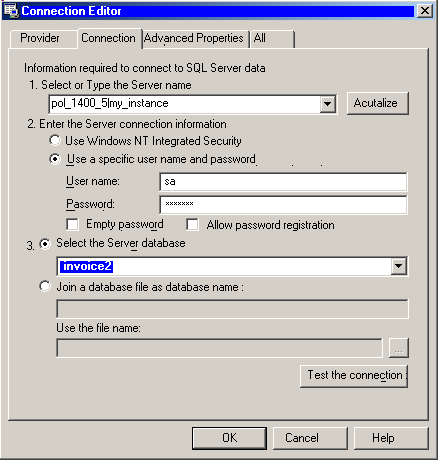
In the Object Inspector, select the "Connection" property, and click the ellipsis (the "..." box at the right) | | |
the connection editor is displayed 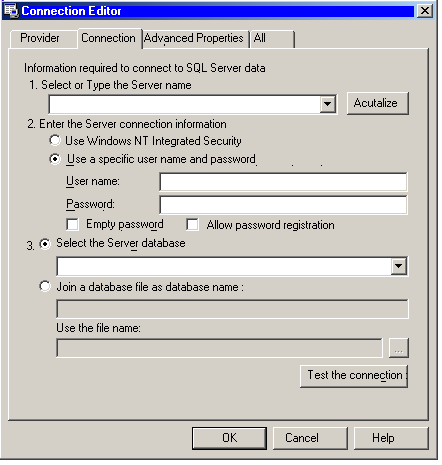 | | | enter
- the server name. In our case:
pol_1400_5\my_instance - the security parameters. "Nt Security" for us.
- the database name:
master
The connection dialog looks like this:
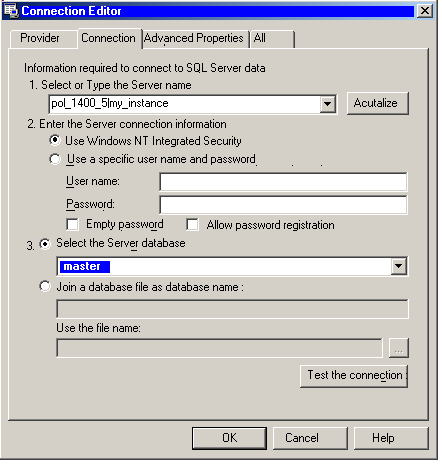 | | | click "Test" | |
| the connection is established 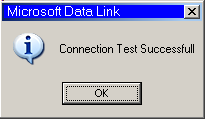
|
4.2.3 - Create the Database
We will now sent the CREATE DATABASE request | | place a Button on the Form, rename it "create_database_", double click on
the Button to create its Click method and add the Database creation code:
const k_create_database=
' CREATE DATABASE invoice2'
+ ' ON PRIMARY '
+ ' ('
+ ' NAME = ''the_invoice_data'' '
+ ' , FILENAME = ''c:\programs\us\db\sql_server\'
+ '_data\the_invoice_data.mdf'''
+ ' ) '
+ ' LOG ON '
+ ' ('
+' NAME = ''the_invoice_log'' '
+ ' , FILENAME = ''c:\programs\us\db\sql_server\'
+ '_data\the_invoice_log.ldf'' '
+ ' ) '
;
procedure TWinForm.create_database___Click(sender: System.Object;
e: System.EventArgs);
var l_c_sql_command: SqlCommand;
begin
SqlConnection1.Open;
l_c_sql_command:= SqlCommand.Create(k_create_database, Sqlconnection1);
try
l_c_sql_command.ExecuteNonQuery();
except
on e: exception do
display_bug_stop('*** err '+ e.Message);
end;
end; // create_database___Click
| |
| | compile, run and click "create_database" | | |
the files are created in the specified directory: 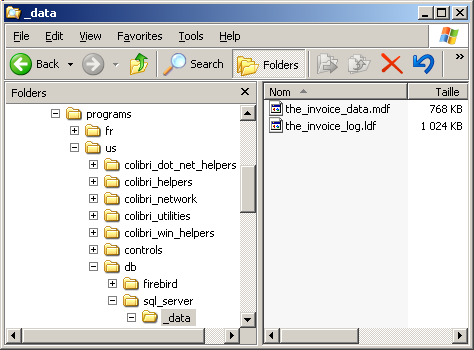
|
4.2.4 - Drop DataBase
If you want to remove the Datatabase, this is the SQL request:
4.2.5 - Display Database Names We also can list all the available Databases on our SQL Server with:
SELECT name FROM sysdatabases |
4.2.6 - The Creation project
Here is a snapshot of the project: 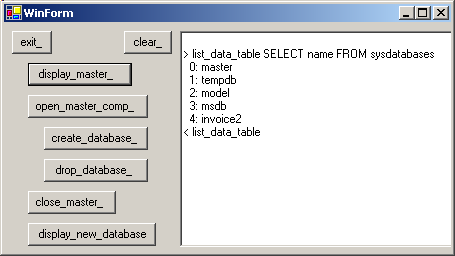 You can download here the 01_create_database.zip project
4.3 - ADO .Net connection We will now establish a connection between our Delphi application and the Server.
4.3.1 - The Data Explorer
The Delphi IDE presents in the top right corner a notebook with a "Data Explorer" tab. The explorer contains a TreeView with all possible drivers, including MSSQL: 
We can add to the MSSQL item an entry for our new INVOICE2 Database: | | click on the MSSQL line
| |
| only the default MsConnection1 will be displayed
| | |
right click on MSSQL, select "Add New Connection"
| | | Delphi tells us to enter the connection name
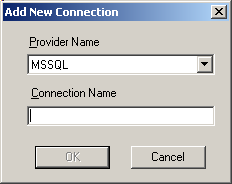 | | | type the name that the Data Explorer will display. In our case:
invoice_2_connection and click "Ok" | | | a new entry has been added to the MSSQL database list:
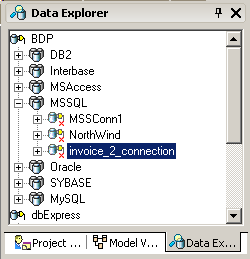 | | | to enter the connection's parameters, right click on "invoice_2_connection"
and select "modify connection" | | | a connection editor is displayed
| | |
enter the database name, the host name, the user name and the password 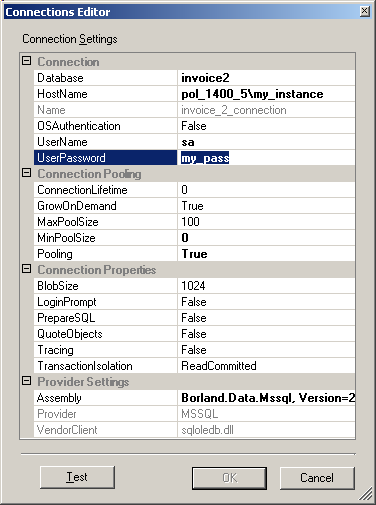 | | |
click "Test" to check the connection, and click "Ok"
|
Our first test was with the Database Explorer, which is a separate utility implemented in its own .EXE. We will now build our own Delphi Projects which
will be able to establish a connection to the newly created Database
4.3.2 - The BDP Connection First we will use a BDP Connection: | |
create a new Windows Forms application and rename it "p_11_sql_connect_invoice" | | |
in the Data Explorer, select the invoice_2_connection, DRAG IT and DROP IT on the Form | | |
Delphi will create a BdpConnection1 component, with all connection parameters already initialized (pointed by the yellow arrow). 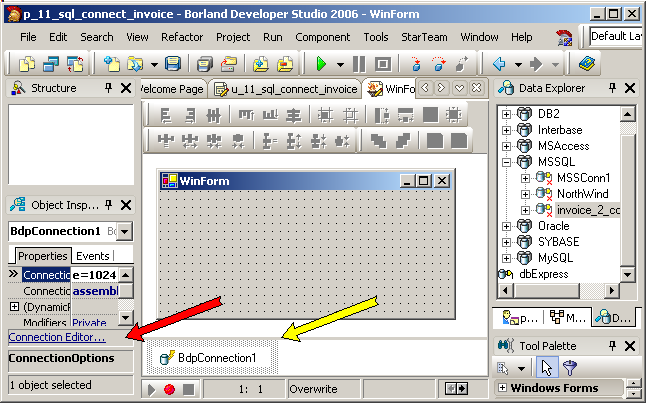 | |
| to check the parameters, click the "connection_editor" link, located at the bottom of the Object Inspector (pointed by the red arrow) | |
| Delphi will open the BdpConnection1 Connection Editor: 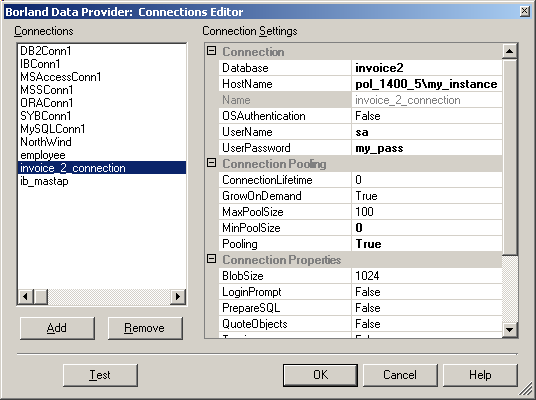 | |
| you can click "test" to check the connection
|
4.3.3 - Connection using an SqlConnection
In this article, we will not use the BDPConnection component, which is a Delphi generic connection component. We will use the native Sql Server connection wrapper, called SqlConnection.
In our global ADO .Net architecture, the Sql Connection is here displayed in red: Let's see the code now.
4.3.4 - Connecting by code
To stress what is involved in the connection, we will first perform the connection using code only. | |
add a Button to the Form, rename it "connect_", create its Click event, and type the connection code:
const k_user_sa= 'user id=sa';
k_password_me= 'Pwd = my_pass';
k_sspi_security= 'integrated security=SSPI';
k_server_name= 'SERVER= "pol_1400_5\my_instance"';
k_invoice_database_name= 'DATABASE= invoice2';
k_invoice_connection_string=
k_user_sa
+ ';'+ k_password_me
+ ';'+ k_sspi_security
+ ';'+ k_server_name
+ ';'+ k_invoice_database_name;
var g_c_sql_connection: SqlConnection= Nil;
procedure TWinForm.connect__Click(sender: System.Object;
e: System.EventArgs);
begin
g_c_sql_connection:= SqlConnection.Create(k_invoice_connection_string);
with g_c_sql_connection do
begin
// -- add the StateChange event
Include(StateChange, Self.SqlConnection1_StateChange);
display('> connect');
Open();
display('< connect');
end; // with g_c_sql_connection
end; // connect__Click
| The Include line simply adds a StateChange event to the dynamic g_c_sqlconnection component. Here is the code of the event | |
| in the CLASS add the event declaration: type
TWinForm = class(System.Windows.Forms.Form)
// -- ...
procedure SqlConnection1_StateChange(sender: System.Object;
e: System.Data.StateChangeEventArgs);
// -- ...
end;
| and here is the body of the event:
procedure TWinForm.SqlConnection1_StateChange(sender: System.Object;
e: System.Data.StateChangeEventArgs);
begin
display(System.String.Format('change {0} -> {1} ',
e.OriginalState, e.CurrentState));
end; // SqlConnection1_StateChange
| Compile, run and click "connect_" | |
| here is the snapshot of the connection: 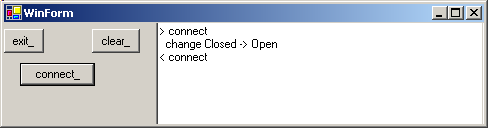
|
You may also add a "disconnect" button, which simple calls the SqlConnection.Close() method.
4.3.5 - Using the SqlConnection component Initializing all the parameters by code is quite boring and error prone, so the
standard way of connecting to an Sql Server Database is to use a SqlConnection component from the Tools Palette: | |
select the "Data Components" tab in the Tools Palette, select the SqlConnection component and drop in on the Form (this is already described in the create database paragraph above) |
| | click on the Form, click on the SqlConnection1 component below the Form,
and in the Object Inspector, click on the ConnectionString property | | |
Delphi will display the Sql Server Connection Editor. Notice that this editor is not the same as the BDP Connection Editor | | |
fill in the database name, the Server Name, the security kind and the Database Name:  | |
| instead of using the "integrated NT security", you can also use your user name and password ("sa" and "my_pass" in our case):
|
To download the source, click 11_sql_connect_invoice.zip
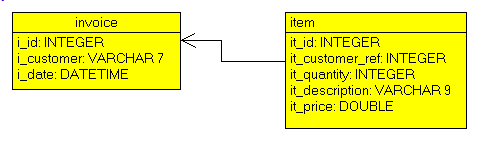
4.4 - Adding Tables 4.4.1 - The Table Content We will create two tables, mimicking a tiny invoicing system: - the INVOICE table contains an ID, the NAME of the customer and a DATE
- each invoice contains several items, each item being defined with an ID, a parent INVOICE NUMBER, the QUANTITY, the DESCRIPTION and the PRICE of the item
Here is a quick schema of our tables:
4.4.2 - The CREATE TABLE Request The standard CREATE TABLE request which will create our INVOICE table is the following:
CREATE TABLE invoice
(
i_id INTEGER NOT NULL PRIMARY KEY,
i_customer CHARACTER(7),
i_date DATETIME
)
| Please note that - the "i_" prefix that we added to all Invoice field name is a personal convention
4.4.3 - Sending the CREATE TABLE request
To send the SQL request to the SQL Server, we must - connect to the Database using a SqlConnection component
- use an SqlCommand component, connect it to the SqlConnection, fill in the
CommandText property with our request and call the SqlConnection.ExecuteNonQuery() method
For coding purposes, SQL requests are divided in two groups:
- the requests which modify in some way the data on the SQL Server: CREATE TABLE, DROP TABLE, ADD INDEX, INSERT rows, ALTER TABLE
parameters and so on. We simply send the text of the request to the Server, and do not expect any data in return (or possibly a success / error notification code)
- the request to retrieve some data (usually full rows, but also aggregates
like COUNT, AVERAGE, SUM etc). For those requests, the Client must first allocate a reception buffer.
Because in the first case the Client only receives a code (usually an Integer)
and in the second the Client must prepare a complete buffering apparatus, the methods used but all database components that we know use 2 different methods. In the case of ADO .NEt the methods are ExecuteNonQuery() and
ExecuteReader(). Therefore to create new Tables, we will call ExecuteNonQuery().
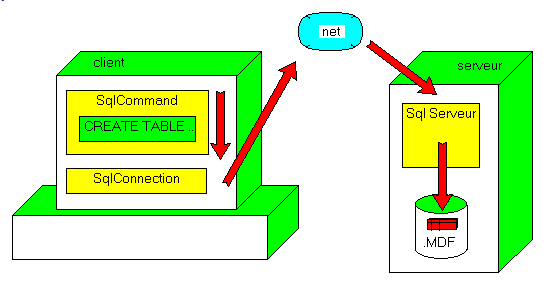
Here in red are the parts of the ADO .Net architecture involved:
And in detail:
- we use an SqlConnection and an SqlCommand components, and fill the CommandText property with the SQL request:
- using the ExecuteNonQuery() method, we send the request to the Sql Server which creates the Table
- the SQL Server enventually sends back an error code
4.4.4 - The creation code Here are the steps: | |
create a new Windows Forms application, and rename it "p_21_sql_create_table"
| | |
drop an SqlConnection component on the Form and initialize the connection string to be able to connect to our INVOICE database, as explained before. Check the connection
|
| | drop a Button, rename it "create_invoice_", create its Click event, and add the INVOICE Table creation code:
const k_create_invoice_table=
'CREATE TABLE invoice '+ k_new_line
+ ' ('+ k_new_line
+ ' i_id INTEGER NOT NULL PRIMARY KEY'+ k_new_line
+ ' , i_customer CHARACTER(7)'+ k_new_line
+ ' , i_date DATETIME'+ k_new_line
+ ' )';
procedure TWinForm.create_invoice__Click(sender: System.Object;
e: System.EventArgs);
var l_c_command: SqlCommand;
l_result: Integer;
begin
SqlConnection1.Open();
l_c_command:= SqlCommand.Create(k_create_invoice_table, SqlConnection1);
try
l_result:= l_c_command.ExecuteNonQuery();
display('Result '+ l_result.ToString);
except
on e: exception do
display_bug_stop(e.Message);
end;
end;
SqlConnection1.Close();
end; // create_invoice_Click
| | | |
execute, run, and click "create_invoice_" | | | here is the snapshot of our project:
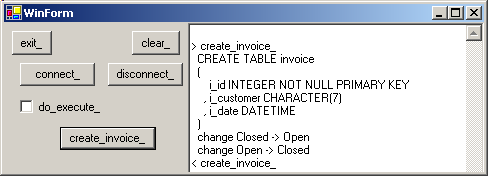
| Please note that: - we added a "connect" and a "disconnect" Button, just to check the connection
- we also have a "do_execute_" Checkbox: if this is not checked, clicking "create_invoice_" will merely display_the SQL Request. This allows us to check the SQL syntax, since any SQL Errors will take quite a while before we
get the control back.
- we also added TRY EXCEPT blocks, because the Exception.Message is reasonably understandable, whereas the .Net error stack is rather cryptic to us.
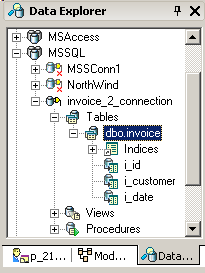
You can display the table in the Data Explorer
4.4.5 - Viewing the Table Schema We can use the SqlConnection to get back the Schema of any table. This involves an iDataReader INTERFACE which will be explained later. So we will
not explain this code now, but it is included in the downloadable .ZIP file
4.4.6 - Drop a Table To remove a Table from the database, we use the following SQL request:
The steps to send this request are the same as the code used for creating a table: | |
drop a Button, rename it "drop_invoice_", create its Click event, and add the code allowing us to drop the invoice table:
const k_drop_invoice_table= 'DROP TABLE invoice';
procedure TWinForm.drop_invoice__Click(sender: System.Object;
e: System.EventArgs);
var l_c_command: SqlCommand;
l_result: Integer;
begin
SqlConnection1.Open();
l_c_command:= SqlCommand.Create(k_drop_invoice_table, SqlConnection1);
if do_execute_.Checked
then begin
l_result:= l_c_command.ExecuteNonQuery();
display('Result '+ l_result.ToString);
end;
SqlConnection1.Close();
end; // drop_invoice__Click
| | | |
execute, run, and click "drop_invoice_" | | | here is the snapshot of our project: 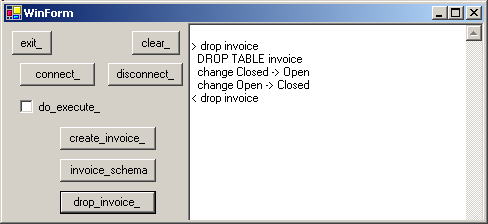
|
4.4.7 - The ITEM table We also added the code to create, display the schema, and drop the ITEM table. This second table will be used to display a Master Detail relation. The code is in the .ZIP.
4.4.8 - The complete project You can download the project here : 21_sql_create_table.zip
4.5 - Adding Rows
To add data rows to our INVOICE table, we use the following SQL request:
INSERT INTO invoice
(i_id, i_customer, i_date)
VALUES (101, 'Smith', '9/21/2006')
|
Using the same technique as the one used to create the Table, we could create a procedure for each row insertion. To automate this process somehow: - for each row to insert, we will use a line like the following:
| fill_the_invoice(100, 'Smith', '9/21/2006' |
- the text of our generalized insert procedure is:
procedure fill_the_invoice(p_id: Integer;
p_customer, p_date: System.String);
var l_values, l_request: System.String;
begin
l_values:= p_id.ToString
+ ', '''+ p_customer+ ''''
+ ', '''+ p_date+ '''';
l_request:= 'INSERT INTO invoice '
+ ' (i_id, i_customer, i_date) '+ k_new_line
+ ' VALUES ('+ l_values+ ')';
execute_non_query(do_execute_.Checked, l_request);
end; // fill_the_invoice
| - and the generic "execute_non_reader" procedure is:
procedure TWinForm.execute_non_query(p_do_execute: Boolean;
p_request: System.String);
var l_c_command: SqlCommand;
l_count: Integer;
begin
if p_do_execute
then begin
l_c_command:= SqlCommand.Create(p_request, SqlConnection1);
Try
l_count:= l_c_command.ExecuteNonQuery();
except
on e: exception do
display_bug_stop(e.Message);
end;
end;
end; // execute_non_query
|
Therefore: |
| create a new Windows Forms project and rename it "p_22_sql_fill_table"
| | |
drop a SqlConnection on the Form and initialize its ConnectionString
| | |
drop a Button on the Form and create its clic event. Type the instructions which fill the table by using the procedure described above:
procedure TWinForm.fill_invoice__Click(sender: System.Object;
e: System.EventArgs);
procedure fill_the_invoice(p_id: Integer; p_customer, p_date: System.String);
var l_values, l_request: System.String;
begin
l_values:= p_id.ToString
+ ', '''+ p_customer+ ''''
+ ', '''+ p_date+ '''';
l_request:= 'INSERT INTO invoice '
+ ' (i_id, i_customer, i_date) '+ k_new_line
+ ' VALUES ('+ l_values+ ')';
execute_non_query(do_execute_.Checked, l_request);
end; // fill_the_invoice
begin // fill_invoice__Click
SqlConnection1.Open();
fill_the_invoice(100, 'Smith', '9/12/2006');
fill_the_invoice(101, 'DevShop', '9/14/2006');
fill_the_invoice(102, 'EastMfg', '9/14/2006');
SqlConnection1.Close();
end; // fill_invoice__Click
|
| | | compile, execute, click "fill_invoice_" | | |
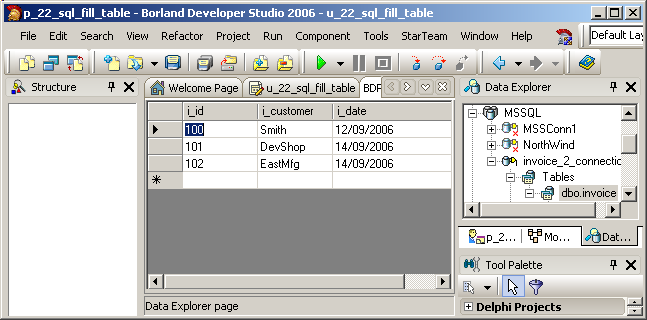
here is a snapshot of our project: 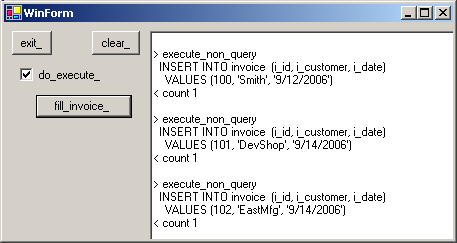
| Please note that : - our execute_non_query can be used for all SQL Server modification code
(everything but SELECT )
- the VALUES parameter requires some precautions:
- strings and dates must be surrounded by quotation marks
- if you send floating values (123.45), make sure that the decimal separator is the US dot (".") and not the one of your local Windows settings
- the dates must be with the US format (month/day/year) and must be between
quotation marks (if you forget the quotes, SQL will carries out a division !)
All those gory details can be hidden in the fill_the_invoice procedure
We can display (and edit) the rows using the Data Explorer:
4.5.1 - Deleting Rows
In order to carry out several tests, we added a request allowing to empty the Table. Removing rows is performed with the DELETE request. This request very
often includes a WHERE which specifies which rows should be deleted. If we forget the WHERE, all the row will be scraped ! Therefore, to delete the row with the ID 105, we could write:
DELETE
FROM invoice
WHERE i_id= 105
|
In our case we want to remove all the rows. So we will use a DELETE without any WHERE. Here is the code: |
| add a Button, rename it "delete_", create its Click event and write the deletion code. This code will call the execute_non_query procedure presented before:
const k_delete_all_invoice= 'DELETE FROM invoice';
procedure TWinForm.delete_invoice__Click(sender: System.Object;
e: System.EventArgs);
begin
SqlConnection1.Open();
execute_non_query(do_execute_.Checked, k_delete_all_invoice);
SqlConnection1.Close();
end; // delete_invoice__Click
|
| | | compile, execute, click "delete_invoice_" | | |
here is a snapshot of our project: 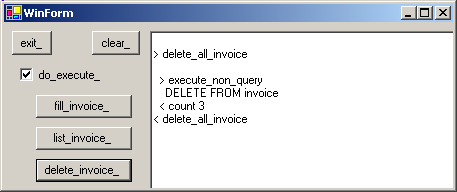
| Note that - the snapshot above displays a "list_invoice_" Button. The code is in the
.ZIP, but will be explained below
- our project also contains code to insert, list and delete ITEM rows
You will find this project in22_sql_fill_table.zip
4.5.2 - Modifying rows To modify the value of some fields of a Table, we use the UPDATE request. To change all "Smith" names into "Martin" names, we could use:
UPDATE invoice
SET i_customer= 'Martin'
WHERE i_customer= 'Smith'
|
We placed the code in a new project:
| | create a new project and rename it "p_23_sql_update_table"
| | |
drop a SqlConnection on the Form and initialize it's ConnectionString as explained above
| | |
drop a Button on the Form and create its Click event. Type the instructions which modify some rows, for example by changing all "Smith" into "Martin":
const k_update_invoice=
'UPDATE invoice' + k_new_line
+ ' SET i_customer= ''Martin''' + k_new_line
+ ' WHERE i_customer= ''Smith''';
procedure TWinForm.update_invoice__Click(sender: System.Object;
e: System.EventArgs);
begin
SqlConnection1.Open();
execute_non_query(do_execute_.Checked, k_update_invoice);
SqlConnection1.Close();
end; // update_invoice__Click
|
The execute_non_query procedure was explained before and was duplicated in the present code. | | | compile, execute, click "update_invoice_"
| | | here is a snapshot of our project: 
|
4.5.3 - Parameterized Queries When we send a complex requests (that was not the case above), the Server tries to optimize the order of the computations. This optimization, for
requests implying many Tables, can take hours. It is then recommended to proceed in 2 steps: - send a request containing the structure, but not all the literal values. The request contains placeholders for the future literal values. Since we only
want the Server to compute the order of the computations (but not the final result), the request is sent using a special Prepare() call:
- the Server then computes the best way to perform the computations:
- when the Client later wishes to retrieve a result, it sends the litteral
values of the parameters to the Server
- the request is now complete, and the Server computes the result and sends it back to the Client
To recap, parametrized queries are processed in two steps: - we send a request containing some unfilled positions, the parameters, and call Prepare()
- later, possibly several times, we send the parameter values to the Server,
and ask the Server to compute and perform the corresponding computation (an UPDATE in this paragraph, but a SELECT in the next paragraph)
Each SQL Engine and each access component set use a different syntax for specifying the parameters of parametrized queries: - either with a number (%1; %2, %3)
- or implicitely by position
- or with an arbitrary identifier (like :one, :x, :customer)
Sql Server uses @ followed by an identifier. So: Note that:
- each parameter must be explicitely created using Parameters.Add
- the type used depends on the SQL engine and the Database access component.
Our SQL Server SqlDbType.Int would become an FbDbType.Integer for FireBird, or a BdpType.Integer for Interbase using the BDP access components
Here is the complete code
| | drop another Button on the Form, rename it "prepare_", create its Click event and write the code which prepares the request:
const k_parametrized_update_request=
'UPDATE invoice '
+ ' SET i_customer= @i_customer'
+ ' WHERE (i_id= @old_i_id) '
;
var g_c_command: SqlCommand;
procedure TWinForm.prepare__Click(sender: System.Object;
e: System.EventArgs);
begin
g_c_command:= SqlCommand.Create(k_parametrized_update_request,
SqlConnection1);
SqlConnection1.Open();
g_c_command.Prepare();
end; // prepare__Click
|
| | | drop two TextBox on the Form where the User will place the ID and the CUSTOMER name | |
| drop another Button on the Form, rename it "execute_", create its Click event and write the code which fills in the parameters and executes the query:
const k_parametrized_update_request=
'UPDATE invoice '
+ ' SET i_customer= @i_customer'
+ ' WHERE (i_id= @old_i_id) '
;
var g_c_command: SqlCommand;
procedure TWinForm.prepare__Click(sender: System.Object;
e: System.EventArgs);
begin
g_c_command:= SqlCommand.Create(k_parametrized_update_request,
SqlConnection1);
SqlConnection1.Open();
g_c_command.Prepare();
end; // prepare__Click
|
| | | execute, run, and
- click "prepare_"
- input an ID and a NAME
- click "execute_"
| |
| here is the snapshot of our project: 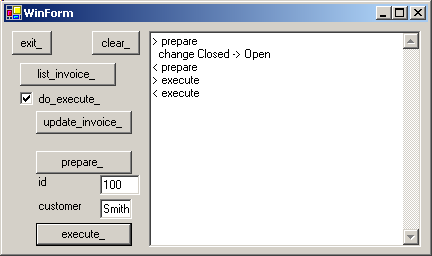
|
You will find the source code in
23_sql_update_table.zip
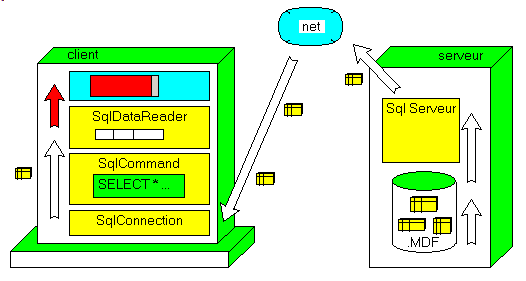
4.6 - Reading Data 4.6.1 - SqlDataReader To display or otherwise handle the content of a TABLE, we must fetch the data
from the Server. The components involved are: - an SqlConnection
- an SqlCommand
- an iDataReader object which allows us to read data rows
- possibly some display controls
Here is the overall architecture, with in red the DataReader and a TextBox:
4.6.2 - Reading Data
To fetch data from Tables, we use the SELECT request:
SELECT i_id, i_customer, i_date
FROM invoice
WHERE i_id< 102
|
This request works like this: - we send the request to the Server:
- we initialize an SqlCommand with the request
- we call the SqlCommand.ExecuteReader() function
- this call transparently allocates a one row buffer
- and the function returns an SqlDataReader() object which will be used to fetch the rows
- the Server uses the Tables present in the FROM clause to build a new table satisfying the constraints specified in the request (which columns, which rows). This new Table, called an "answer set", is sent back to the
Client:
- the SqlDataReader fetches those rows, and the Client carries out some computations on the rows. In our case, the rows are displayed in a TextBox:
Here are the steps: | | create a new Windows Forms Application, rename it "p_31_sql_display_data_reader"
|
| | drop an SqlConnection component on the Form and initialize the connection string to be able to connect to our INVOICE database, as
explained before. Check the connection | | |
drop a Button on the Form, rename it "display_invoice_", create its Clic event and type the code which calls ExecuteReader():
const k_select_training= 'SELECT * FROM invoice';
procedure TWinForm.display_invoice__Click(sender: System.Object;
e: System.EventArgs);
var l_c_command: SqlCommand;
l_c_reader: iDataReader;
l_row_index: Integer;
l_column_index: Integer;
l_display: String;
begin
l_c_command:= SqlConnection1.CreateCommand();
l_c_command.CommandText:= k_select_training;
SqlConnection1.Open();
l_c_reader:= l_c_command.ExecuteReader();
l_row_index:= 0;
while l_c_reader.Read() do
begin
l_display:= '';
for l_column_index:= 0 to l_c_reader.FieldCount- 1 do
l_display:= l_display+ ' '
+ l_c_reader.GetValue(l_column_index).ToString;
display(l_row_index.ToString+ ':'+ l_display);
Inc(l_row_index);
end; // while
SqlConnection1.Close();
end; // display_invoice_click
|
| | | execute, run, and click "display_invoice_" | | |
here is the snapshot of our project: 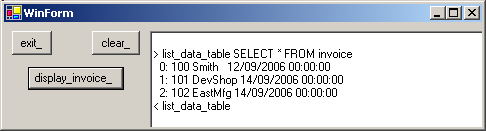
|
Please note that - we had already used DataReaders in the preceding projects:
- in the CREATE TABLE project
- in the INSERT INTO, as well as the UPDATE projects
- we used a iEnumerator to display the rows. We also could use an
iEnumerator for the fields. Since the iDataReader.FieldCount directly returns the field count, we used a FOR instead. Alternately we could use a
FOREACH construct, or in a ToString function to display the full row
4.6.3 - Filling a DataGrid by code We will now display the INVOICE rows in a DataGrid.
The following ADO Net components will be used: - SqlConnection and SqlCommand to fetch the data
- a DataAdapter to pump the data from the SqlCommand into a DataSet by calling Fill()
- a DataSet which will contain a DataTable where ALL the rows will be stored
- a DataGrid to display the data
This can be shown on our global architectural schema:
In the code: - we drop the components:
- an SqlCommand, with a valid SELECT
- a SqlDataAdapter containing a SqlCommand property referencing the SqlCommand object
- an empty DataSet
- we load the data
- by opening the connection
- by calling SqlDataAdapter.Fill(xxx)
- we can close connection
- we finally connect the single DataTable of our DataSet to a DataGrid
Those are the steps:
| | create a new Windows Forms application, and rename it "p_32_sql_display_datagrid_code"
| |
| drop an SqlConnection component on the Form and initialize the connection string to be able to connect to our INVOICE database, as explained before. Check the connection
| |
| from the "Data Controls" tag of the Tools Palette, select the DataGrid: 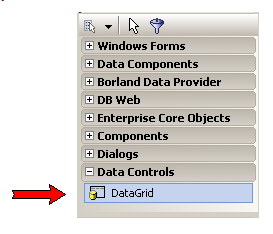 and drop it on the Form
| | | drop a Button, rename it "datatable_", create its Click event, and add
the code to fill the DataAdapter and display the data in a DataGrid:
const k_select_invoice= 'SELECT * FROM invoice';
procedure TWinForm.datatable__Click(sender: System.Object;
e: System.EventArgs);
var l_c_command: SqlCommand;
l_c_data_adapter: SqlDataAdapter;
l_c_data_set: Dataset;
l_c_data_table_invoice_ref: DataTable;
begin
l_c_command:= SqlCommand.Create(k_select_invoice, SqlConnection1);
l_c_data_adapter:= SqlDataAdapter.Create;
l_c_data_adapter.SelectCommand:= l_c_command;
l_c_data_set:= DataSet.Create('my_invoices');
SqlConnection1.Open();
l_c_data_adapter.Fill(l_c_data_set);
SqlConnection1.Close();
l_c_data_table_invoice_ref:= l_c_data_set.Tables[0];
// -- view a single table in the dbGrid
DataGrid1.DataSource:= l_c_data_table_invoice_ref;
end; // datatable__Click
| | | |
execute, run, and click "datatable_" | | | here is the snapshot of our project: 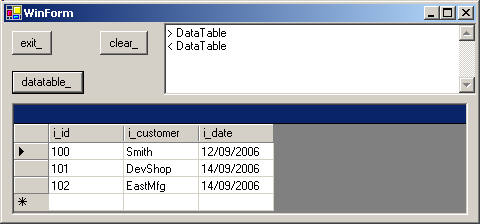
|
Some comments: - all the objects are created with local variables, which makes it possible to better understand which components are involved and how they interact
- the connection needs to be open only for the loading of the DataSet. Once the data has been transfered in memory, the connection can be closed
- it is FILL which is the key instruction. This instruction is called at
runtime. If we use a BdpDataAdapter, this can also be done by toggling BpdDataAdapter.Active to True at design time (but this is not possible with the SqlDataAadapter)
- with dbExpress, the dataflow "direction" is uniform:
tDataGrid -> tDataSource -> tClientDataset -> tDataProvider -> tSqlQuery -> tSqlConnection
but in ADO .Net, here Fill() reverses the chaining direction: tDataGrid -> tDataTable -> tDataTable <== tDataAdapter ->
tSqlCommand -> tSqlConnection - our SqlCommand.CommandText may contain several SELECT requests separated by ";" :
my_c_sql_command.CommandText:=
'SELECT * FROM invoice ; SELECT * FROM cities';
| In this case, the DataSet would contain several DataTables :
DataSet.Tables[0] and DataSet.Tables[1] The significant fact is that an ADO .Net DataSet contains a SET of
DataTable (or, more accurately, a collection of them). In Win32 Delphi, a "DataSet" is a generic name for a tQuery and a tTable, not a set of Tables
And this explains why we have to use DataSet.Tables[0] - finally we connect the DataGrid to our DataTable. We could also have connected the DataGrid to the DataSet:
procedure TWinForm.dataset__Click(sender: System.Object;
e: System.EventArgs);
var l_c_command: SqlCommand;
l_c_data_adapter: SqlDataAdapter;
l_c_data_set: Dataset;
begin
l_c_data_adapter:= SqlDataAdapter.Create;
l_c_data_adapter.SelectCommand:= SqlCommand.Create(k_select_invoice,
SqlConnection1);
l_c_data_set:= DataSet.Create('my_invoices');
SqlConnection1.Open();
l_c_data_adapter.Fill(l_c_data_set);
SqlConnection1.Close();
DataGrid1.DataSource:= l_c_data_set;
end; // dataset__Click
| with the following result: 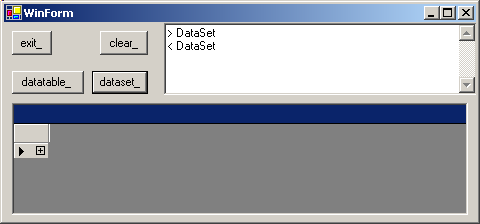
and when we click on "+": 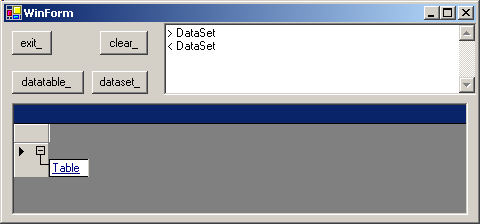 and on "table": 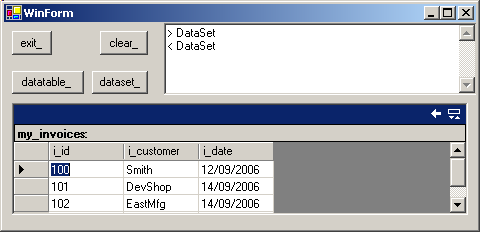 Note
- the title "my_trainings" was provided during the creation of the DataSet
- and the navigation icon with a left arrow at the top right corner of the DataGrid enables to fold the DataTable back.
This tree structure with only one TABLE is of little interest here, and this is why we connected the DataGrid directly to the single DataSet.Tables[0]
4.6.4 - DatGrid display with components
Instead of creating local components (for the command, the data adapter, the dataset), me can use components from the Tools Palette: | |
create a new Windows Forms application, and rename it "p_33_sql_display_datagrid"
| | |
drop an SqlConnection component on the Form and initialize the connection string to be able to connect to our INVOICE database, as explained before. Check the connection
|
| | from the "Data Components" tab of the Tools Palette select the SqlDataAdapter: 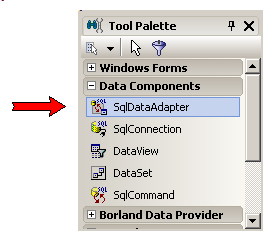
and drop it on the Form | | | click on the Form, then click on SqlDataAdapter1 | |
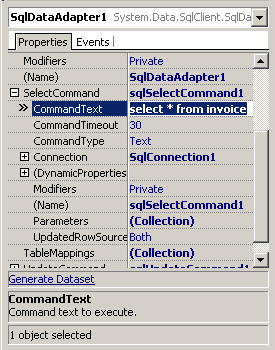
| the Object Inspector displays the properties of SqlDataAdapter | | |
input the SQL request:
- click on the SelectCommand to unfold it
- select the SqlConnection property and select SqlConnection1
- in the CommandText property, type the SQL request:
SELECT * FROM invoice
| | | here is the Object Inspector snapshot:
 | | |
click the "Generate Dataset" link located at the bottom of the Object Inspector | | |
Delphi generates a DataSet11 object, which is displayed below the Form | | |
from the "Data Controls" tab of the Tools Palette, select a DataGrid and drop it on the Form | | |
Click on the DataGrid. In the Object Inspector, select the DataSource property and link it to DataSet11 by typing Dataset11._Table | |
| the column names of the Table are displayed in the Datagrid: 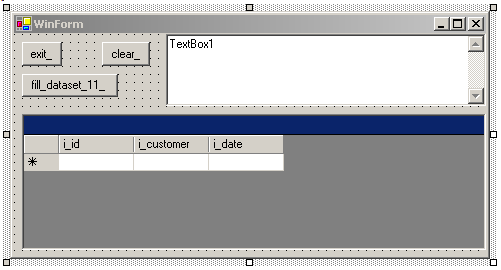 | |
| drop a Button on the Form, rename it "fill_dataset_11_", create its Click event and type the code which will fill the DataTable:
procedure TWinForm.fill_dataset_11__Click(sender: System.Object;
e: System.EventArgs);
begin
SqlConnection1.Open();
SqlDataAdapter1.Fill(DataSet11);
SqlConnection1.Close();
dataGrid1.DataSource:= DataSet11.Tables[0];
end; // fill_dataset_11__Click
| | | |
execute, run, and click "fill_dataset_11_" | | | here is the snapshot of our project: 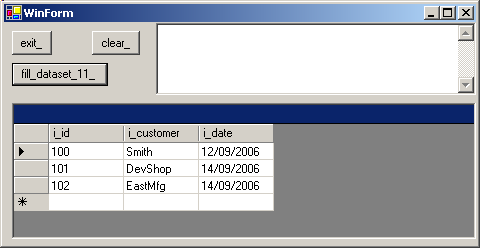
|
Please note that: - SqlDataAdapter.Fill() can only be called at runtime (not at design time)
- the DataSet generated is located in a special unit DataSet1Unit.pas that was created by Delphi when we clicked "Generate Dataset"
- instead of letting Delphi generate the DataSet, we could instead:
- drop a DataSet on the Form
- fill it and connect it in a ButtonClick event
The benefit of letting Delphi generate its own DataSet is to visualize the
columns of the Table in a DataGrid
- if we had used a BdpAdapter, we could have opened the BdpAdapter at design time (and would have seen live data at design time)
4.6.5 - Master Detail Relation Displaying linked tables is not very difficult. The main point is to find how to specify this link in the requests as well as in the DataGrids.
Lets display the invoices with their related items. The first trial is to build a JOIN between both tables: | | create a new Windows Forms application, and rename it
"p_34_sql_master_detail"
| | | drop an SqlConnection component on the Form and initialize the connection
string to be able to connect to our INVOICE database, as explained before. Check the connection
| | |
from the "Data Components" tab of the Tools Palette select an SqlDataAdapter and drop it on the Form | | |
click on the Form, then click on SqlDataAdapter1 | | | the Object Inspector displays the properties of SqlDataAdapter |
| | input the SQL request:
| | | from the "Data Components" tab of the Tools Palette, select a DataSet: 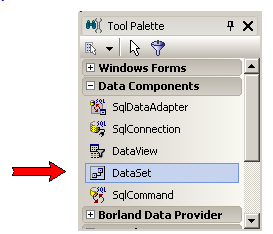
and drop in on the Form | | | from the "Data Controls" tab of the Tools Palette, select a DataGrid and drop it on the Form |
| | Click on DataGrid1. In the Object Inspector, select the DataSource property and link it to DataSet11 by typing
Dataset1.Table[0] | | | drop a Button, rename it "fill_", create its Click event, and add the
code to fill the DataSet1:
procedure TWinForm.fill__Click(sender: System.Object;
e: System.EventArgs);
begin
SqlConnection1.Open;
SqlDataAdapter1.Fill(DataSet1.Tables[0]);
DataGrid1.DataSource:= DataSet1.Tables[0];
SqlConnection1.Close;
end; // fill__Click
|
| | | execute, run, and click "fill_" | | |
here is the snapshot of our project: 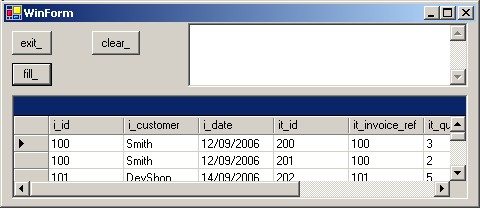
|
A little more tricky, but more interesting, let us display the INVOICEs and the
ITEMs in two separate DataGrids: | | from the "Data Components" tab of the Tools Palette select an SqlDataAdapter and drop it on the Form |
| | click on the Form, then click on SqlDataAdapter2 Input the SQL request: | | |
from the "Data Components" tab of the Tools Palette, select a DataSet and drop in on the Form | | |
from the "Data Controls" tab of the Tools Palette, select two DataGrids and drop them on the Form | | |
drop a Button, rename it "fill_2_", create its Click event, and add the code to fill the DataSet2 and display the data of both tables in the DataGrids:
procedure TWinForm.fill_2__Click(sender: System.Object;
e: System.EventArgs);
var l_c_master_column, l_c_detail_column: DataColumn;
begin
SqlConnection1.Open;
// -- fill the master AND the detail tables
SqlDataAdapter2.Fill(DataSet2);
l_c_master_column:= Dataset2.Tables[0].Columns['i_id'];
l_c_detail_column:= Dataset2.Tables[1].Columns['it_invoice_ref'];
// -- add relation
DataSet2.Relations.Add('my_relation', l_c_master_column, l_c_detail_column);
// -- link the tables
DataGrid2.DataSource:= DataSet2;
DataGrid2.DataMember:= 'Table';
DataGrid3.DataSource:= DataSet2;
DataGrid3.DataMember:= 'Table.my_relation';
SqlConnection1.Close;
end; // fill_2__Click
|
| | | execute, run, and click "fill_2_" | | |
here is the snapshot of our project: 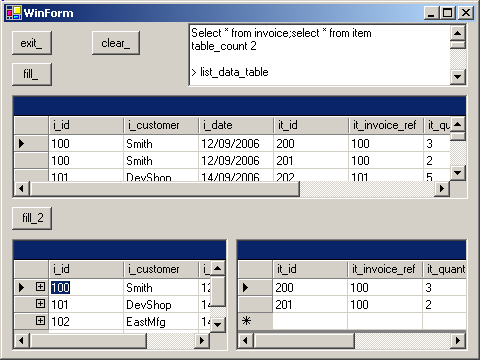
|
4.7 - In Memory DataSet
4.7.1 - The DataSet Architecture We will now examine the DataSet possibilities: filling, modifying, sorting, filtering etc. We could use a DataSet connected to and filled by a
DataAdapter, as we did above. It is more instructive to use an autonomous DataSet, than will be build and handled by code without any connection to the
SQL Server database. But remember that all the computations could be carried out on a DataSet linked to a SQL Server Table. This is the part of our global architecture diagram that we will focus on:
The DataSet is represented in the Microsoft documentation as an aggregate containing: - a collection of DataTable
- a collection of DataRelation
- a collection of DataView
We will first fill the DataTable by code:
4.7.2 - Creating a DataTable by code Our simple memory DataTable will contain simple invoices (identifier, name). We will - create the DataTable
- then create each column, by specifying its type and attributes.
Here how to create the table in memory | |
create a new Windows Forms application, and rename it "p_41_sql_create_in_memory"
| | |
drop a Button, rename it "create_data_table_", create its Click event, and add the following creation code:
var g_c_invoice_data_table: DataTable;
procedure TWinForm.create_data_table__Click(sender: System.Object;
e: System.EventArgs);
var l_c_data_column: DataColumn;
begin
display_line;
display('create_data_table');
g_c_invoice_data_table:= DataTable.Create();
g_c_invoice_data_table.Columns.Add('i_id', TypeOf(Integer));
l_c_data_column:= DataColumn.Create('i_customer',
TypeOf(System.String));
l_c_data_column.MaxLength:= 30;
l_c_data_column.AllowDbNull:= False;
g_c_invoice_data_table.Columns.Add(l_c_data_column);
Include(g_c_invoice_data_table.RowChanged, row_changed);
Include(g_c_invoice_data_table.ColumnChanged, column_changed);
end; // create_data_table__Click
| | | |
execute, run, and click "create_data_table_"
|
4.7.3 - Monitoring the Changes There is not much to display during the creation. But now we will add rows, modify values etc. and this can be traced in several
ways. First we can connect some events of the DataTable. The carefull reader will have detected the two Include() lines at the end of our creation procedure.
We did add the RowChanged and ColumnChanged events. To get a list of all possible events and their signatures, we used the .Net Help: | |
we selected any well known .Net type, like DataTable
| | | we pushed F1
| |
| the root of the Help is displayed: 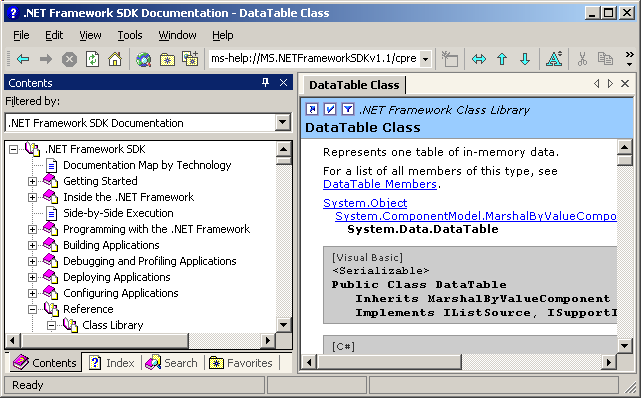
We directly skip the first levels of the TreeView, and go directly to the Class Library: Reference
Class Library
This branch displays all the main NameSpaces, and in particular Reference
Class Library
System.Data
DataTable Class
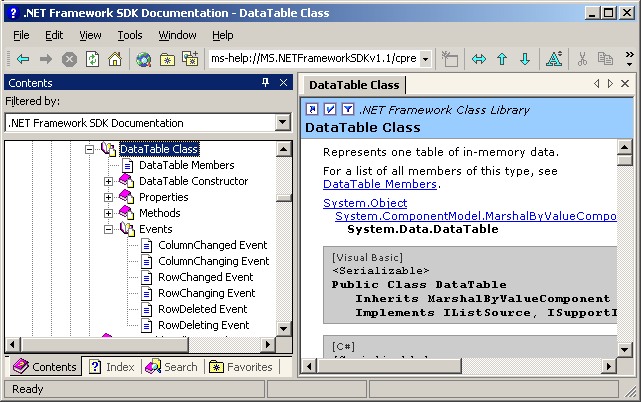
| If I had only one piece of advice for the newbie .Net developer, it would be to
become familiar with the .Net Help. And this is not very difficult: the main parts are - System (the basic types like Strings)
- System.Collection : the different containers, the enumerators
System.Data for ADO .Net (and System.Data.SqlClient for SQL Server)
- System.IO for file and directory handling and streams
- System.Net for network handling (TCP IP)
- System.Runtime for remoting
- System.Web for ASP .Net
- System.Windows.Forms for all the visual controls
And from there, its all Rock, Rattle and Roll !
And here is the code of our events: | | declare events RowChanged and EventChanged in the PUBLIC section of the
tWinForm CLASS, with the parameters displayed in our code snippet: type
TWinForm = class(System.Windows.Forms.Form)
// -- ...
public
constructor Create;
procedure row_changed(sender: tObject;
e: System.Data.DataRowChangeEventArgs);
procedure column_changed(sender: tObject;
e: System.Data.DataColumnChangeEventArgs);
end; // TWinForm
| and write the code to display somehow the changes:
procedure TWinForm.row_changed(sender: tObject;
e: System.Data.DataRowChangeEventArgs);
begin
display(System.String.Format('on_row_changed {0} ', e.Action)
+ ' : ' + f_display_data_row(e.Row, 2))
end; // row_changed
procedure TWinForm.column_changed(sender: tObject;
e: System.Data.DataColumnChangeEventArgs);
begin
display(System.String.Format('on_column_changed {0} ', e.ProposedValue)
+ ' : ' + f_display_data_row(e.Row, 2))
end; // column_changed
|
|
Note that:
- to avoid writing the events with their strange parameters, we could have dropped a DataSet on the Form, created the events, removed the bogus DataSet and graftet the orphan events to our in memory DataTable
4.7.4 - Filling the DataTable We can now fill the DataTable using the following technique: - the DataTable.NewRow() function creates and returns a new empty row
- using a reference of this row, we fill the fields
Here is how to proceed: | |
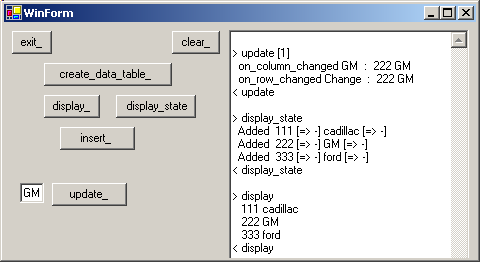
drop a Button on the Form, rename it "insert_", create its Click event and type the code which will create some lines with reasonable field values:
procedure TWinForm.insert__Click(sender: System.Object;
e: System.EventArgs);
procedure add_row(p_id, p_customer: System.String);
var l_c_data_row: DataRow;
begin
l_c_data_row:= g_c_invoice_data_table.NewRow();
l_c_data_row['i_id']:= p_id;
l_c_data_row['i_customer']:= p_customer;
g_c_invoice_data_table.Rows.Add(l_c_data_row);
end; // add_row
begin // insert__Click
add_row('111', 'cadillac');
add_row('222', 'gm');
add_row('333', 'ford');
end; // insert__Click
| | | | drop another Button, "display_", and write the code which displays the DataTable content |
| | execute, run, and click "insert_" and then "display_" | | |
here is the snapshot of our project: 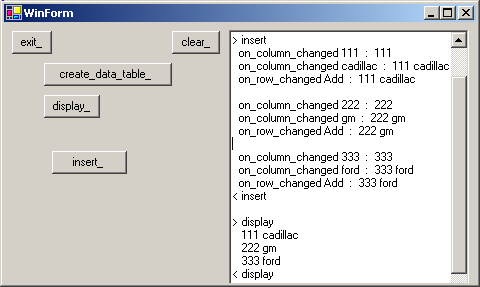
|
Note that: - for the display we used auxiliary routines. In fact, we placed these
procedures in a U_ADO_NET_HELPERS unit which is contained in the downloadable .ZIP
- the ADO .Net DataTable events look somehow sparse and not so systematic as
the very complete OnBefore and OnAfter events of Delphi DataSets.
Each row of a DataTable may contain state information: - a Current version (the value before a change)
- a Proposed version (the value after the change)
Here is how to get those versions: | |
drop a Button, rename it "display_all_", create its Click event, and add the code which will display for each row the current and propose versions, if any are available:
function f_display_data_row_state_version(p_c_data_row: DataRow;
p_column_count: Integer): System.String;
var l_column_index: Integer;
l_current_value, l_proposed_value, l_value: System.String;
begin
Result:= System.String.Format('{0} ', p_c_data_row.RowState);
for l_column_index:= 0 to p_column_count- 1 do
begin
if p_c_data_row.HasVersion(DataRowVersion.Current)
then l_current_value:= p_c_data_row[l_column_index,
DataRowVersion.Current].ToString()
else l_current_value:= '';
if p_c_data_row.HasVersion(DataRowVersion.Proposed)
then l_proposed_value:= p_c_data_row[l_column_index,
DataRowVersion.Proposed].ToString()
else l_proposed_value:= '';
l_value:= l_current_value;
if (l_current_value<> l_proposed_value)
then l_value:= l_value+ ' [=> '+ l_proposed_value+ ']';
Result:= Result+ ' '+ l_value;
end; // vor l_column_index
end; // f_display_data_row_state_version
procedure TWinForm.display_all__Click(sender: System.Object;
e: System.EventArgs);
var l_c_row_enumerator: iEnumerator;
l_c_data_row: DataRow;
l_display: System.String;
l_data_row_state: DataRowState;
l_state: String;
l_c_row_version: DataRow;
begin
l_c_row_enumerator:= g_c_invoice_data_table.Rows.GetEnumerator();
while l_c_row_enumerator.MoveNext() do
begin
l_c_data_row:= l_c_row_enumerator.Current as DataRow;
display(f_display_data_row_state_version(l_c_data_row, 2));
end; // while l_c_row_enumerator
end; // display_all__Click
| | | | execute, run, and click "insert_" and then "display_state_" | |
| here is the snapshot of our project: 
|
To display the values of the state enumeration, we used the Format function.
4.7.5 - Modifying Field Values We can also modify values of the DataTable: |
| add a TextBox to the Form
| | |
drop a Button, rename it "update_", create its Click event, and add the code which will change the second column of row 1 of the table, using the TextBox value:
procedure TWinForm.update__Click(sender: System.Object;
e: System.EventArgs);
var l_c_data_row: DataRow;
begin
l_c_data_row:= g_c_invoice_data_table.Rows[1];
l_c_data_row['i_customer']:= update_text_box_.Text;
end; // update__Click
| | | |
execute, run, and click "create_", "insert_" "update_" and "display_state_" | | | here is the snapshot of our project:
|
If our application includes validation rules, some modification could leave the
DataSet in an incorrect state (sum of the credits and debits etc). To avoid triggering errors, we can defer the validations by calling my_datarow.BeginEdit(), and after the modifications, either
my_datarow.Cancel() or my_datarow.EndEdit. In addition, calling my_datatable.AcceptChanges implicitely calls EndEdit for all the changed rows. Here is an example: |
| add a Checkbox to the Form and rename it BeginEdit
| | |
change the "update_" code by adding a call to Row.BeginEdit before the modification of the field value:
procedure TWinForm.update__Click(sender: System.Object;
e: System.EventArgs);
var l_c_data_row: DataRow;
begin
l_c_data_row:= g_c_invoice_data_table.Rows[1];
if begin_edit_.Checked
then l_c_data_row.BeginEdit;
l_c_data_row['i_customer']:= update_text_box_.Text;
end; // update__Click
| | | |
execute, run, and click "create_", "insert_", "beginedit_", "update_", "display_state_", "accept_changes_" and "display_changes" | | |
here is the snapshot of our project: 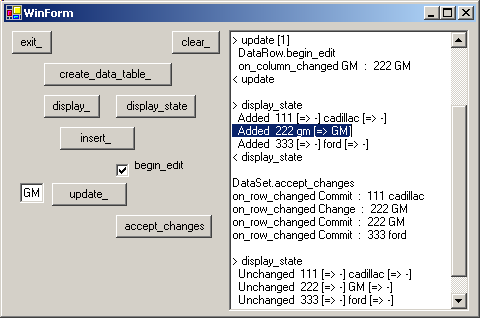
|
So: - when we call BeginEdit, all rows modified before EndEdit are recorded with
a modification marker, and the DataTable contains both the old value (called Current) and new value (called Proposed)
We can retrieve both Current and Proposed: - to use an enumerated value (like DataRowVersion.Proposed) , the syntax is:
my_enumerated_type.my_enumerated_value This is the Java way of denoting enumerated values - this BeginEdit EndEdit business somehow reminds us of the DataSet.Edit,
DataSet.Post mechanism of Delphi, and the handling of the row states is also similar to the Delphi ClientDataSet row state
4.7.6 - Deleting Rows
To remove a row from a DataTable, we simply call my_row.Delete(). The code is in the .ZIP The complete project which creates, inserts, updates and deletes is in the
downloadable 41_sql_create_in_memory.zip file
4.7.7 - Views Views allow us to get different representations of the raw DataTable: we can
sort, filter, compute aggregates, search the raw values. As this ADO .Net architecture picture shows, each DataSet contains a collection of such views:
And each DataTable has a default view:
my_c_data_view:= my_c_data_table.DefaultView;
|
We can use Views to sort the rows of a DataTable by calling
my_c_data_view.Sort:= 'i_customer ASC';
| Here is a complete example: |
| create a new Windows Forms application, and rename it "p_43_sql_dataview"
| | |
drop a Button, rename it "create_data_table", create its Click event, and add code to create an in memory Datatable (we create the DataSet because
we will access the DataView collection). Our DataTable has 3 columns (i_id, i_customer and i_amount):
var g_c_data_set: DataSet;
procedure TWinForm.create_data_set__Click(sender: System.Object; e: System.EventArgs);
var l_c_invoice_data_table: DataTable;
procedure create_column_definitions;
var l_c_data_column: DataColumn;
begin
l_c_invoice_data_table.Columns.Add('i_id', TypeOf(Integer));
l_c_data_column:= DataColumn.Create('i_customer', TypeOf(System.String));
l_c_data_column.MaxLength:= 15;
l_c_invoice_data_table.Columns.Add(l_c_data_column);
l_c_invoice_data_table.Columns.Add('i_amount', TypeOf(Double));
end; // create_column_definition
procedure insert_row_values;
procedure add_invoice(p_id: Integer; p_customer: System.String; p_amount: Double);
var l_c_data_row: DataRow;
begin
l_c_data_row:= l_c_invoice_data_table.NewRow();
l_c_data_row['i_id']:= p_id;
l_c_data_row['i_customer']:= p_customer;
l_c_data_row['i_amount']:= p_amount;
l_c_invoice_data_table.Rows.Add(l_c_data_row);
end; // add_invoice
begin // insert_row_values
add_invoice(201, 'apple', 1234.51);
add_invoice(202, 'exxon', 625.51);
add_invoice(203, 'dow', 334.51);
add_invoice(204, 'ibm', 134.51);
end; // insert_row_values
var l_c_data_view: DataView;
begin // create_data_set__Click
g_c_data_set:= DataSet.Create('business');
l_c_invoice_data_table:= DataTable.Create();
l_c_invoice_data_table:= g_c_data_set.Tables.Add('invoice');
create_column_definitions;
insert_row_values;
l_c_data_view:= DataView.Create(l_c_invoice_data_table);
display_data_view(l_c_data_view, 3);
end; // create_data_set__Click
| | | | drop a Button, rename it "sort_", create its Click event, and add code to sort the DataTable
procedure TWinForm.sort__Click(sender: System.Object;
e: System.EventArgs);
var l_c_sorted_data_view: DataView;
begin
l_c_sorted_data_view:= g_c_data_set.Tables[0].DefaultView;
l_c_sorted_data_view.Sort:= 'i_customer ASC';
display_data_view(l_c_sorted_data_view, 3);
end; // sort__Click
|
| | | execute, run, and click "create_data_table_" and "sort_" | |
| here is the snapshot of our project: 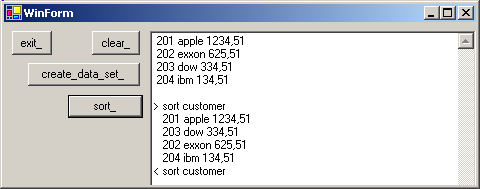
|
We can also search the DataSet to find a row with some value. The Find() function will return the DataRow containing this value:
my_c_table.DefaultView.Sort:= 'i_customer ASC';
my_find_index:= y_c_table.DefaultView.Find('ibm');
|
Let us stress that: - it is MANDATORY to sort the DataTable before calling Find(). An exception will be raised if this has not been done
- if you do not want to perform the Sort() on the original table, use an
auxilary table and resyncrhonize using a key value
Here is a complete example: - drop a TextBox on the Form
- drop a Button, rename it "find_", create its Click event, and add code to
sort first, and then look for the value contained in the TextBox
procedure TWinForm.find__Click(sender: System.Object;
e: System.EventArgs);
var l_c_sorted_data_view: DataView;
l_string_to_find: System.String;
l_find_index: Integer;
begin
l_string_to_find:= find_text_box_.Text;
// -- MUST sort
l_c_sorted_data_view:= g_c_data_set.Tables[0].DefaultView;
l_c_sorted_data_view.Sort:= 'i_customer ASC';
display_data_view(l_c_sorted_data_view, 3);
l_find_index:= l_c_sorted_data_view.Find(l_string_to_find);
display('found at '+ l_find_index.ToString);
end; // find__Click
| - execute, run, and click "create_data_table_" and "find_"
- here is the snapshot of our project:
We can filter out some rows by specifying a filtering expression in the RowFilter property:
my_c_data_table.DefaultView.RowFilter:= ' i_customer> ''g'' ';
|
Here is the code: | | drop a Button on the Form, name it "filter_", create its Click event and
add an expression which will filter the DefaultView:
procedure TWinForm.filter__Click(sender: System.Object;
e: System.EventArgs);
var l_c_filtered_data_view: DataView;
begin
l_c_filtered_data_view:= g_c_data_set.Tables[0].DefaultView;
l_c_filtered_data_view.RowFilter:= ' i_customer> ''g'' ';
display_data_view(l_c_filtered_data_view, 3);
end; // filter__Click
| | | | execute, run, and click "create_data_table_" and "filter_" | |
| here is the snapshot of our project: 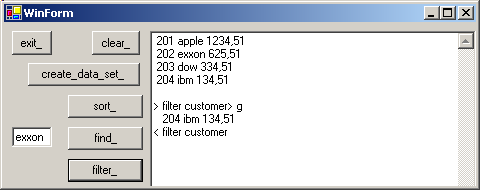
|
Note that
- we performed the filtering after all other examples. In our case, the filter only left one row, and sorting would not have been very interesting.
- there are all kinds of other possibilities: launching SQL requests on the
in memory DataSet, compute aggregates etc, but we will not present those in this tutorial.
4.8 - the DataBindings 4.8.1 - DataBindings Introduction
Displaying values of DataSets in controls (TextBox, ListBox, DataGrids ...) always involves DataViews. In fact, when we write:
my_data_grid.DataSource:= my_data_table;
| this will be understood as ("polymorphic magic"):
my_data_grid.DataSource:= my_data_table.DefaultDataView;
|
This works well when transfering data from the DataSet to a visual control. But in order to transfer modifications from a visual control back to the DataSet, we must use DataBindings:
These DataBindings are rather delicate to handle, and I found on Google several postings which were much more severe about them.
Anyway, the fundamental goal of DataBindings is to to define "synchronous movement zones": all the controls connected to a zone notify and are notified of any position changes in the underlying DataView.
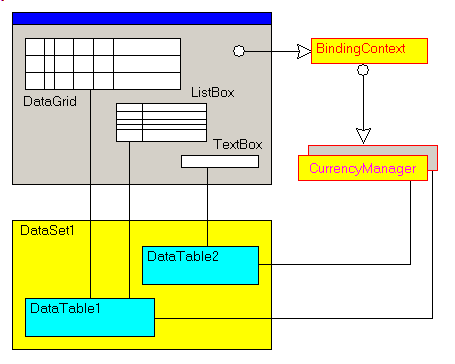
DataBindings are obtained via BindingContexts. These contexts are associated with VISUAL CONTROLS. Therefore, there are BindingContext associated with the
Form, the DataGrids, the TextBoxes etc. To keep things simple, we will use the BindingContext of the Form. A BindingContext enables us to recover a CurrencyManager, where "currency"
means "actual", "current" (nothing to do with money !). The Microsoft schema to explain this is:
And these DataBindings can be to use to synchronize - several visual controls, like DataGrids, ListBoxes, TextBoxes
- several data sources: DataView, of course, but also with in memory data
values or structures ARRAY OF xxx etc.).
DataBindings are of two types: - those used to synchronize simple data (an Integer)
- those used to synchronize lists of data (values of a column of a DataTable, data of an ARRAY, a Collection). In fact any CLASS that implements the iList INTERFACE.
4.8.2 - Simple DataBindings of a DataTable To add a binding to any visual control, we simply call
my_visual_control.DataBindings.Add(my_property, my_view, my_expression); | where - my_property specifies the linked property. For example 'Text' for a
TextBox
- my_view specifies the origin of the data. For example a DataSet or an ARRAY
- my_expression tells which part of the source is displayed. For example the column 'customer' of a DataSet
Once we have established the link, we create a CurrencyManager. The main property of the CurrencyManager is Position. By modifying the value of
Position (by code or using Buttons), we will change the position in the data.
Here is a first example with two TextBox and a DataTable : |
| create a new Windows Forms application, and rename it "p_43_sql_simple_data_binding"
| | |
declare a DataSet in the PUBLIC section of the Form type
TWinForm = class(System.Windows.Forms.Form)
// -- ...
public
m_c_data_set: DataSet;
constructor Create;
end; // TWinForm
|
| | | drop a Button, rename it "create_data_table_", create its Click event,
and add some code which will create and fill the DataSet:
procedure TWinForm.create_data_table__Click(sender: System.Object;
e: System.EventArgs);
var l_c_invoice_data_table: DataTable;
procedure create_column_definitions;
var l_c_data_column: DataColumn;
begin
l_c_invoice_data_table.Columns.Add('i_id', TypeOf(Integer));
l_c_data_column:= DataColumn.Create('i_customer', TypeOf(System.String));
l_c_data_column.MaxLength:= 15;
l_c_invoice_data_table.Columns.Add(l_c_data_column);
l_c_invoice_data_table.Columns.Add('i_amount', TypeOf(Double));
end; // create_column_definition
procedure insert_row_values;
procedure add_invoice(p_id: Integer; p_customer: System.String;
p_amount: Double);
var l_c_data_row: DataRow;
begin
l_c_data_row:= l_c_invoice_data_table.NewRow();
l_c_data_row['i_id']:= p_id;
l_c_data_row['i_customer']:= p_customer;
l_c_data_row['i_amount']:= p_amount;
l_c_invoice_data_table.Rows.Add(l_c_data_row);
end; // add_invoice
begin // insert_row_values
add_invoice(201, 'macy', 1234.51);
add_invoice(202, 'exxon', 625.51);
add_invoice(203, 'dow', 334.51);
add_invoice(204, 'ibm', 134.51);
end; // insert_row_values
begin // create_data_set__Click
m_c_data_set:= DataSet.Create('business');
l_c_invoice_data_table:= DataTable.Create();
l_c_invoice_data_table:= m_c_data_set.Tables.Add('invoice');
create_column_definitions;
insert_row_values;
end; // create_data_set__Click
| | | |
drop a TextBox to display the 'i_id' column, and rename it "id_text_box"
| | | drop a TextBox to display the 'i_customer' column, and rename it
"customer_text_box" | | | drop a Button on the Form, rename it "bind_data_table_", create its
Click event and add the code which will add a DataBinding to our TextBoxes and will create the CurrencyManager :
procedure TWinForm.bind_data_table__Click(sender: System.Object;
e: System.EventArgs);
var l_c_binding: Binding;
begin
l_c_binding:= Binding.Create('Text',
m_c_data_set, 'INVOICE.I_ID');
id_text_box_.DataBindings.Add(l_c_binding);
customer_text_box_.DataBindings.Add('Text',
m_c_data_set, 'invoice.i_customer');
g_c_currency_manager:=
BindingContext[m_c_data_set.Tables[0].DefaultView] as CurrencyManager;
Include(g_c_currency_manager.CurrentChanged, current_changed);
Include(g_c_currency_manager.PositionChanged, position_changed);
end; // bind_data_table__Click
| | | |
drop a Button on the Form, rename it "next_", create its Click event which will modify the position of the CurrencyManager:
procedure TWinForm.next__Click(sender: System.Object;
e: System.EventArgs);
begin
BindingContext[m_c_data_set, 'invoice'].Position:=
BindingContext[m_c_data_set, 'invoice'].Position+ 1;
end; // next__Click
| | | |
add a similar "previous_" Button | | | execute, run, and click "create_", "display_", "bind_", and "next_" | |
| here is the snapshot of our project: 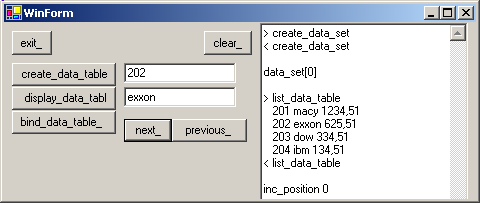
|
We will now bind visual controls to an ARRAY. This will work because in .Net, the dynamic ARRAYs do implement the iList INTERFACE. Here are the components involved:
We will create an ARRAY of invoice Objects: - this is the CLASS definition
type c_invoice=
class
Public
m_id: Integer;
m_customer: System.String;
m_amount: Double;
Constructor create_invoice(p_id: Integer;
p_customer: System.String; p_amount: Double);
procedure display_invoice;
property id : Integer read m_id write m_id;
property customer : System.String
read m_customer write m_customer;
property amount : Double
read m_amount write m_amount;
end; // c_invoice
| - and the table is defined by:
g_c_invoice_array: array of c_invoice;
|
And here is the code: | | create a new UNIT, rename it "u_c_invoice", and:
- define the c_invoice CLASS
- write its CONSTRUCTOR and display_invoice method
- add the id, customer and amount PROPERTIES
| | |
import this unit in the USE clause of our main unit | | | declare the ARRAY as a PUBLIC member of the Form |
| | drop a Button on the Form, rename it "create_array_", create its Click event and type the code which will create the table and fill it:
procedure TWinForm.create_array__Click(sender: System.Object;
e: System.EventArgs);
var l_invoice_index: Integer;
procedure add_invoice(p_id: Integer; p_customer: System.String;
p_amount: Double);
var l_c_invoice: c_invoice;
begin
l_c_invoice:= c_invoice.create_invoice(p_id, p_customer, p_amount);
g_c_invoice_array[l_invoice_index]:= l_c_invoice;
Inc(l_invoice_index);
end; // add_invoice
begin // create_array__Click
SetLength(g_c_invoice_array, 4);
l_invoice_index:= 0;
add_invoice(201, 'macy', 1234.51);
add_invoice(202, 'exxon', 625.51);
add_invoice(203, 'dow', 334.51);
add_invoice(204, 'ibm', 134.51);
end; // create_array__Click
| | | |
drop a TextBox which will display the id PROPERTY and call it array_id_text_box
| | |
drop a TextBox which will display the customer PROPERTY and call it array_customer_text_box | | |
drop a Button on the Form, rename it "bind_array_", create its Click event and add the code which will add DataBinding to each TextBox, and create the CurrencyManager :
procedure TWinForm.bind_array__Click(sender: System.Object;
e: System.EventArgs);
begin
array_id_text_box_.DataBindings.Add('Text', g_c_invoice_array, 'id');
array_customer_text_box_.DataBindings.Add('Text',
g_c_invoice_array, 'customer');
end; // bind_array__Click
| | | |
drop a Button on the Form, rename it "next_", create its Click event and modify the position of the CurrencyManager:
procedure TWinForm.next_t__Click(sender: System.Object;
e: System.EventArgs);
begin
BindingContext[g_c_invoice_array].Position:=
BindingContext[g_c_invoice_array].Position+ 1;
end; // next_t__Click
| and do the same to decrement the Position | |
| execute, run, and click "create_", "display_", "bind_", and "next_" | | |
here is the snapshot of our project: 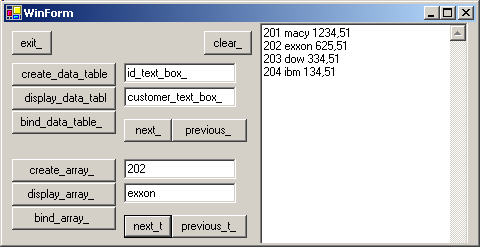
|
Some notes:
- we placed the DataSet and ARRAY declarations in the Form CLASS. I imagine that it facilitates the communications with the ContextManager
- the CurrencyManager is only used to move the Position
- for the ARRAY, the data that we want to display must be in the PUBLIC parts of the c_invoice CLASS, and even presented as a PROPERTY (a
simple member is not enough)
- the preceding results not very impressive. 8 hours of battle to find out how to connect the different parts. We find .Net to be too "detailed" (too fine
granularity) and "hyper polymorphic" (between "()" or "[ ]" you can place almost anything, the compiler accept the code, but you might have to reboot after trying to run the project).
Are the DataBindings worth all these efforts ? Somehow yes, since they are the necessary path between the visual components and the data (the in-memory DataTable, and from there the Sql Server).
4.9 - Modifying Server Tables 4.9.1 - Update Introduction We already presented how to directly write SqlCommand to change data values.
But this was done by code only. We are concerned here with modifications using visual controls. To let the user modify Server data, we proceed into two stages
- we modify the data of an in memory DataTable (generally linked to visual controls)
- and we call DataAdapter.Update
When DataAdapter.Update is called, the SQL request which add, modify or
delete data are sent to the Server. These SQL requests are: - either explicitely written by the programmer
- or automatically generated by the DataAdapter. The generator uses the
SELECT Command which was used to load the DataTable in the first place
4.9.2 - Changing data by code Let us first modify the data by hand (not by typing values in visual controls).
Here is the modifying code: | | create a new Windows Forms application, and rename it "p_51_sql_update_via_code"
| |
| drop an SqlConnection component on the Form and initialize the connection string to be able to connect to our INVOICE database, as
explained before. Check the connection
| | |
drop a Button, rename it "change_invoice_", create its Click event, and change some values of the in memory DataTable:
procedure TWinForm.change_invoice__Click(sender: System.Object;
e: System.EventArgs);
var l_c_invoice_data_table: DataTable;
l_c_data_row: DataRow;
begin
g_c_data_adapter:= SqlDataAdapter.Create(k_select_invoice, SqlConnection1);
g_c_data_set:= DataSet.Create('my_dataset');
g_c_data_adapter.TableMappings.Add('Table', 'my_invoice');
g_c_data_adapter.Fill(g_c_data_set);
l_c_invoice_data_table:= g_c_data_set.Tables['my_invoice'];
display_data_table(l_c_invoice_data_table);
// -- insert a row
l_c_data_row:= l_c_invoice_data_table.NewRow();
l_c_data_row['i_id']:= Convert.ToInt32(id_textbox_.Text);
l_c_data_row['i_customer']:= customer_textbox_.Text;
l_c_invoice_data_table.Rows.Add(l_c_data_row);
// -- modify a row
l_c_data_row:= l_c_invoice_data_table.Rows[3];
l_c_data_row['i_customer']:= customer_textbox_.Text;
// -- delete a row
l_c_invoice_data_table.Rows[Convert.ToInt32(delete_id_textbox_.Text)].Delete;
end; // change_invoice__Click
|
|
To update the Server Tables, we could simply call DataAdapter.Update(). But in order to visualize the SQL requests used by the DataAdapter, we use a CommandBuilder, which will display those requests.
This is the code: | | drop a Button on the Form, rename it "update_command_builder_" and type the following code in its Click event:
procedure TWinForm.update_commandbuilder__Click(sender: System.Object;
e: System.EventArgs);
var l_c_command_builder: SqlCommandBuilder;
l_c_data_adapter: SqlDataAdapter;
begin
g_c_data_adapter.Update(g_c_data_set);
display(l_c_command_builder.GetUpdateCommand.CommandText);
end; // update_commandbuilder__Click
| | | |
execute, run, and click "display_", "change_", "update_", "display_" | | | here is the snapshot of our project:
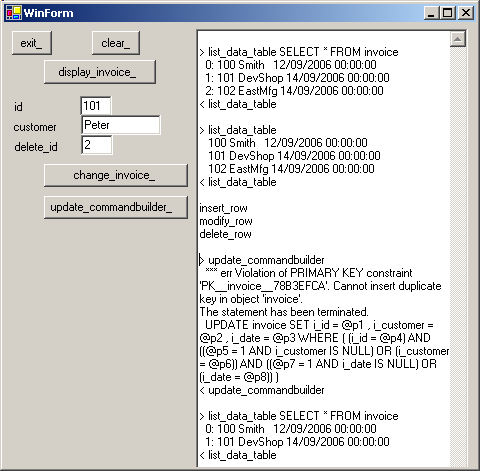
|
The request displayed by CommandBuilder is rather complex, but basically it tries to avoid comparing NULL values
4.9.3 - Writing custom SQL requests If we know that only certain columns will be modified, it is more efficient to generate our own optimized SQL. This is how it works:
- we examine each line of the DataTable, and check its State value: if the row was somehow changed, we write and sent the relevant SQL request
- for INSERT, it is very simple: we simply use the new values to fill the VALUES clause of the INSERT INTO request
- for UPDATE we stumble, as always, on the problem of concurrent accesses:
- in the WHERE clause we must specify which rows we want to modify
- the in-memory DataSet still contains the original values that we fetched at the time of the SELECT call, and we therefore know the original key (ID) of the row. So we can ask to modify the row having this previous
key
- we can also, if the application requires it, check that other values did not change. For a plane reservation, we certainly also would check that the available seats did not change between the SELECT call and the
reservation request (the customer could ask whether there are some available seats, think for some time, and later, much later, finally decide to book a flight). In this case, we could include in the
WHERE clause some code checking that the actual Server data did not change, by comparing the available seats to those available when we first sent the SELECT
Here is how to write the parametrized queries: | | drop a Button on the Form, rename it "update_manual_" and type the
updating code in its Click event: a WHILE loop checks the state of each row and calls the relevant updating sub-procedure:
procedure TWinForm.update_manual_sql__Click(sender: System.Object;
e: System.EventArgs);
var l_c_row_enumerator: iEnumerator;
l_c_row: DataRow;
begin // submit_updates
SqlConnection1.Open();
l_c_row_enumerator:= g_c_data_set.Tables[0].Rows.GetEnumerator();
while l_c_row_enumerator.MoveNext() do
begin
l_c_row:= l_c_row_enumerator.Current as DataRow;
case l_c_row.RowState of
DataRowState.Added : do_insert_row(l_c_row);
DataRowState.Modified : do_update_row(l_c_row);
end; // case
end; // while l_c_row_enumerator
SqlConnection1.Close();
end; // update_manual_sql__Click
| For INSERT we directly write the request:
procedure do_insert_row(p_c_added_row: DataRow);
var l_values, l_request: System.String;
var l_c_command: SqlCommand;
begin
l_values:= p_c_added_row['i_id'].ToString
+ ', '''+ p_c_added_row['i_customer'].ToString+ ''''
+ ', '''+ p_c_added_row['i_date'].ToString+ ''''
;
l_request:= 'INSERT INTO invoice '
+ ' (i_id, i_customer, i_date) '+ k_new_line
+ ' VALUES ('+ l_values+ ')';
l_c_command:= SqlCommand.Create(l_request, SqlConnection1);
l_c_command.ExecuteNonQuery;
end; // do_insert_row
|
And for UPDATE we use a parameterized request:
procedure do_update_row(p_c_modified_row: DataRow);
const k_update_invoice=
'UPDATE invoice '
+ ' SET i_customer= @i_customer '
+ ' WHERE i_id= @i_id';
var l_c_command: SqlCommand;
begin
l_c_command:= SqlCommand.Create(k_update_invoice, SqlConnection1);
l_c_command.Parameters.Add('@i_id', SqlDbType.Int);
l_c_command.Parameters.Add('@i_customer', SqlDbType.VarChar, 7);
l_c_command.Parameters['@i_id'].Value:= p_c_modified_row['i_id',
DataRowVersion.Original];
l_c_command.Parameters['@i_customer'].Value:=
p_c_modified_row['i_customer'];
l_c_command.ExecuteNonQuery;
end; // do_update_row
|
| | | execute, run, and click "display_", "change_", "update_manual", "display_" | |
| here is the snapshot of our project: 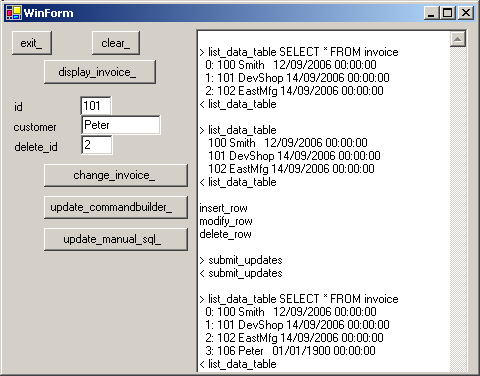
|
4.9.4 - Modification using visual controls We can change the Table values using visual controls. Here the project: | |
create a new Windows Forms application, and rename it "p_52_sql_update_via_datagrid"
| | |
drop an SqlConnection component on the Form and initialize the connection string to be able to connect to our INVOICE database, as explained before. Check the connection
|
| | add a DataAdapter, a DataSet and a DataGrid as explained before. Also add a Button to call the DataAdapter.Fill method
const k_create_invoice_table=
'CREATE TABLE invoice '+ k_new_line
+ ' ('+ k_new_line
+ ' i_id INTEGER NOT NULL PRIMARY KEY'+ k_new_line
+ ' , i_customer CHARACTER(7)'+ k_new_line
+ ' , i_date DATETIME'+ k_new_line
+ ' )';
procedure TWinForm.create_invoice__Click(sender: System.Object;
e: System.EventArgs);
var l_c_command: SqlCommand;
l_result: Integer;
begin
SqlConnection1.Open();
l_c_command:= SqlCommand.Create(k_create_invoice_table, SqlConnection1);
try
l_result:= l_c_command.ExecuteNonQuery();
display('Result '+ l_result.ToString);
except
on e: exception do
display_bug_stop(e.Message);
end;
end;
SqlConnection1.Close();
end; // create_invoice_Click
| | | |
drop a Button, create its Click event, and add the code which calls DataAdapter.Update() | | |
execute, run, click "fill_", modify some values, then click "update_" | | | here is the snapshot of our project:
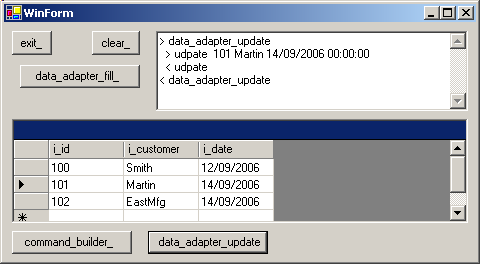
|
5 - Download the Sources Here are the source code files: The .ZIP file(s) contain:
- the main program (.DPR, .DOF, .RES), the main form (.PAS, .DFM), and any other auxiliary form
- any .TXT for parameters, samples, test data
- all units (.PAS) for units
Those .ZIP
- are self-contained: you will not need any other product (unless expressly mentioned).
- for Delphi 6 projects, can be used from any folder (the pathes are RELATIVE)
- will not modify your PC in any way beyond the path where you placed the .ZIP (no registry changes, no path creation etc).
To use the .ZIP: - create or select any folder of your choice
- unzip the downloaded file
- using Delphi, compile and execute
To remove the .ZIP simply delete the folder. The Pascal code uses the Alsacian notation, which prefixes identifier by
program area: K_onstant, T_ype, G_lobal, L_ocal, P_arametre, F_unction, C_lasse etc. This notation is presented in the Alsacian Notation paper.
As usual:
- please tell us at fcolibri@felix-colibri.com if you found some errors, mistakes, bugs, broken links or had some problem downloading the file. Resulting corrections will
be helpful for other readers
- we welcome any comment, criticism, enhancement, other sources or reference suggestion. Just send an e-mail to fcolibri@felix-colibri.com.
- or more simply, enter your (anonymous or with your e-mail if you want an answer) comments below and clic the "send" button
- and if you liked this article, talk about this site to your fellow developpers, add a link to your links page ou mention our articles in your blog or newsgroup posts when relevant. That's the way we operate:
the more traffic and Google references we get, the more articles we will write.
6 - The author Felix John COLIBRI works at the Pascal
Institute. Starting with Pascal in 1979, he then became involved with Object Oriented Programming, Delphi, Sql, Tcp/Ip, Html, UML. Currently, he is mainly
active in the area of custom software development (new projects, maintenance, audits, BDE migration, Delphi
Xe_n migrations, refactoring), Delphi Consulting and Delph
training. His web site features tutorials, technical papers about programming with full downloadable source code, and the description and calendar of forthcoming Delphi, FireBird, Tcp/IP, Web Services, OOP / UML, Design Patterns, Unit Testing training sessions.
|