| Delphi Mobile Point of Sale Software - Felix John COLIBRI.
Using FireBase, FireDac, DataSnap, Rest, Wifi, and FireMonkey | - abstract : Android tablet or smartphone point of sale application using a
WIFI connection to a DataSnap REST Server connected with FireDac to a FireBird database
- key words : Android, WIFI, point of sale device, REST Client, REST Server, JSON, DataSnap methods, FireDac, FireBird
- software used : Windows XP Home, Delphi XE7, Android 4.3
- hardware used : Pentium 2.800Mhz, 512 M memory, 140 G hard disc, Samsung Galaxy Nexus, Android 4.3
- scope : Delphi Xe6 to Xe8, Delphi Seattle, Delphi Berlin
- level : Delphi developer
- plan :
1 - WIFI Point of Sale devices
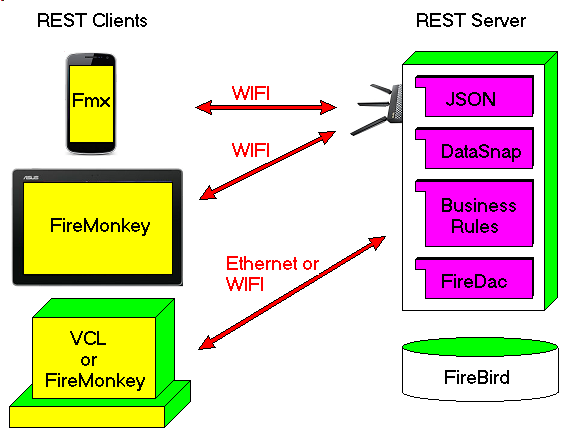
For Shop management, data is usually centralized in some database, but the shop workers move around the shop and must have access to this database. Wifi is quite adapted to solve this kind of problem.
From a Delphi point of view, this can be implemented using - Firemonkey for the Client mobile device (smartphone, tablet, dedicated mobile device)
- REST services for communications between the client and the server
- to offer those services from the server, FireBase as a database, FireDac for data access, DataSnap as a REST server and Json for packet formatting
The objective is to display on a tablet the content of one or several table
contents. The mobile device will interrogate a Server who which will load the data and send it over to the Client.
In this article we will present the structure of such a REST Server / REST clients architecture : - the Rest Server
- a Rest Client on a PC using the VCL
- a Rest Client using FireMonkey for the shop workers
2 - The Rest Server 2.1 - The choice of the components The Database can be any database. We chose FireBase which is installed in 3
minutes sharp and, according to some surveys, is the most popular database for Delphi users. But you can use Oracle, Sql Server, Postgres, Interbase, MySql etc. To communicate with the Clients, the Server can use any transfer protocol.
However this protocol must be compatible with the mobile devices, and, in this case, Rest is a good solution. To implement Rest services, a Tcp Server could be used. We would have to handle
the marshalling / unmarshalling of the objects ourselves. Here comes JSon, which was just created for this very purpose: transfer objets from one place to the other. And for JSon, FireDac offers an out of the box library.
Finally the Client must be able to request the data. If the data is in the form of objects, DataSnap with methods (function returning objects in our case) can be used.
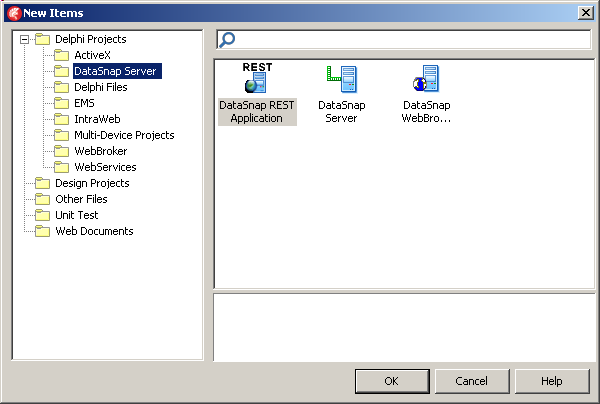
2.2 - Building the DataSnap Rest Server
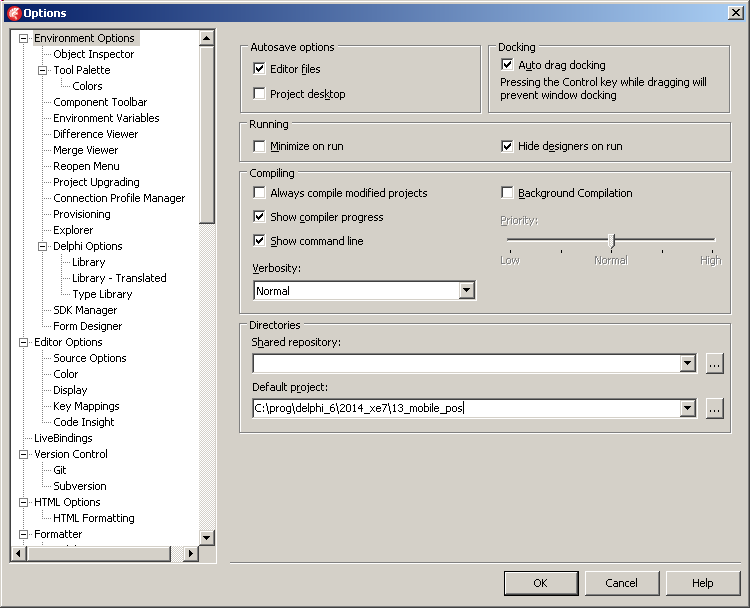
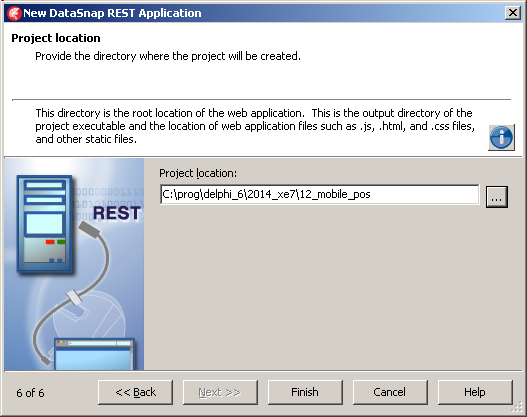
Four your comfort, initialize the folder of your projects:
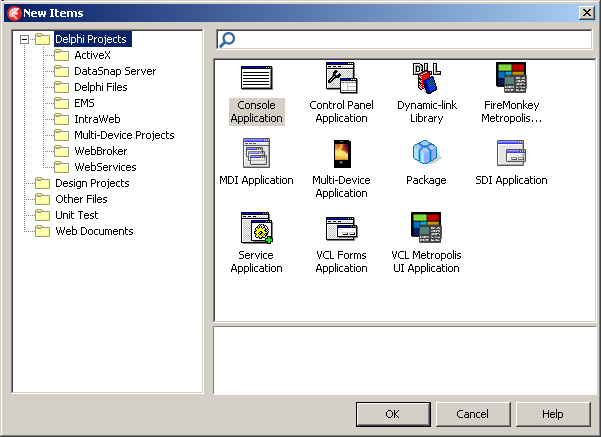
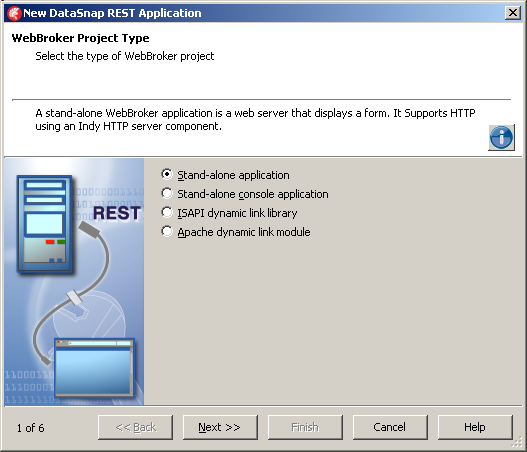
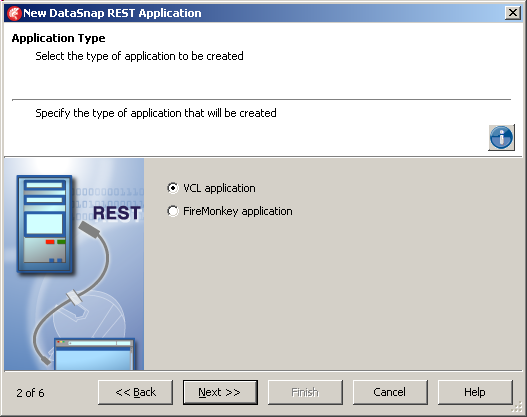
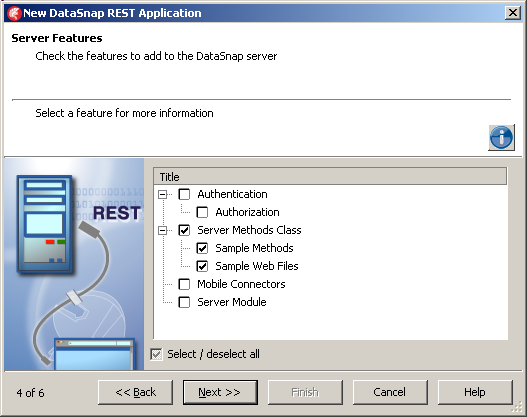
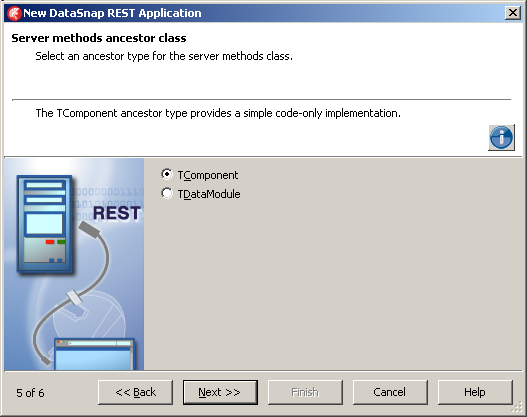
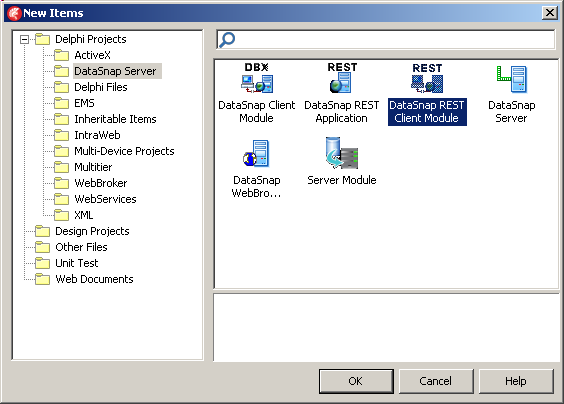
To create the Rest Server
2.3 - The WebBroker Rest Server Units
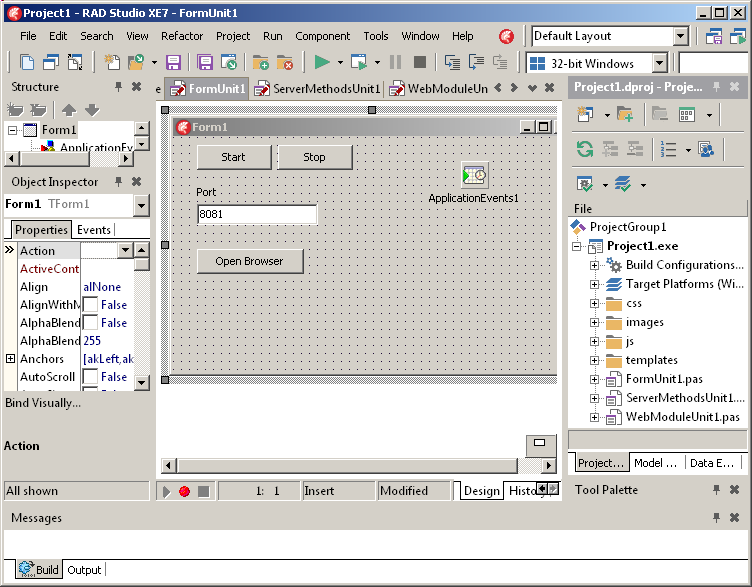
The first step is to save all the generated files  | click "Save Project"
| | |
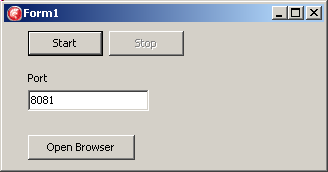
save "FormUnit1.Pas" as "u_server_main.pas". This is the tForm that will be displayed on the desktop, allowing the user to start and stop the server
| | |
save "WebModuleUnit1.pas" as "u_web_module.pas"
|  | save "ServerMethodsUnit1.pas" as "u_server_methods.pas"
| |
| save "Project1.dproj" as "p_12_rest_server.dproj"
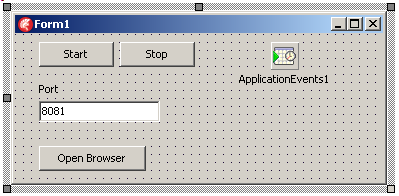
| And - u_server_main.pas will start / stop the server, and can be used to launch a
web browser for test purposes
- u_web_module.pas contains all the components which manage the Rest Server.
It contains the basic DataSnap Server components, plus the components used by the Rest type of Server
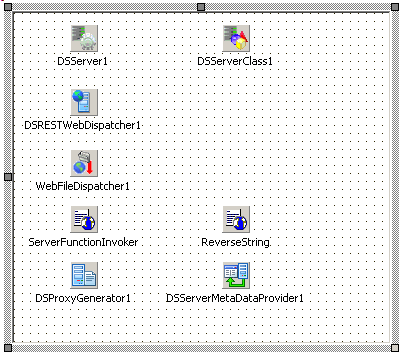
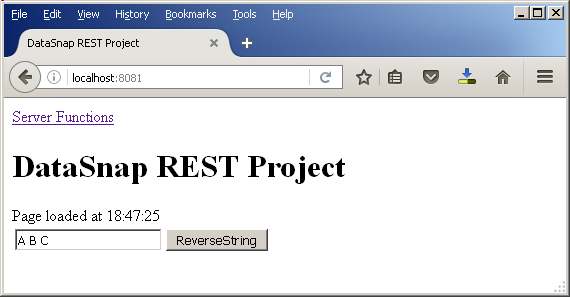
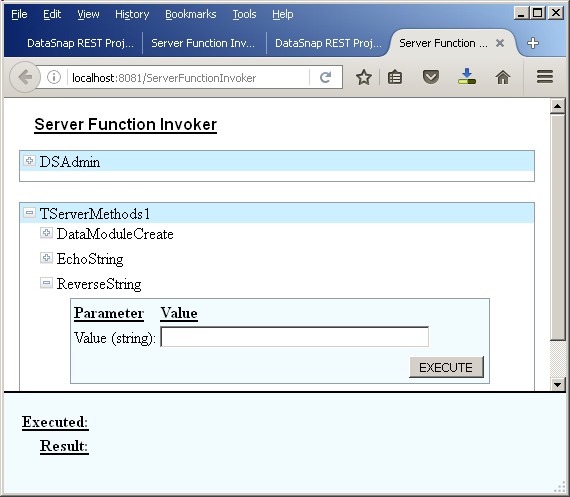
- u_server_methods.pas is a tDataModule containing all the methods the Rest Server will offer to its clients. In Our case, the Wizard has prepared two functions, EchoString and ReverseString.
Unit u_server_methods;
Interface
Uses System.SysUtils, System.Classes, System.Json,
Datasnap.DSServer, Datasnap.DSAuth,
DataSnap.DSProviderDataModuleAdapter;
Type
{$METHODINFO ON}
TServerMethods1 =
Class(TDataModule)
Private
Public
Function EchoString(Value: string): string;
End;
{$METHODINFO OFF}
Implementation
{$R *.dfm}
Uses System.StrUtils;
Function TServerMethods1.EchoString(Value: string): string;
Begin
Result := Value;
End; // EchoString
End.
| Notice
- the tDataModule ancestor
- the $METHODINFO compiler directive which enables the Server to call our methods
Compile the project. Since we changed the Server Methods unit name, we must
change the same name in the u_web_module.pas 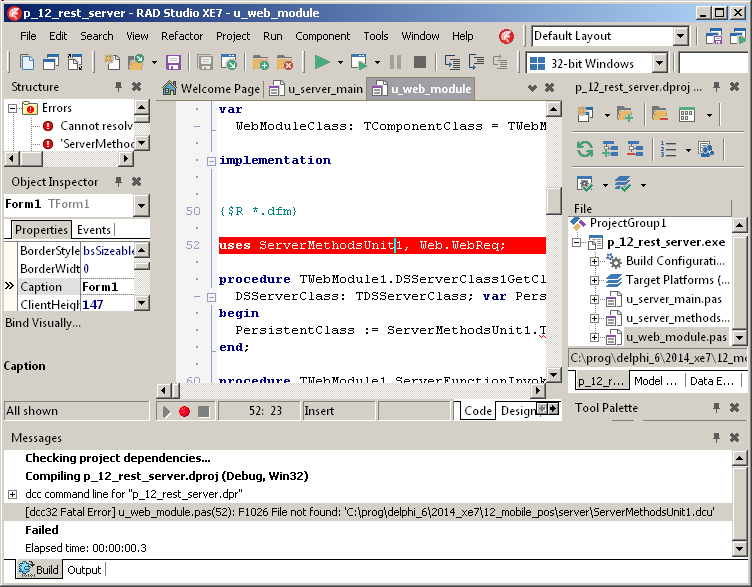 So | |
change all ServerMethodsUnit1 identifiers into u_server_methods (3 occurences)
|
Eventually unblock the Windows lock : 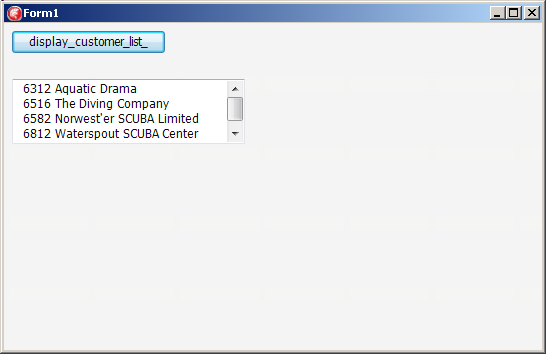
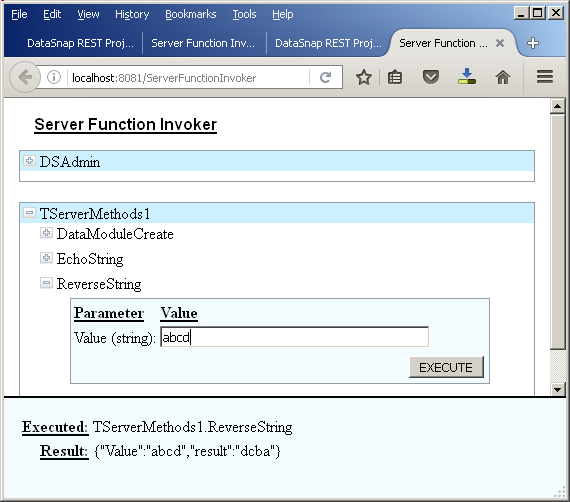
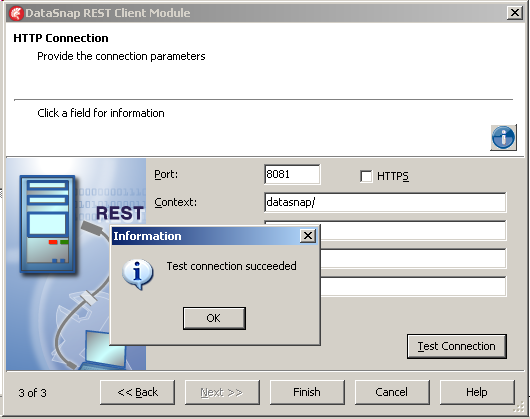
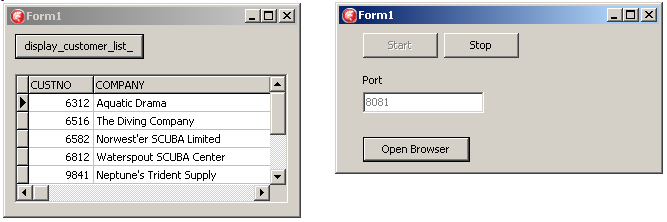
2.4 - Test the Rest Server The main form can be used to start the server and open a browser to test all DataSnap methods. To test "reverse string"
Note
2.5 - The DataSet transfer Rest method Our Rest Server is going to send the content of some Table to its clients. We chose the Delphi "MastApp" database, and will use - the CUSTOMER table
- the ORDERS table (with a CUSTNO foreign key)
- the ITEMS table (with an ORDERNO foreign key)
You can dowload the .ZIP of this Database If you select another database, just find 2 or 3 tables with a master / detail
relationship. We added the Sql Scripts to allow you to create and fill those tables.
Copy the database near the Server: | | create a _data\ folder
| | | copy the MASTAPP_25.FDB base there
|
We will start with a client which will display the CUSTOMER ( CUSTNO, COMPANY ) table.
2.6 - The Firedac components To read and write the tables, we will use FireDac. First we initialize the link to the FireBird driver : | |
select the u_server_methods unit | | | from the Tool Palette, drop a tFDGUIxWaitCursort on the DataModule | |
| then drop a tFDPhysIBDriverLink
| | |
double click on the DataModule to create its OnCreate method and initialize the driver's DriverId, VendorHome and VendorLib Properties by code :
Procedure TServerMethods1.DataModuleCreate(Sender: TObject);
Begin
With FDPhysIBDriverLink1 Do
Begin
DriverId:= 'FB25';
VendorHome := 'C:\Program Files\Firebird\Firebird_2_5';
VendorLib := 'fbclient.dll';
End; // with ADPhysIBDriverLink1
End; // DataModuleCreate
|
| Please note: - we hard coded the location of our FireBird 2.5 fbclient.dll location
- if you use another version of Firebird, or Firebird was installed in another
folder, adjust the code accordingly
- we also assume a 32 bit PC. If you use a 64 bit PC, you should change the Firebird Client .DLL also
- you could also initialize the FireDac driver using the FdDrivers.Ini file.
This has been explained in great detail in the following Delphi FireDac Connection article
- of course, if you use another database engine, you should use the matching initialization code
To initialize the database connection | |
drop a tFdConnection on the DataModule
| | | in the DataModuleCreate event, add this code which essential fills the
tFdConnection Params property:
Procedure TServerMethods1.DataModuleCreate(Sender: TObject) ; //
Begin
// o o o
With FdConnection1 Do
Begin
Close;
With Params Do
Begin
Add('DriverID=IB');
Add('Server=localhost');
Add('Database= C:\prog\delphi_6\2014_xe7\13_mobile_pos\_data\Mastapp_25.fdb');
Add('User_Name=SYSDBA');
Add('Password=masterkey');
End; // with Params do
LoginPrompt:= False;
Open;
End; // with FdConnection1
End; // DataModuleCreate
|
|
Note that - the connection cannot be tested, but we will create a Server Method to test it
Finally, we add a tDataSet |
| drop a tFdQuery on the DataModule, rename it fd_customer_query, and in it's Sql property type
SELECT custno, company
FROM customer
|
|
2.7 - Test of the Database Connection The easiest way to test the connection and the query is to build a DataSnap function : | |
in the u_server_methods unit, in the tServerMethods Class add the following definition:
Function f_test_connection: string;
| | |
| type Shift Ctrl C to create the implementation and fill the body:
Function TServerMethods1.f_test_connection: string;
Begin
FDConnection1.Open;
If FDConnection1.Connected
Then Begin
Result:= 'connected';
FdQuery1.Open;
If FDQuery1.Active
Then Result:= Result+ ' fdQuery Open'
Else Result:= Result+ ' *** fdQuery Closed';
End
Else Result:= '*** connection pb';
End;
|
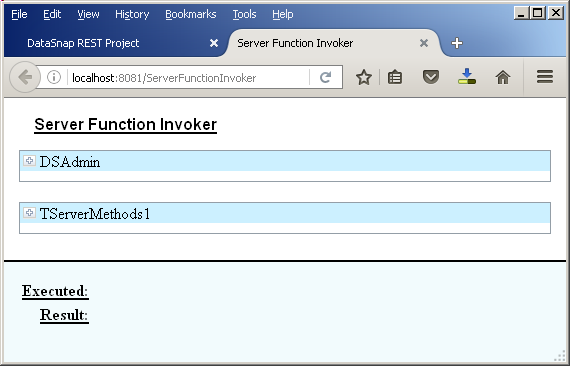
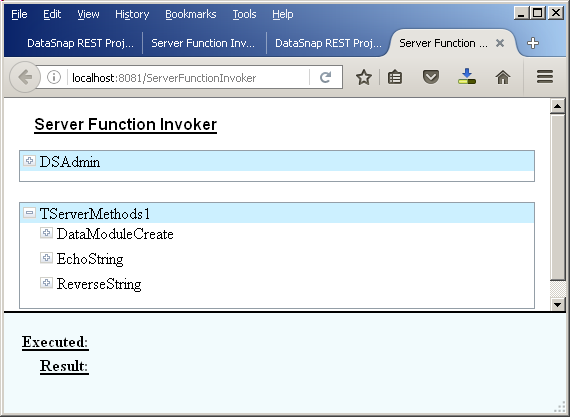
| | | run, start the server, open the browser, click on the function invoker
link, open the TServerMethod, click on the "+" before f_test_connection, click "EXECUTE" | | | the database is connected and the query opened:

|
2.8 - The Server Method returning a tDataSet
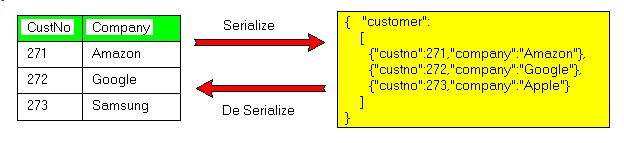
The Client will ask for the CUSTOMER dataset. This resource will be sent over as the result of a DataSnap function. To marshall (send over as a stream) the dataset, we will use the Json
formatting. Our CUSTOMER ( CUST_NO, COMPANY ) table will be formatted as : For the illustration, we indented the JSON text, but usually it does not
contain spaces (the punctuation is enough to parse the format) :
This dataset formatting will be performed by FireDac components : |
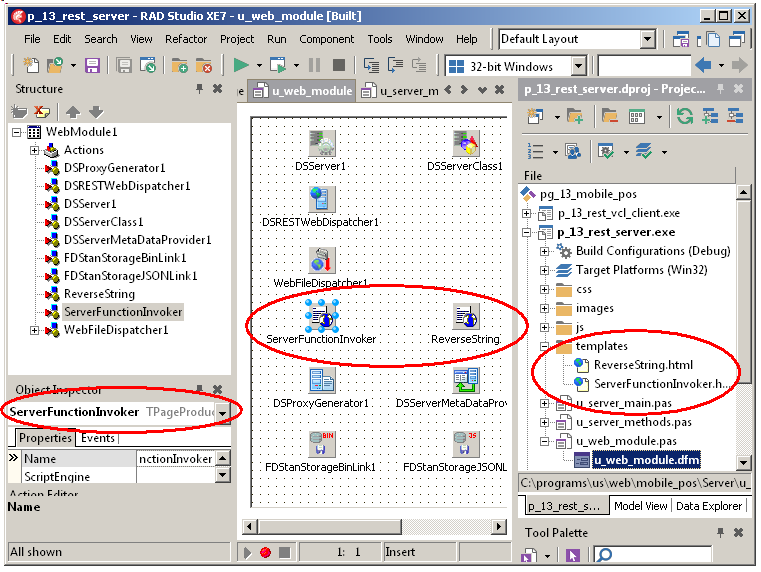
| select the u_web_module
| | | from the Tool Palette
- select a tTFDStanStorageBin and drop it on the module
- select a tFDStanStorageJSON and drop it on the module
|
Now we will add the DataSnap Method: |
| select the u_server_methods datamodule
| | |
in the tTServerMethods1 Class, add this function :
Function f_c_get_customer_name_list: TFDJSONDataSets;
| | |
| since the tFDJSONDataSets is unknown (the red wriggles), add the Data.FireDACJSONReflect to the Interface Uses clause: | |
| with the cursor between Class and End, press Shif Ctrl Click to create the function body, and type this code:
Function TServerMethods1.f_c_get_customer_name_list: TFDJSONDataSets;
Begin
// -- Clear active so that query will reexecute.
fd_customer_query.Active := False;
Result := TFDJSONDataSets.Create;
// -- convert the Query Answer Set into a JSON DataSet
TFDJSONDataSetsWriter.ListAdd(Result, fd_customer_query);
End; // f_c_get_customer_name_list
|
|
To explain the function content :
- FireDac has a tFDJSONDataSetsWriter Class with a ListAdd Class function.
- we can add one or several queries to this Class
- when requested, the writer will convert the queries Answer Sets into the
tFDJSONDataSet using RTTI (Reflection, in Java parlance).
2.9 - Keep the Server running So the server is running. To be able to import the tDataSet in a Rest client,
the server must be running. So start the server with "Run Without Debugging", or alternately from the File Explorer (the .EXE is located in Win32\Debug\ path (relative to the .DPR)
3 - The Desktop VCL Rest Client 3.1 - The first Client We will start with a standard Windows VCL Client. To build the client |
| launch Delphi, and select "File | New | Vcl Application"
| | |
a standard VCL application is created
| | | save the project and unit in a Client_VCL\ folder under u_client_vcl and p_13_rest_vcl_client
|
| | run the project to make sure everything is ok
|
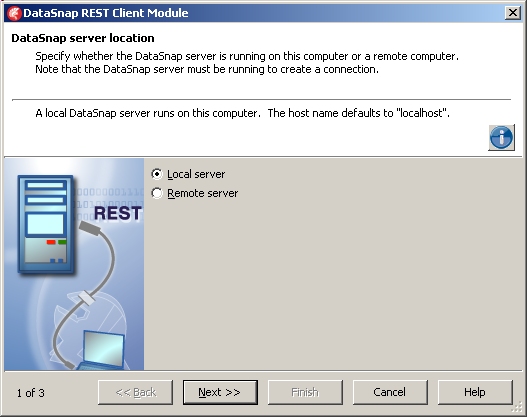
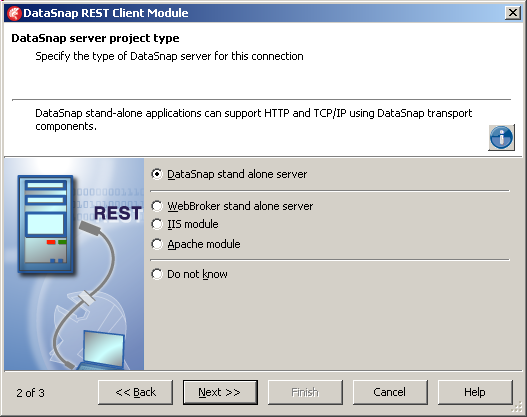
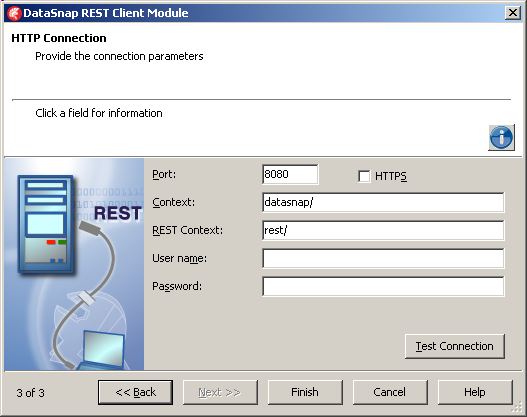
3.2 - The Client Rest import unit To build the Rest import unit
The import units are - the ClientClassesUnit1 which generates the DataSnap methods proxies
- the ClientModuleUnit1 tDataModule with a TDSRestConnection component which will be uses as a TCP client
Rename both units | |
change ClientClassesUnit1 into u_client_classes
| | | add Data.FireDACJSONReflect to the Interface Uses clause
|
| | change ClientModuleUnit1 into u_client_datamodule. In this Unit, replace ClientClassesUnit1 with u_client_classes
|
| | Run the client and close it
|
And we must also add the FireDac JSON components to unmarshall the dataset: |
| select the u_client_datamodule form
| | | from the Tool Palette
- select a tTFDStanStorageBin and drop it on the module
- select a tFDStanStorageJSON and drop it on the module
|
3.3 - Fetch the Customer from the Client
To get the CUSTOMER ( CUSTNO, COMPANY ) from the Server, we must - add a tDataSet to the client Form. In this case a memory dataset, since the content will be provided by the Rest Server
- call the f_c_get_customer_name_list Function to fill the dataset.
Therefore, for the memory dataset ; | |
select the u_client_form
| | | from the Tool Palette, select a tFdMemTable, drop it on the form and rename it fd_customer_list_dataset
| and for the filling procedure ; | | add the u_server_methods to the Implementation Uses clause
| |
| also add the Data.FireDACJSONReflect which contains the TFDJSONDataSets Class
| |
| in the Private section of tForm1 Class, add this Procedure declaration :
Procedure get_customer_name_list;
| | | |
create the body (Shift Ctrl C) and type its content:
Procedure TForm1.get_customer_name_list;
Var l_c_json_dataset_list: TFDJSONDataSets;
Begin
// -- clear the dataset
fd_customer_list_dataset.Close;
// -- fetch the dataset list from the Rest Server
l_c_json_dataset_list := ClientModule1.ServerMethods1Client.f_c_get_customer_name_list;
// -- read the first dataset of this list into the memory dataset
fd_customer_list_dataset.AppendData(
TFDJSONDataSetsReader.GetListValue(l_c_json_dataset_list, 0));
// -- opent the customer_list dataset
fd_customer_list_dataset.Open;
End; // get_customer_name_list
| | | |
compile the project (or
|
This procedure will be called from a tButton, and the result of the dataset displayed. Since the tFdMemDataSet is a tDataSet descendent, it is compatible
with a tDataSource / tDbGrid. Therefore | | from the Tool PalEtte
- drop a tDataSource component and set its DataSet to
fd_customer_list_dataset
- drop a tDbGrid component and set its DataSource property to DataSource1
| | |
drop a tButton, fetch the data and display it in the grid :
Procedure TForm1.display_customer_list_Click(Sender: TObject);
Begin
get_customer_name_list;
End; // display_customer_list_Click
| | |
| run the Client and click display_customer_list_
| | | here is the glorious result :
|
4 - The Mobile Rest Client
4.1 - The SmartPhone DataSnap Rest Client We will now add another Client which will run on a mobile device. We will demonstrate the case with an Android Smartphone (Samsung Nexus), but
any other Android phone or tablet, or Apple iPhone or tablet would work, thanks to the "single code base" Delphi principle.
4.2 - The Mobile check This is not a paper about starting with Delphi Mobile programming.
However just a couple of reminders - check your Java pathes. We installed Delphi Xe7 asking to install the Java files. So they were all downloaded and copied into
- Program Files\ for the Java SDK
- C:\Documents and Settings\All
Users\Documents\Embarcadero\Studio\15.0\PlatformSDKs
for the Android SDK and NDK
You can check that Delphi can use those files with "Tools | Options | Environment Options | SDK Manager", where no combo should display a yellow
triangle warning
- to deploy the Delphi build ARM code, the smartphone must be linked to the PC using an USB cable. When this cable is plugged into the PC, the phone asks whether you want to use USB debugging, which you should accept
4.3 - Testing the Android WIFI and connection 4.3.1 - WIFI connection Our smartphone uses WIFI to connect to our DataSnap Rest Server (USB for deployment, but WIFI for execution).
Before diving into the FireMonkey code, it is important to test the connection.
Our REST Server and REST client behave in a classical Client / Server mode: - the Server is started at some known IP, Port
- the Client connects to this fixed IP, Port, and sends some request
- the Server sends some answer back
4.3.2 - Assigning a Fixed IP to the Server The first thing is to assign a fixed IP, Port to the Server.
Our server is located on a PC linked to a switch. This switch has a manager which - displays the WIFI password
- contains a DHCP server which allocates the devices IP.
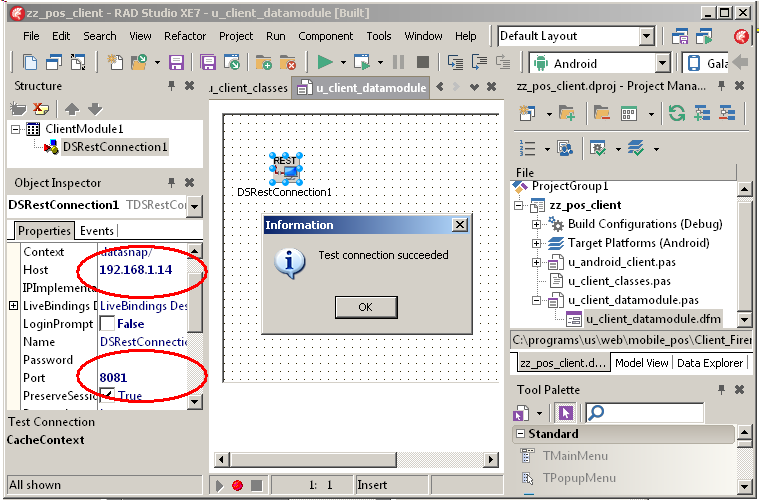
The manager can be used to freeze the IP of one or several connected devices. The other devices are allocated random IPs. So we froze the Server IP, setting its value to 198.168.1.14. We can check this using IPCONFIG :
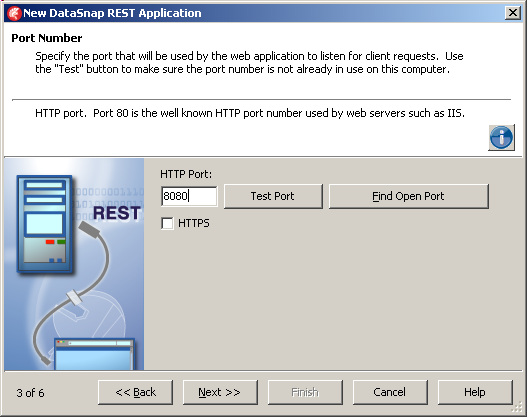
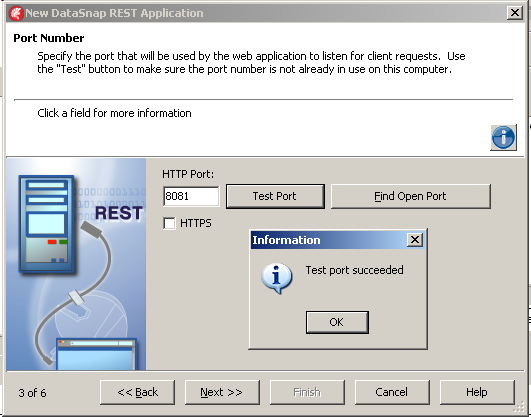
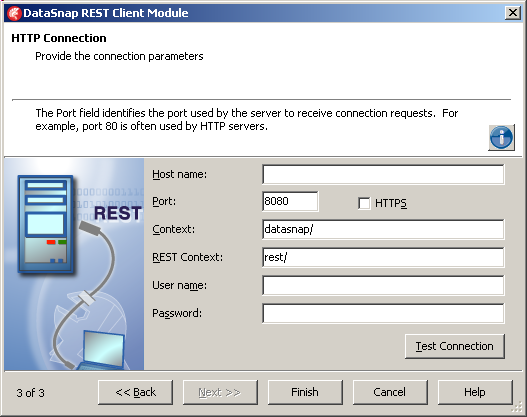
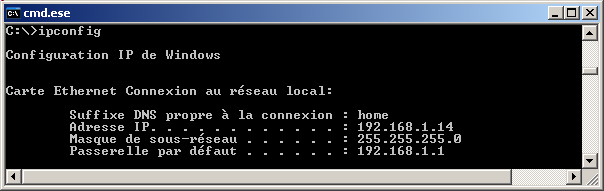 The Port of our REST Server application was set when we created this Server with Delphi. It is 8081.
4.3.3 - Adding the Android device to the network The mobile device must be hooked to the WIFI network: - the switch WIFI manager has a dialog displaying its WIFI parameters. In our case
- security WPA etc
- password : some value, in our case a 26 byte Hex number, like 439F5 etc
- we typed this password on the Android device, by selecting "settings | WIFI", in the WIFI servers in the area, selecting our WIFI network, and then
entering the WIFI password
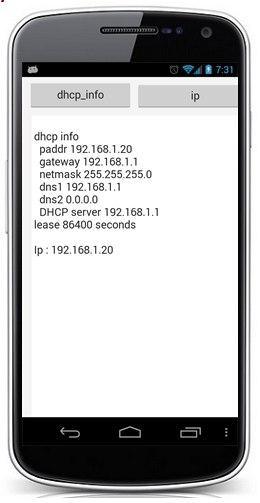
4.3.4 - Testing the Android connection Knowing the Client IP is not important. We can optionnally check it - the Switch displays the IP of all WIFI connected devices. In our case the
dynamically assigned IP was 192.168.1.20
- we can also display the WIFI information including the device's IP on the smartphone itself. Those WIFI settings can be tested by a Delphi application
using JNI (Java Native Interface) Classes. This not obvious, but Stack Overflow and Google allowed us to find the solution. Here is our Delphi Android app displaying the Android IP:
Knowing the Client IP, we can PING the device from the switch or from the Server; 
4.3.5 - Testing the TCP Connection The most important is to be check that the Client can connect to the Server and send some requests.
This test was performed using a tIdTcpClient which tries to Connect.
We used a small FireMonkey project with a tIdTcpClient, 2 edits, a button and a memo. Here is the main FireMonkey form code :
Unit u_test_android_connection_to_server;
Interface
Uses System.SysUtils, ...
, IdBaseComponent, IdComponent, IdTCPConnection, IdTCPClient
...
, FMX.Edit;
Type TForm1 =
Class(TForm)
Memo1: TMemo;
connect_: TButton;
IdTCPClient1: TIdTCPClient;
ip_edit_: TEdit;
port_edit_: TEdit;
Procedure connect_Click(Sender: TObject);
Private
Public
End;
Var Form1: TForm1;
Implementation
{$R *.fmx}
{$R *.NmXhdpiPh.fmx ANDROID}
Procedure display(p_text: String);
Begin
Form1.Memo1.Lines.Add(p_text);
End; // display
Procedure TForm1.connect_Click(Sender: TObject);
Var l_ip_port: String;
Begin
With IdTCPClient1 Do
Begin
Host := ip_edit_.Text;
Port:= StrToInt(port_edit_.Text);
ConnectTimeout := 2000; //2 secs
l_ip_port:= Format('Host %s : %s is ',
[ip_edit_.Text, port_edit_.Text]);
Try
Connect;
display(l_ip_port+ 'reachable');
Except
On e: Exception Do
display('*** '+ l_ip_port+ 'UNreachable');
End;
Disconnect;
End; // with IdTCPClient1
End; // connect_Click
End |
And here is the successful result : 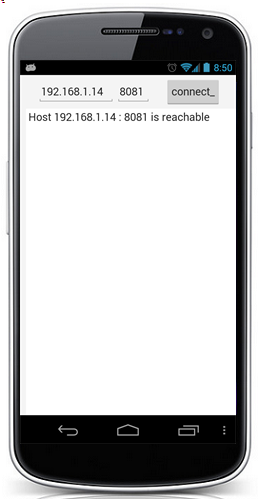
4.4 - The FireMonkey DataSnap REST Client
4.4.1 - The steps We must - run the server
- create the FireMonkey application
- add the DataSnap method import units
- write the user code
First, make sure the Rest Server is running. The server will be called by the Delphi IDE to import the classes and method definitions.
The FireMonkey client application steps are quite similar to the VCL client
applications steps, with a couple of differences - we must assign the Server IP
- to display the data, we cannot use a tDbGrid which is Windows VCL specific, but will use FireMonkey controls
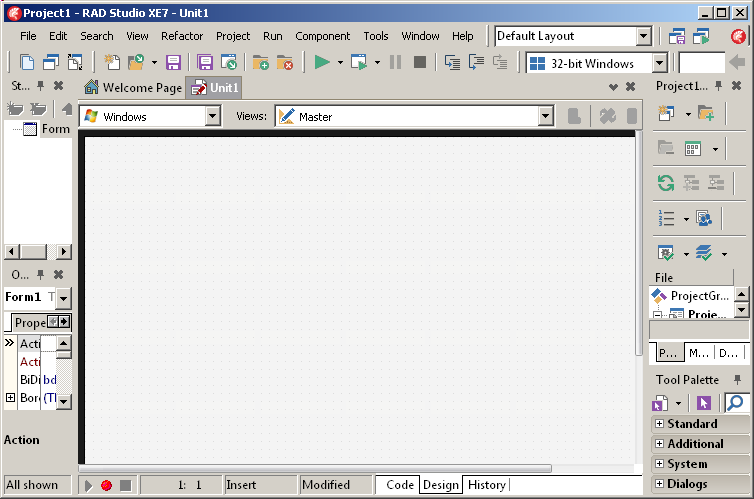
4.4.2 - The FireMonkey application To create the FireMonkey REST Client :
To allow Delphi to send the Android ARM executable to the mobile device, connect the device to your developpment machine : |
| connect the USB cable of your android device to the Delphi PC
| | |
the android device asks you to confirm the debug mode : "Allow Usb Debugging ?" | | | touch "ok"
| |
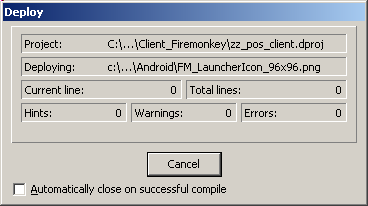
| the status line displays the debugging icon 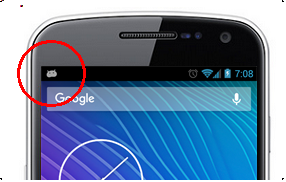 | |
| brushing the finger down on the status line confirms this debugging mode : |
| | and the phone is displayed in the windows explorer 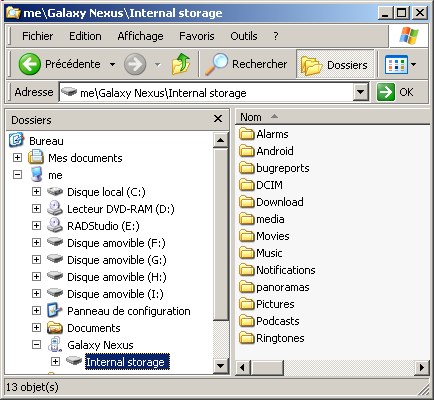 Delphi can now deploy any FireMonkey to the Android device
|
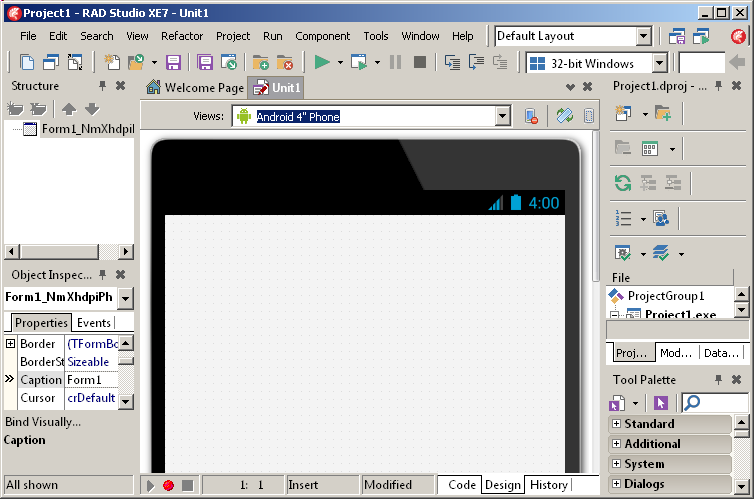
Check that everything is Ok by running the project |
| drop a Button on the Form
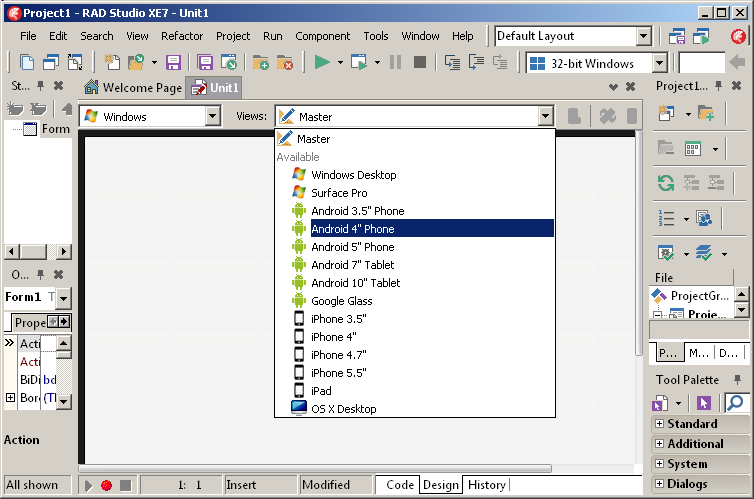
| | | select the Android platform. In the project
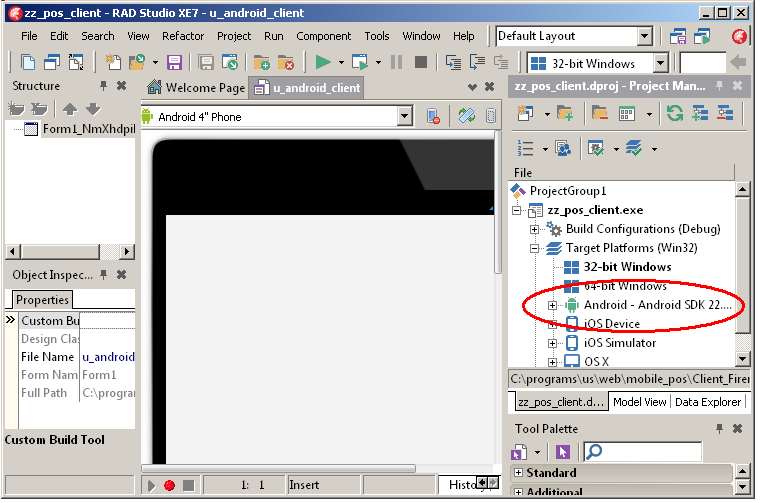 | | | run the application (F9)
|
| | the compiler will display "compiling, linking, deploying, stripping symbols, packaging, installing"
 If the device is active, you will see our page with Button1. If the phone is in sleep mode, pushing "Power" will display the same thing.
and the application is at the end of the application pages: 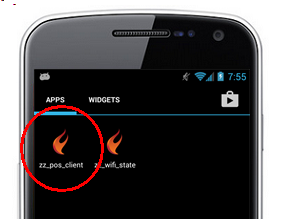
|
4.4.3 - The REST Client application We now add the REST import units:
Rename both units | | change ClientClassesUnit1 into u_client_classes
| |
| add Data.FireDACJSONReflect to the Interface Uses clause
| | |
change ClientModuleUnit1 into u_client_datamodule. In this Unit, replace ClientClassesUnit1 with u_client_classes
| | |
compile the client by typing Shift F9 (or "Project | Build")
|
Please note : - the Android cross-compilation and Android deployment is rather lengthy. This is the reason we used "Build" rather than "Run"
- even then, the compiling is still longer then the Windows compilation. It is possible to return to the Windows target platform until the project is complete, and then shift back to the Android target platform
- as far as the import units are concerned, we could have copied the VCL DataSnap import unit, and changed the DsRestConnection1 host address. We can even test the connection by double clicking on this component :
4.4.4 - Add the FireDac JSON components
And we must also add the FireDac JSON components to unmarshall the dataset: | | select the u_client_datamodule form
| |
| from the Tool Palette
- select a tTFDStanStorageBin and drop it on the module
- select a tFDStanStorageJSON and drop it on the module
|
4.5 - Fetch the Customer from the Client We now must add a tDataSet to the client Form. Therefore : | |
select the u_android_client_form
| | | from the Tool Palette, select a tFdMemTable, drop it on the form and
rename it fd_customer_list_dataset
| To test the fetching of the data, we first will use a Memo : | |
drop a tMemo on the tForm
| | | write the display global Procedure which simply adds the text to the Form's Memo1 :
Procedure display(p_text: String);
Begin
Form1.Memo1.Lines.Add(p_text);
End; // display
|
| and for the filling procedure : |
| add the u_server_methods to the Implementation Uses clause
| | |
also add the Data.FireDACJSONReflect which contains the TFDJSONDataSets Class
| | |
in the Private section of tForm1 Class, add this Procedure :
Procedure get_customer_name_list;
| | | |
create the body (Shift Ctrl C) and type its content:
Procedure TForm1.get_customer_name_list;
Var l_c_json_dataset_list: TFDJSONDataSets;
Begin
// -- clear the dataset
fd_customer_list_dataset.Close;
// -- fetch the dataset list from the Rest Server
l_c_json_dataset_list := ClientModule1.ServerMethods1Client.f_c_get_customer_name_list;
// -- read the first dataset of this list into the memory dataset
fd_customer_list_dataset.AppendData(
TFDJSONDataSetsReader.GetListValue(l_c_json_dataset_list, 0));
// -- opent the customer_list dataset
fd_customer_list_dataset.Open;
End; // get_customer_name_list
| Both the definition and the body can be copied from the VCL u_client_form Unit
| | | drop a tButton and write the code which fetches the data and displays it in the tMemo :
Procedure TForm1.display_customer_list_Click(Sender: TObject);
Begin
get_customer_name_list;
With fd_customer_list_dataset Do
While Not Eof Do
Begin
display(Format('%6s %s',
[ Fields[0].AsString, Fields[1].AsString ] ));
Next;
End; // while not Eof
End; // display_customer_list_Click
| | | |
for the first test, change the platform target to "Windows" ("Project Manager | zz_pos_project | Target Platform"
| | | run the VCL project
|
| | this is the output :
|
Note that the form has been displayed in "Windows Format" (not the phone width and height).
4.6 - Bind the DataSet to Visual Controls Our memo display was just to check the fetching.
For production applications, we will use FireMonkey controls, and bind them visually to the tFdMemDataSet.
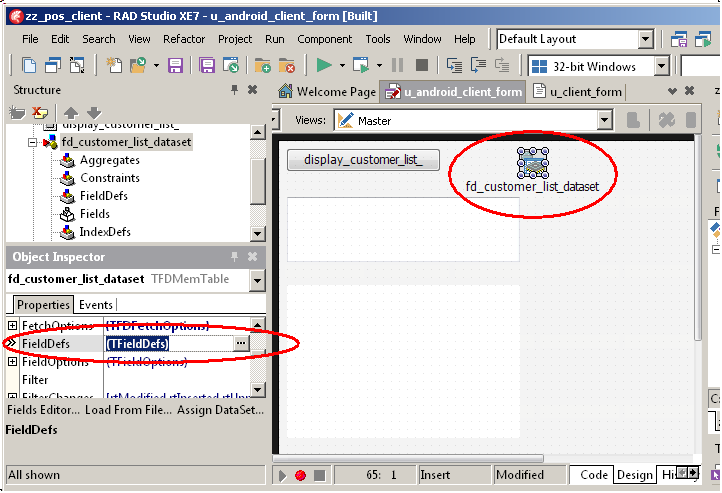
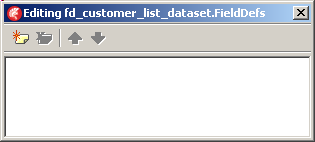
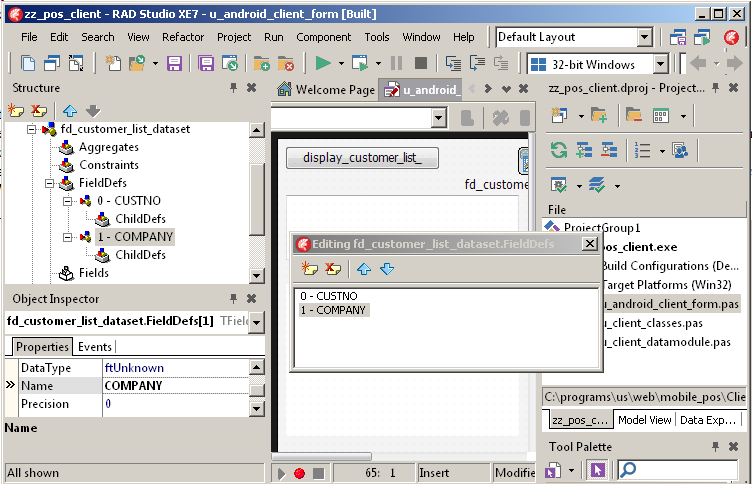
To bind the tFdMemDataSet fields to the columns of the tListView, we must
create dataset fields. Creating tFields is difficult at design time, but creating FieldDefs is possible To create the tFieldDefs
Now add a tListView and bind it : |
| drop a tListView on the form
| | |
select the "Detail" listview, by selecting in the Object Inspector "Listview | ItemAppearance | ListItemRightDetail" 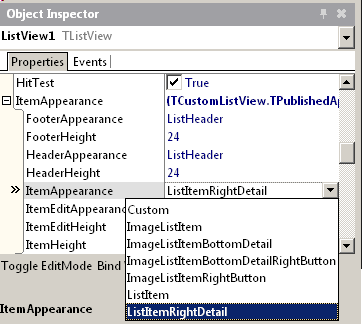
The listview will display a .INI kind of two "key-value" columns list | | | open the LiveBindings Designer by selecting "View | LiveBindings Designer"
(or by selecting the ListView1, selecting it's LiveBindings  | |
| the LiveBindings Designer is opened, displaying all the bindable objects 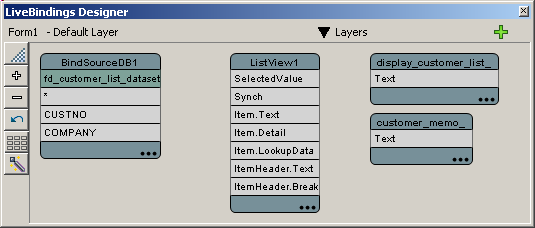
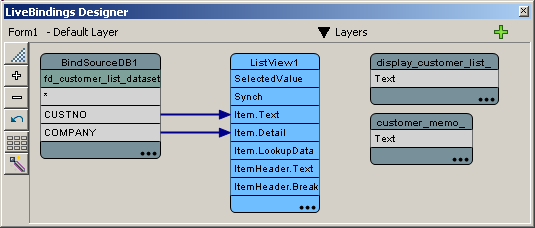
| | | bind "Listview Item.Text" to "MemDataSet CUSTNO" (drag the mouse from the Item.Text to the CUSTNO
| |
| bind the Item.Detail to the COMPANY
| | | this is the current situation :
 | | |
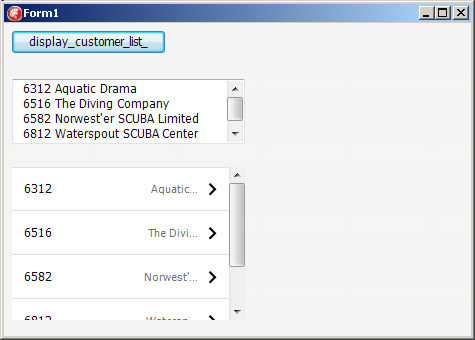
run the (VCL) project and click on the Button
| | | opening the DataSet automatically displays the values in the ListView :
|
Please note - in our Delphi XE7 version, the LiveBindings Designer would not display the
tFdMemDataSet fieldefs we just created. Closing the app and reloading it did the trick.
4.7 - Run on the Android Mobile Device Since the syntax is correct, we will now adjust to Android. Therefore
| | change the Designer view back to "Android 4 inches" 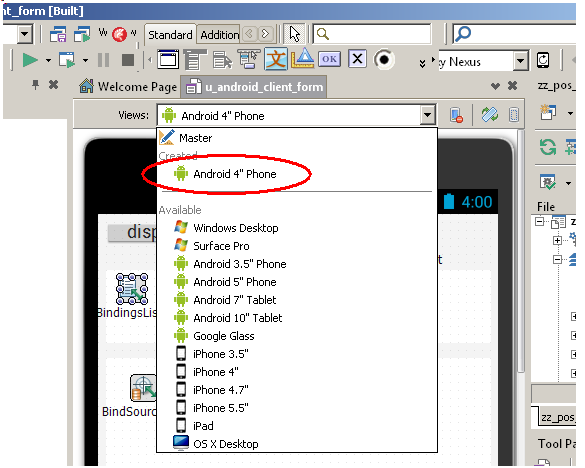 |
| | change the Target Platform to "Android" 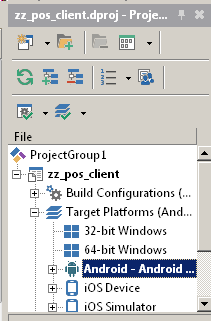 |
| | run the application
| | | this is the result
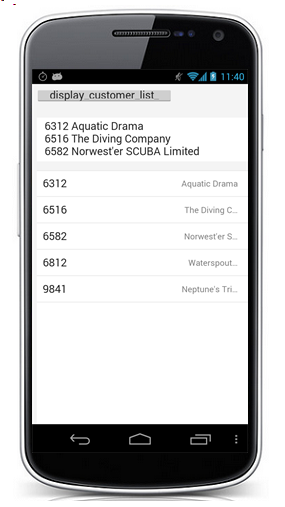
|
Please note - in our case, the "Run" took between 2 and 3 minutes. This is the reason why
we preferred to first run in Windows mode
- let's stress again that it is the "single code base" which allowed us to code in Windows Mode and then run in Android mode
- we also encountered a "F2039" error, because we added an incorrect second "]" in the Format of the fields
- our display is quite primitive, to say the least. For customer
applications, we would resize the controls, add shading, more sophisticated controls etc.
5 - Remarks
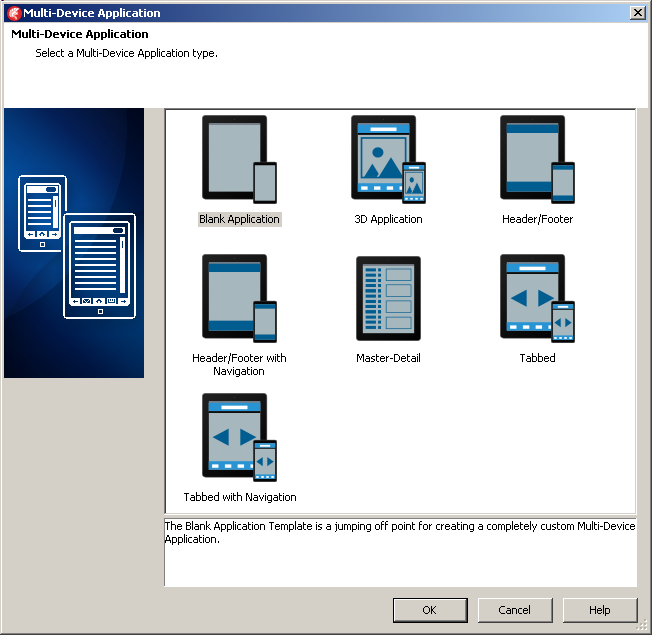
The FireUi Multi device Designer
"File | New | Multi Device Application" automatically calls the multi device designer. This wizard works with a "Master View" which contains the common elements of the design, and one or several device specific views. This explains why
- properties like the Name of controls are in the Master View, and to change a Name, we must switch to the Master View
- if we move the controls in the Master View, the changes are not propagated
to the other Views. Each view manages the graphic properties. Those properties are saved in a separate .DFM, named called in our case "u_android_client_form.NmXhdpiPh.fmx".
This .DFM obviously contains the delta values :
Inherited Form1_NmXhdpiPh: TForm1_NmXhdpiPh
ClientHeight = 615
ClientWidth = 400
DesignerMasterStyle = 0
Inherited display_customer_list_: TButton
Size.Width = 225.000000000000000000
End
Inherited customer_memo_: TMemo
Size.Width = 385.000000000000000000
Size.Height = 73.000000000000000000
End
Inherited ListView1: TListView
Size.Width = 385.000000000000000000
Size.Height = 457.000000000000000000
End
Inherited fd_customer_list_dataset: TFDMemTable
Left = 264
End
Inherited BindSourceDB1: TBindSourceDB
Left = 136
Top = 64
End
Inherited BindingsList1: TBindingsList
Left = 36
Top = 61
End
End
|
- we think that this multi-device designer is a good tool for similar size devices, but for building applications targeted to phones, tablets and desktop devices, the design will have to be separated
- for our first Android trials we used the Windows Target Platform because of round trip speed. Of course the resulting FireMonkey Windows layout is not adapted. The goal was NOT to build a desktop application. When the code was
working as expected, we switched to the Android Platform.
This also demonstrate that the Design Views and the Target Platform are two separate concerns. In the end, however, we selected at the same time an
Android view and an Android target platform
5.1 - What's Next ? We presented the case of a simple table in read-only mode. There are many possible extensions and improvements :
- add an "update" function. The user can enter data which is then sent back to the Server
- operate on many table : our single table example is quite simplistic. At least we should be able to use Master / Detail relationships
- in a multi user environment, we should take care of the threads
- finally a Business Object organization can simplify the Business Rules handling.
5.2 - What kind of devices / applications
We simply sketched the structure of a POS software. The detailed content of the applications depends on the specific application. It could be as simple as retrieving a list of products or as complex as a full fledged ERP. In the case
of more complex software, the big applications like accounting or order processing would be handled on desktop PC's, not on mobile devices. Those PCs can still be connected via WIFI, an can use REST and FireMonkey. But the
benefit is less obvious than for hand held mobile devices.
And different devices can be used for different kind of applications - phones for simple requests / entries with simple screens
- tablets for more elaborate reports, computations, advertising or guides
- desktop devices for application with richer screen designs : cash register, accounting etc
In the case of Point of Sale software, FireMonkey is particularly well suited. Il allows attractive simple touch screen design for applications like restaurant ordering, cash register, payment terminal etc
5.3 - The Datasnap Wizards
Special congratulations to Delphi (Embarcadero ? Idera ?) for the two DataSnap wizards. Without them it would be nearly impossible to set up the REST Servers and Clients. Not only for the components and their links, but also for the generated code.
5.4 - Proxy Generation As with SOAP Web Services, the Server Application uses some objects (a tDataSet in our case) and this object's data has to be sent over to the
Client. The general solution is to build a proxy object on the Client side. Then - the DataSnap framework generates the units containing the proxies
- at run time, the Client works with the proxy, and the REST Client
communicates with the REST Server to get information or other objects from the Server.
- the code of the proxy was completely handled by the DataSnap framework. All we had to do was call the method to retrieve and instantiate the client proxy.
We used a tDataSet object, and FireDac handled the marshalling using JSON. If we switch to Business Objects, DataSnap directly creates the proxies, and data can be exchanged using JSON.
5.5 - The article title
Could we add other buzzwords to our "Using FireBase, FireDac, DataSnap, Rest, Wifi, and FireMonkey" title ? No problem here, what about "Android, LiveBindings, JSON, FireUi, JNI, DHCP, WebBroker". Well, piling up buzzwords
was not the objective of this paper, and does not guarantee readership. As this story demonstrates: a survey showed that the three best selling books were about Abraham Lincoln, doctors and dogs. So one feller wrote a book "Dr
Lincoln's dog". Which was a total flop.
5.6 - References About REST web services : - the Delphi WIKI contains several tutorials and demos about REST services
- Pawel GLOWACKI wrote a series of 11 Delphi Labs: DataSnap code samples, ranging form a simple calculator to authentication and callbacks
For displaying the Smarphone screen :
- we used Jim MCKEETH screen grabber Android Screen View.
As explained in the "readme", it simply uses the ADB (Android Debug Bridge)
to fetch the screen image and display in the grabber's Form.
For testing the WIFI connection - those tests involve JNI (Java Native Interface). We used two sources
- Remy LEBEAU wrote about Delphi XE6 and Android Ping
Whenever we had any Tcp / Ip problem, this is the man who always provided,
in Embarcadero's forums or StackOverflow, an answer, usually with a piece of code which solved the problem.
- also many thanks to Alexis FRUHINSHOLZ, co founder of SocialCompare, who helped us with the WIFI connection diagnostic tools
6 - Download the Sources Here are the source code files: The .ZIP file(s) contain:
- the main program (.DPR, .DOF, .RES), the main form (.PAS, .DFM), and any other auxiliary form
- any .TXT for parameters, samples, test data
- all units (.PAS) for units
Those .ZIP
- are self-contained: you will not need any other product (unless expressly mentioned).
- for Delphi 6 projects, can be used from any folder (the pathes are RELATIVE)
- will not modify your PC in any way beyond the path where you placed the .ZIP (no registry changes, no path creation etc).
To use the .ZIP: - create or select any folder of your choice
- unzip the downloaded file
- using Delphi, compile and execute
To remove the .ZIP simply delete the folder. The Pascal code uses the Alsacian notation, which prefixes identifier by
program area: K_onstant, T_ype, G_lobal, L_ocal, P_arametre, F_unction, C_lasse etc. This notation is presented in the Alsacian Notation paper.
As usual:
- please tell us at fcolibri@felix-colibri.com if you found some errors, mistakes, bugs, broken links or had some problem downloading the file. Resulting corrections will
be helpful for other readers
- we welcome any comment, criticism, enhancement, other sources or reference suggestion. Just send an e-mail to fcolibri@felix-colibri.com.
- or more simply, enter your (anonymous or with your e-mail if you want an answer) comments below and clic the "send" button
- and if you liked this article, talk about this site to your fellow developpers, add a link to your links page ou mention our articles in
your blog or newsgroup posts when relevant. That's the way we operate: the more traffic and Google references we get, the more articles we will write.
7 - The author
Felix John COLIBRI works at the Pascal Institute. Starting with Pascal in 1979, he then became involved with Object Oriented Programming, Delphi, Sql, Tcp/Ip, Html, UML. Currently, he is mainly
active in the area of custom software development (new projects, maintenance, audits, BDE migration, Delphi
Xe_n migrations, refactoring), Delphi Consulting and Delph
training. His web site features tutorials, technical papers about programming with full downloadable source code, and the description and calendar of forthcoming Delphi, FireBird, Tcp/IP, Web Services, OOP / UML, Design Patterns, Unit Testing training sessions.
|