|
Asp Net 2.0 Master Pages - Felix John COLIBRI. |
- abstract : the new Asp.Net 2.0 Master Pages allow us to define the page structure in a hierarchical way
- key words : Asp.Net 2.0, Master Page, Content Page
- software used : Windows XP Home, Delphi 6
- hardware used : Pentium 2.800Mhz, 512 M memory, 140 G hard disc
- scope : Rad Studio 2007
- level : Delphi developer
- plan :
1 - Web Site look and feel
To give to your site a uniform structure, appearance, behaviour, you have several techniques using Asp.Net 2.0: - for the display, .CSS (Cascading Style Sheet) and themes
- for the page structure, Master Page coupled with Content Pages
- for the navigation new controls, like menus and treeviews
- for the content of each page, web parts
In this article, we are going to present the Master Page technique
2 - Using Asp.Net Master Pages 2.1 - Master Page concept
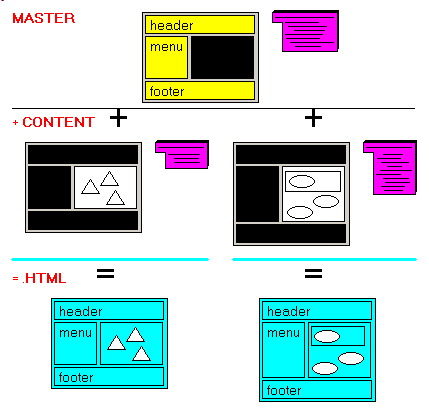
The basic idea is to split the structure of an .ASPX page in two parts: - some parts should remain the same between the different pages
- some parts vary with each page
This concept of factorizing common features, and adding new elements at the margin sound very familiar to object oriented developer, and it is inheritance. So: - the Master Page is the ancestor page
- the Content Pages contain the elements of the Master Page and can change some of those parts.
which can be summarized like this:
To build pages using Master Pages - we create a Master page with
- some elements (HTML components, Web components, even code)
- one or more content placeholder
- the derived Content Pages
- inherit from the Master Page (thereby getting its components and code)
- can add in the content placeholders elements of their own
A typical use is a page composed of - a Master Page with some header (titles, logo, login etc)
- a Content Page with some additional information (text, links to other page, DataGrids etc)
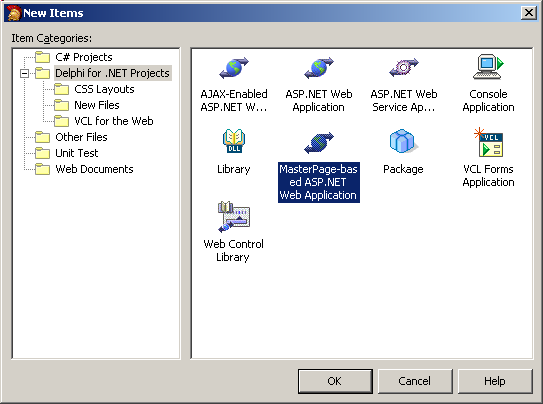
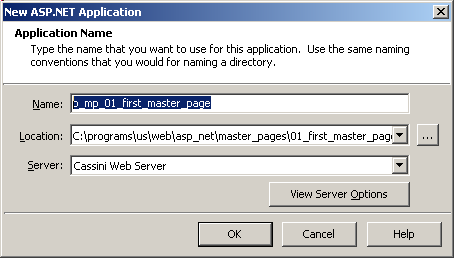
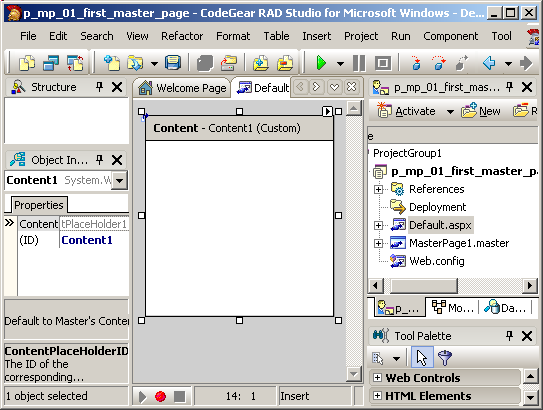
2.2 - First Master Page example 2.2.1 - Creating Master Page Asp.Net application We startTo create a Master Page application
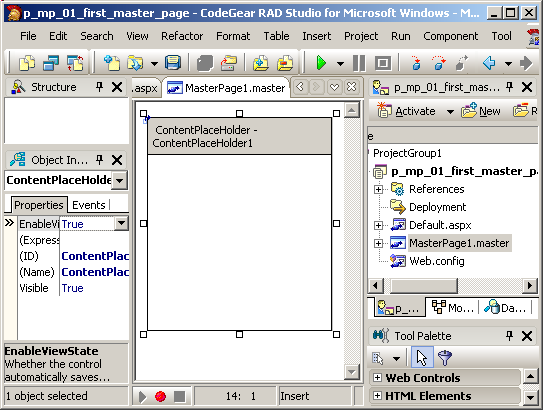
This setup contains:
- in the Project Manager
- the usual References, Web.Config
- the MasterPage1.Master which is the currently selected item
- the Default.Aspx, which is the site default page, which derives from Masterpage1
- in the central Designer, a Page with a first ContentPlaceholder
For the MasterPage1.MasterPage: - the .PAS shows that the CLASS is a a Page descendent:
unit MasterPage1;
interface
type TMasterPage1 =
class(System.Web.UI.MasterPage)
// ...ooo...
end; // TMasterPage1
| - the .ASPX contains the placeholder tag:
<%@ Master language="c#" Debug="true" Codebehind="MasterPage1.pas"
AutoEventWireup="false" Inherits="MasterPage1.TMasterPage1"%>
<!DOCTYPE HTML PUBLIC "-//W3C//DTD HTML 4.01 Transitional//EN">
<html>
<head runat="server">
<title></title>
</head>
<body>
<form runat="server">
<div>
<asp:contentplaceholder id="ContentPlaceHolder1" runat="server">
</asp:contentplaceholder>
</div>
</form>
</body>
</html> |
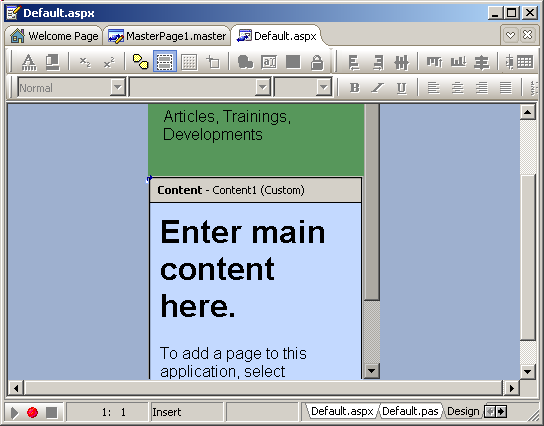
We select the Default page, and: - this page display a content at the position of the PlaceHolderContent, and the area outside of the Content elements is grayed, telling us that we cannot modify those areas:
 - the .PAS tells that the CLASS still descends from Page:
unit Default;
interface
type TDefault =
class(System.Web.UI.Page)
// -- ... ooo ...
end; // TDefault
|
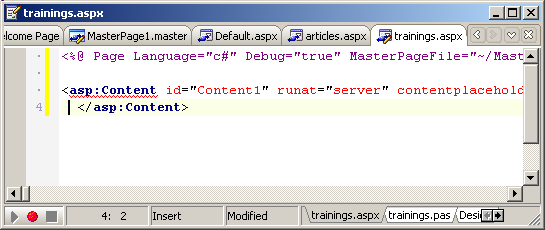
- but in the Default.Aspx, the page directive references MasterPage1:
<%@ Page Language="c#" Debug="true"
MasterPageFile="~/MasterPage1.master"
Codebehind="Default.pas" AutoEventWireup="false"
Inherits="Default.TDefault" Title="Untitled Page" %>
<asp:Content ID="Content1"
ContentPlaceHolderID="ContentPlaceHolder1" Runat="server">
</asp:Content> | and - the MasterPage.master file is referenced with the ~/ which corresponds to the root
- there is no <HTML>; <HEAD> or <BODY> tags, since those are defined in the Master Page
- there is however a Content1 tag, and this tag references the
ContentPlaceHolder1 by using a special ContentPlaceHolderID. In fact, if we place several ContentPlaceHolders on the Master Page, the Content Pages will have the corresponding Contents, with the ID
matching the ID of the ContentPlaceHolder. This is performed automatically by the Delphi IDE: whenever we add a new ContentPlaceHolder to the Master Page, the Content Pages will
automatically include the matching Contents.
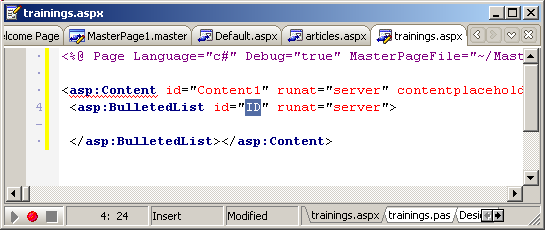
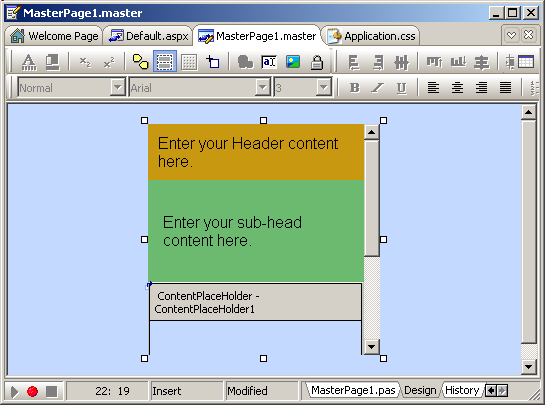
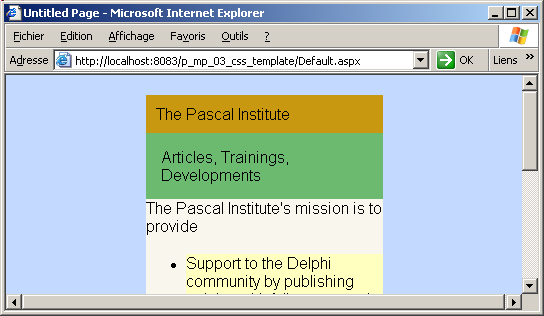
2.3 - Adding elements to the Master Page Assuming that ContentPlaceHolder1 corresponds to the main text of the page, we will add
- before it some header, with for instance a logo and a title
- after it some footer
So
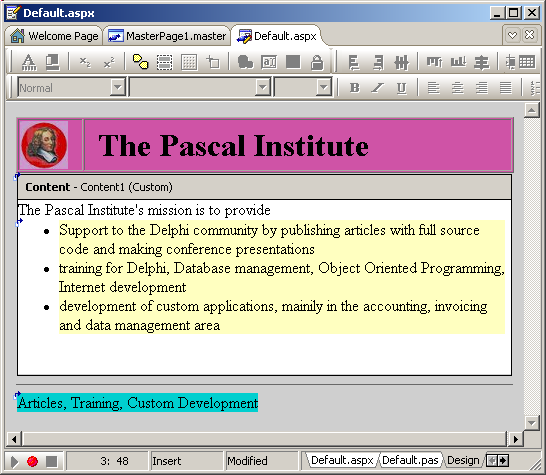
2.4 - Adding elements to a Content Page
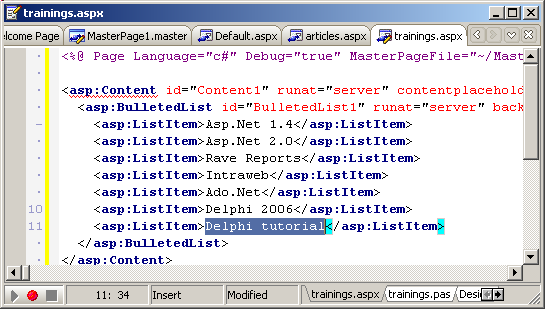
Now we can add the elements to the Content Pages. For now, lets simply add some text. In our case, we added an introduction phrase, followed by a bulleted list:
Please note that - during design, the PlaceHolderContent area in the Master Page or Content Pages has a minimum size. We cannot shrink it to the desired space. This
might be a small inconvenient for building the final layout.
In our case, the content is the central area, and the text about the size of Content, so this is not too disturbing. But if we had used smaller
ContentPlaceHolder, the distortion would have been greater
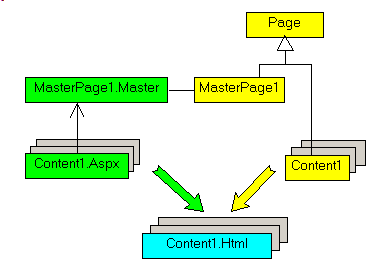
2.5 - Visual Inheritance The purpose of Master Pages is to be able to inherit common page elements, and even code.
As we explained in our Asp.Net Tutorials (see Google), the final .HTML is build using both - the .ASPX which acts like some kind of .HTML template
- the .PAS which contains the code which handles on the Server the events
when the Client click on some button or otherwise triggers some action
In the case of Master Page, this is still the case, but both visual controls
and events are split between the Master Page and the Content Page:
We can have some idea of how the controls are built on the Server by using the Asp.Net trace mode:  |
select Default, the .ASPX tab, and in the <@ Page tag insert the TRACE attribute:
<%@ Page Language="c#" Debug="true"
MasterPageFile="~/MasterPage1.master"
Codebehind="Default.pas" AutoEventWireup="false"
Inherits="Default.TDefault" Title="Untitled Page"
Trace="true"
%>
| | 
| here is the resulting trace: 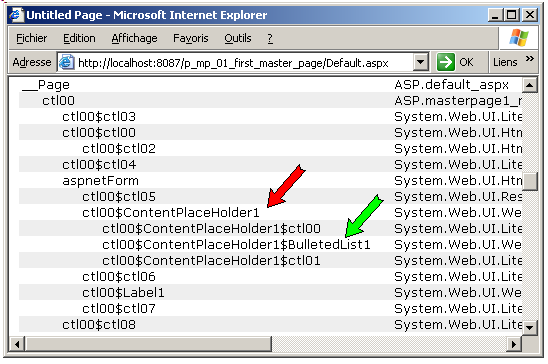 which shows that the Master Page controls are built before the Content Page controls
|
2.6 - Default Content In some case, we could want to use pages where some Contents are not filled by the Content Page, but has some default value. This can be done with the following technique:
| | in the Master Page, add the default elements to the PlaceHolderContent.
This will usually never be visible, since it will be overridden by each Content Page's own elements
| | |
in the Content Pages which should display the default content from the Master Page, remove the "<asp:Content " tag from the .ASPX file
|
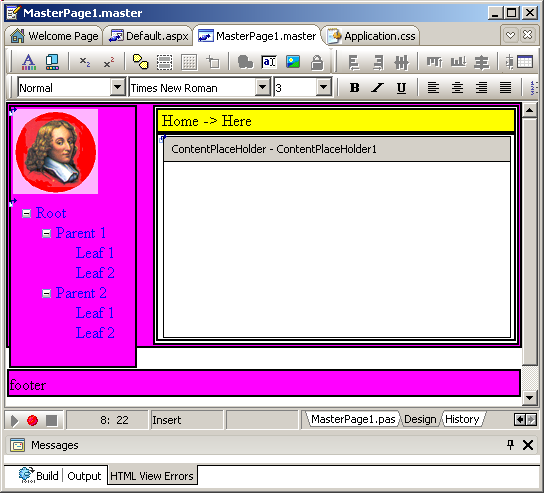
3 - Using CSS Templates 3.1 - more realistic page Our first example is rather simplistic. To mimic the page you are actually reading, we must add - the menu at the left
- the current position (the "Home->paper->web->asp_net->master_pate" text at the top of the page
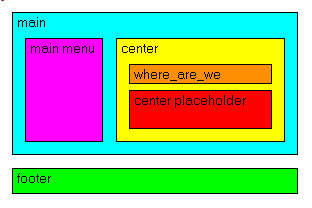
The basic structure looks like:
To add some additional structure to our pages, we could use HTML TABLEs, as we already did for the header. We are going instead to use HTML DIV tags, whith their position defined by the STYLE attribute. Here is the .HTML goal:
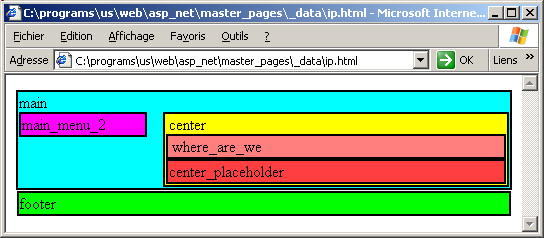 and here is the .HTML code:
<HTML>
<BODY>
<DIV style="background-color:00FFFF;border:2px solid black;
padding:1px; " >
main
<DIV style="background-color:FF00FF;border:2px solid black;
padding:1px;
float: left;
width: 8em ; " >
main_menu_2 </DIV>
<DIV style="background-color:FFFF00;border:2px solid black;
padding:1px;
margin-left: 9em; " >
center
<DIV style="background-color:FF7F7F;border:2px solid black;
padding:1px; " >
where_are_we </DIV>
<DIV style="background-color:FF3F3F;border:2px solid black;
padding:1px; " >
center_placeholder </DIV>
</DIV>
</DIV>
<DIV style="background-color:00FF00;border:2px solid black;
padding:1px; margin:1px;
clear: both;
" >
footer </DIV>
<BODY>
</HTML>
|
To build this with Asp.Net:
If you look at the pasted .ASPX code, you will notice that - some attribute names have been capitalized
- the "shortcut" attributes like MARGIN have been replaced with their
expanded versions (MARGIN-LEFT etc)
We will use 3 Content Pages: - the home page
- the article page
- the training page
Here is how to proceed:
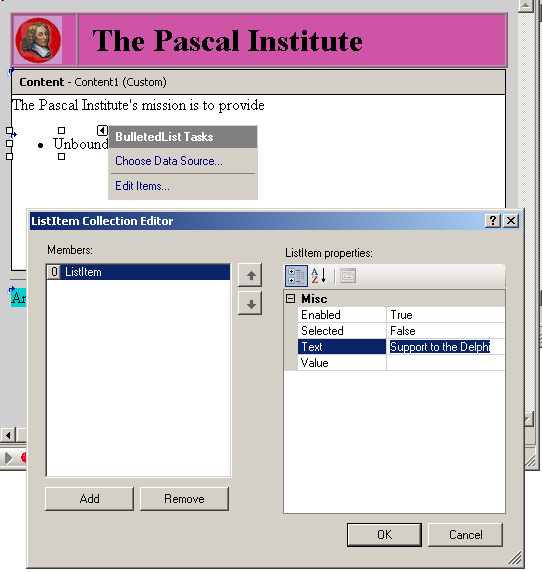
And we do the same for the TRAININGS and other pages. Instead of using the Bulleted List Editor, we can directly type the .HTML text in the .ASPX using Live Templates. To prepare this |
| select ARTICLES
| | | select the ARTICLES.ASPX tab:
<%@ Page Language="c#" Debug="true" MasterPageFile="~/MasterPage1.master"
Codebehind="articles.pas" AutoEventWireup="false"
Inherits="articles.Tartiles" Title="Untitled Page" %>
<asp:Content id="Content1" runat="server"
contentplaceholderid="ContentPlaceHolder1">Last articles (oct 20 2007):<BR>
<asp:BulletedList id="BulletedList1" runat="server" backcolor="#FFFFC0">
<asp:ListItem>Shockwave Flash Player</asp:ListItem>
<asp:ListItem>AJAX Tutorial</asp:ListItem>
<asp:ListItem>BlackFish Sql programming</asp:ListItem>
<asp:ListItem>Delphi DbExpress 4 Programming</asp:ListItem>
</asp:BulletedList>
</asp:Content>
| where you can see that the bulleted list is defined by the
BulletedList and ListItem tags.
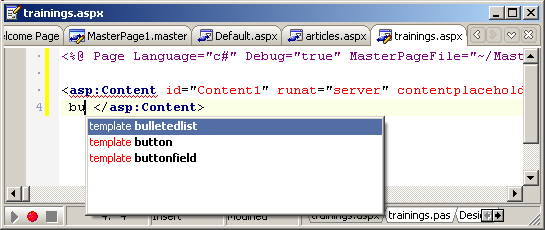
| Now, with the .ASPX tab selected, open the template list: |
| select "View | Templates"
| | | the list of all templates are presented
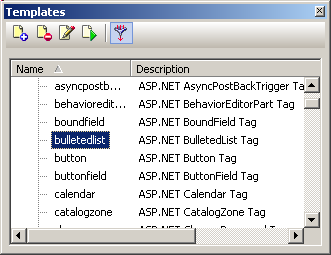 among which "BulletedList" and "ListItems"
| Therefore, to build our training page
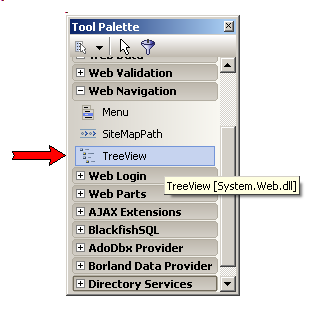
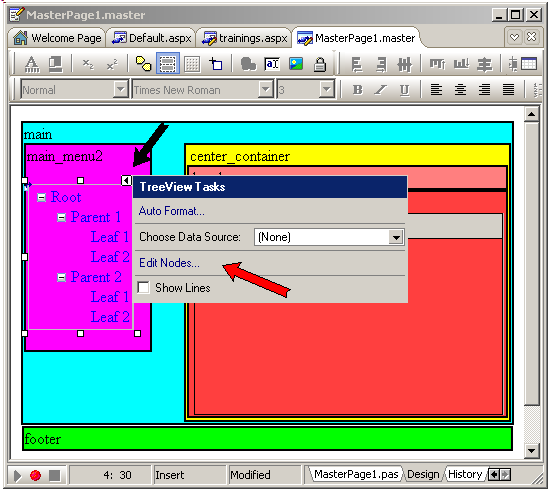
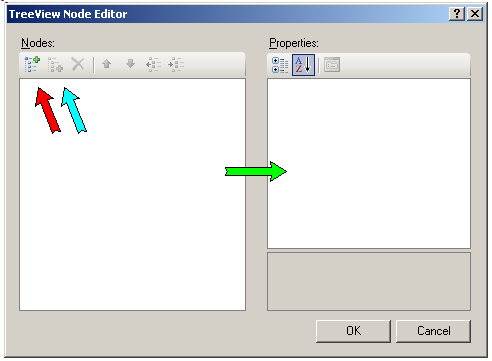
Now we can add a TreeView to allow navigation:
And here is the result: 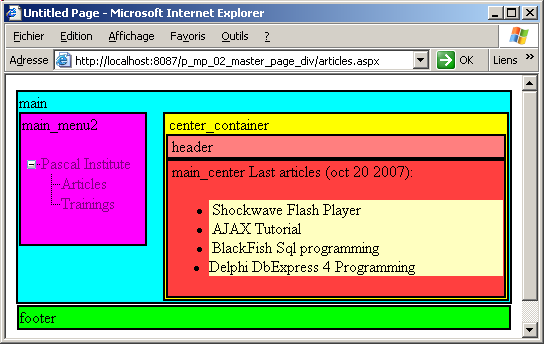
Note that
- usually the STYLE attributes are grouped together in a .CSS style sheet file. Among the benefits are
- a separation of the visual aspect and the .HTML text
- the possibility to reuse later the same .CSS style attributes in another application
This is quite easy to do, and will be shown below.
- at this stage, we could get rid of our tentative names ("header", "main
center", "footer" etc). This will also be done in the coming examples
- instead of using the TreeView editor, we could as well have used the treeview live template
3.2 - CSS Templates
It took us quite some time to find out how to position the DIV tags. As you saw, we first defined the block organization, then made a plain .HTML trial
version, and finally integrated the DIV structure in the Master Page. To avoid this tedious task, Delphi offers predefined .CSS templates
3.2.1 - First .CSS template Example
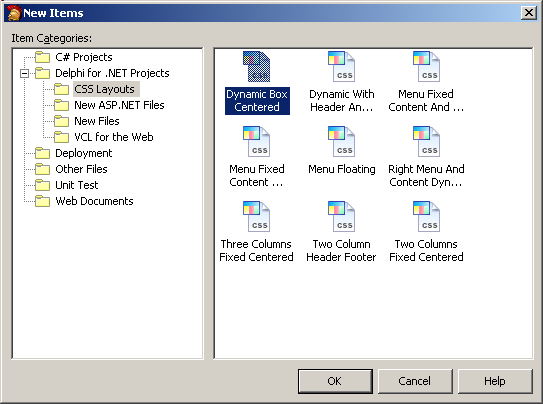
Let's build a new project with a .CSS Master Page template:
In addition, the Project Manager now contains an APPLICATION.CSS file with the style sheet for this layout: 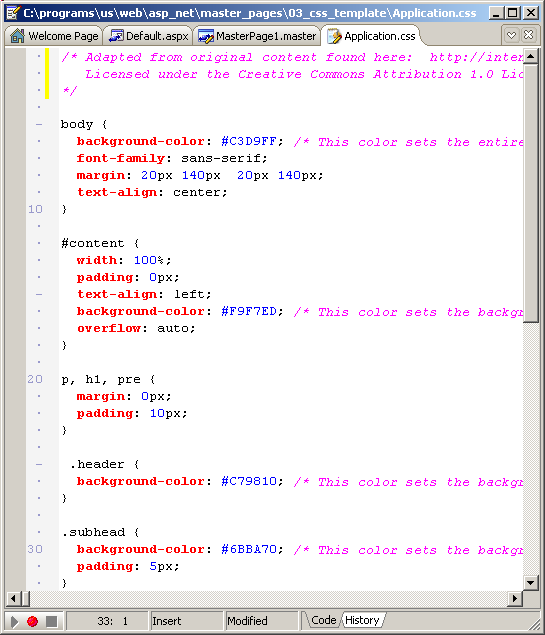
As you can see, this masterpiece is Copyrighted !. Maybe you are allowed to modify some values here or there, but you should read the copyright agreement first, or send your lawyers negociate some arrangements.
In any case the MasterPage1.Aspx contains the LINK tag to this .CSS file: 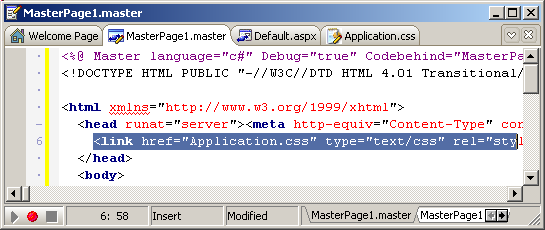
To use this .CSS layout
Please note
- as we already mentioned, the sizes during design are misleading. The green sub-header is way too high, but is resized to a reasonable height in the final result
- this layout finally boils down to using the MARGIN STYLE attribute to keep the 3 boxes in the middle
3.3 - Create your own Template Library
The whole .CSS layout template library is defined in the Delphi Object Repository folder: 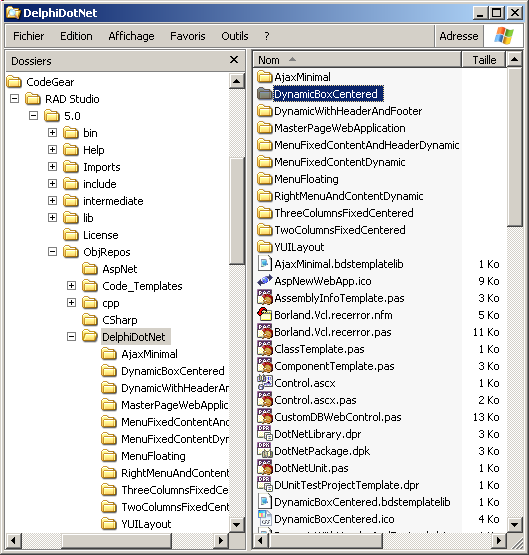
where there is a DynamicBoxCentered folder with the usual Asp.Net files, and a DynamicBoxCentered.bdstemplatelibrary configuration file. Therefore, to mimic this organization, we must
- create our basic application (which will be copied for the user application)
- add the bdstemplatelibrary configuration file.
First the template project: |
| create a new folder, copy the project MASTER_PAGE_DIV project, load it in Rad Studio
| | |
in the Project Manager, rename the project PASCAL_INSTITUTE_TEMPLATE, remove the ARTICLES and TRAININGS pages
| | |
select "File | New | Other | Web Document" 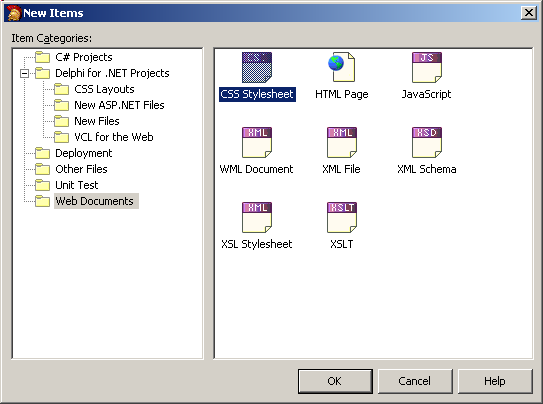 and save it as APPLICATION.CSS | |
| type the .CSS for our basic "menu - where_we_are - content - footer" page: 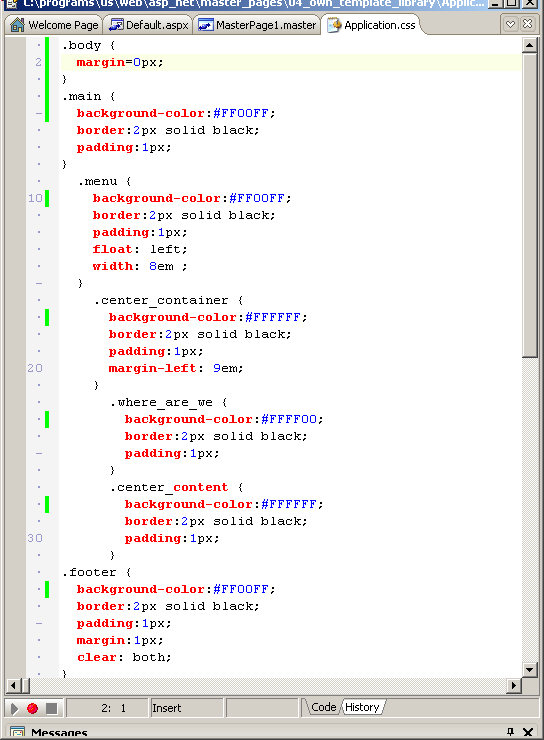 and save the result | |
| select MasterPage1 and the .MASTER central .HTML tab
| | |
position the caret after the TITLE tag, and add the LINK tag, using, for instance css CtrlEnter and filling the slot with Application.Css:
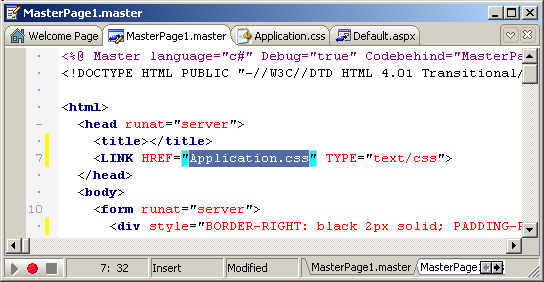 AND add check that you have both type="text/css" and
rel="stylesheet" before the ">" (either some are missing from the template, or they are only required by Internet Explorer) | | |
in the DIV tags, replace the STYLE attributes with a CLASS attribute referencing our .CSS markers. For instance the main
DIV that is displayed at the bottom of the previous snapshot and which contains:
<div style="BORDER-RIGHT: black 2px solid; PADDING-RIGHT: 1px;
BORDER-TOP: black 2px solid; PADDING-LEFT: 1px;
PADDING-BOTTOM: 1px; BORDER-LEFT: black 2px solid;
PADDING-TOP: 1px; BORDER-BOTTOM: black 2px solid;
BACKGROUND-COLOR: #00ffff">
main
</div>
| now becomes:
<div class="main">
main
</div>
| | | |
do the same for the other DIVs. It might come handy to pretty print the .ASPX presentation by selecting "Edit | HTML Tidy | Format Document", and after all replacements, check the .ASPX with "Edit | HTML Tidy | Check
Documents for Errors" Here is the result:
<%@ Master language="c#" Debug="true" Codebehind="MasterPage1.pas"
AutoEventWireup="false" Inherits="MasterPage1.TMasterPage1"%>
<!DOCTYPE HTML PUBLIC "-//W3C//DTD HTML 4.01 Transitional//EN">
<html>
<head runat="server">
<title></title>
<link href="Application.css" type="text/css" rel="stylesheet">
</head>
<body class="body">
<form runat="server">
<div class="main">
<div class="menu">
<asp:image id="Image1" runat="server"
imageurl="~/pascal_institute.png"></asp:image>
<asp:treeview id="TreeView1" runat="server"></asp:treeview>
</div>
<div class="center_container">
<div class="where_are_we">
Home -> Here
</div>
<div class="center_content">
<asp:contentplaceholder id="ContentPlaceHolder1"
runat="server">
</asp:contentplaceholder>
</div>
</div>
</div>
<div class="footer">
footer
</div>
</form>
</body>
</html>
| | | |
the design should look exactly the same as before separating the style in a .CSS file
| Now
In a similar way, cleanup the Default page | | select the default page, and replace the Content1 text with "type your content here"
|
| | save all
|
Now we have to create a configuration file for this template. To get an idea of
the format of such a file, open the DynamicBoxCentered.bdstemplatelib file in the object repository folder. Here is the content:
<?xml version="1.0" encoding="UTF-8"?>
<TemplateLibrary Version="1.0" id="DynamicBoxCentered" >
<Name>Dynamic Box Centered</Name>
<Description>Dynamic Box Centered</Description>
<Items>
<Item id="DynamicBoxCentered" Creator="AspDelphiProjectRepositoryCreator">
<Name>Dynamic Box Centered</Name>
<Description>Single box, centered with header and subheader</Description>
<ProjectFile>DynamicBoxCentered.dproj</ProjectFile>
<Icon>DynamicBoxCentered.ico</Icon>
<author>CodeGear</author>
<DefaultProjectName>DynamicBoxCentered</DefaultProjectName>
<FilePath>DynamicBoxCentered</FilePath>
<Categories>
<Category Value="CSS Layouts" Parent="Borland.Delphi.NET.New">
CSS Layouts
</Category>
</Categories>
</Item>
</Items>
</TemplateLibrary>
|
CAUTION: this original file is a Linux thingy (Linefeed instead of Return Linefeed) with a funny indentation.
Simply copy this file, and replace the values with your own values:
<?xml version="1.0" encoding="UTF-8"?>
<TemplateLibrary Version="1.0" id="pascal_institute" >
<Name>Pascal Institute</Name>
<Description>Pascal Institute</Description>
<Items>
<Item id="pascal_institute" Creator="pascal_institute">
<Name>Pascal Institute</Name>
<Description>Left menu, center location and content, footer</Description>
<ProjectFile>p_mp_04_pascal_institute_template.dproj</ProjectFile>
<Icon>DynamicBoxCentered.ico</Icon>
<author>Felix-Colibri</author>
<DefaultProjectName>pascal_institute</DefaultProjectName>
<FilePath>04_own_template_library</FilePath>
<Categories>
<Category Value="CSS Layouts" Parent="Borland.Delphi.NET.New">
CSS Layouts
</Category>
</Categories>
</Item>
</Items>
</TemplateLibrary>
| and
- the project is our project .DPROJ
- the path is the path containing this project
Then | |
save this file as PASCAL_INSTITUTE.BDSTEMPLATELIB in the folder containing the project
|
We now include this in the Delphi IDE | |
select "Tools | Template Libraries"
| | | the template library dialog is displayed: 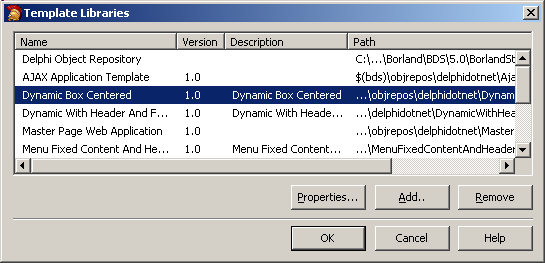 | | | click "Add" and select your .BDSTEMPLATELIB file
| |
| the template is added to the library 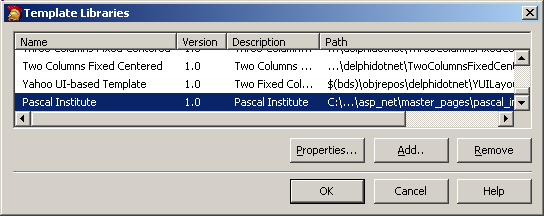 |
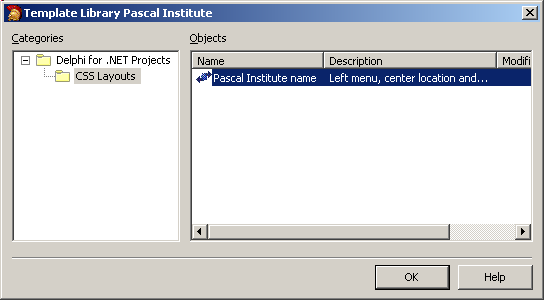
| | double click on this item | | | the properties are displayed:
 | | | Click "Ok" | |
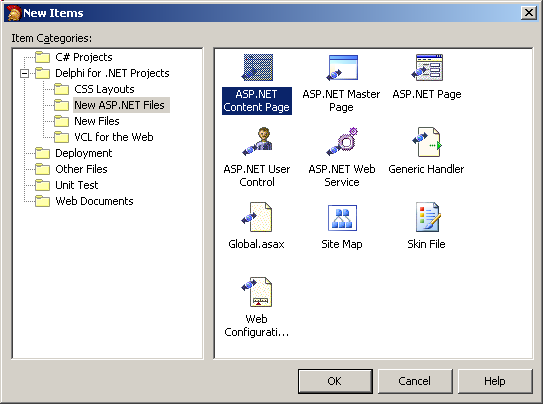
| close everything | | | select "File | New | Other | Delphi for .Net Projects | Css Layouts"
|
| | our new templates is also displayed: 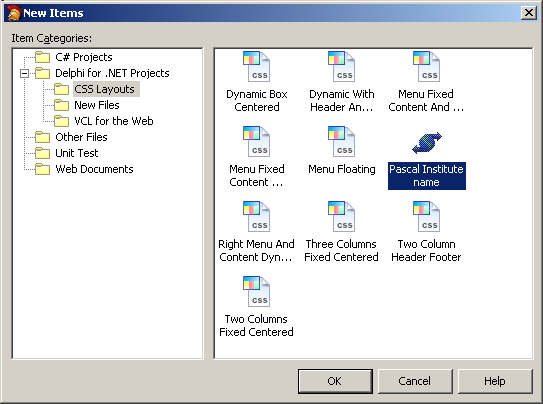
|
4 - Adding Title and Meta Tags 4.1 - Change the TITLE Our page did not containt any specific title. The title is important
- to offer a default file name when the user saves the page
- for all the referencing tools (Google etc)
We cannot add a title to a Content Page, since it does not contain the
TITLE tag. This tag is at the Master Page level. But Asp.Net anticipated this and allows us to set the title in the @page
directive located at the start of the .ASPX. This <@ Page tag can contain a TITLE attribute, and we can use this to set the Content's Page title.
Here is a simple example:
Please note - this CSS layout uses another CSS technique than our first example: it sets the absolute position of two DIV instead of using a floating
DIV at the left. The absolute positioning however only works for top-leftmost DIV, whereas the floating DIV can be used in
several blocks down in the page
- you may find many examples of those layouts on the YUI site.
4.2 - Adding some META tags
The same problem arises for META tags. In this case, since those can be quite numerous and take much room, they cannot be set from the <@ Page tag.
We have to get access to the master Page control, and modify its Header properties. This is usually performed in the Content Page's OnInit event. Here is an example: |
| select the .Code tab, and in the OnInt event, add the code which adds a "Keywords" META tag:
procedure TDefault.OnInit(e: EventArgs);
var l_c_my_page: System.Web.UI.Page;
l_c_html_head: HtmlHead;
l_c_html_meta: HtmlMeta;
begin
InitializeComponent;
inherited OnInit(e);
l_c_my_page:= Master.Page;
with l_c_my_page do
begin
Header.Title:= 'my_page_title';
// -- asp.Net 2.0 obsolete code:
// Header.MetaData.Add('Keywords', 'Delphi articles, training, development');
l_c_html_head:= HtmlHead(Header);
l_c_html_meta:= HtmlMeta.Create;
with l_c_html_meta.Attributes do
begin
Add('name', 'keywords');
Add('content', 'Delphi articles, training, development');
end; // with l_c_html_meta
l_c_html_head.Controls.Add(l_c_html_meta);
end;
end; // OnInit
|
Note that we commented out an Asp.Net 2.0 beta code which allowed to directly use a Page.Header.MetaData CLASS. This is no longer possible, so we used this other technique | |
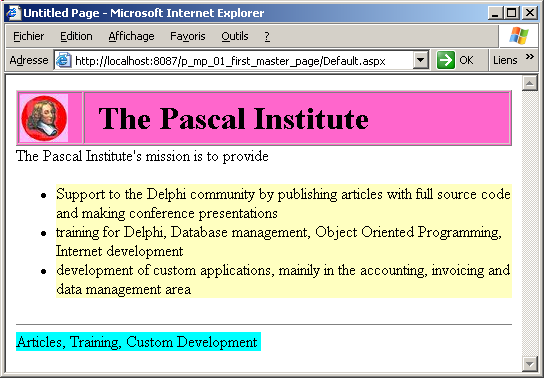
| compile and run
| | | when the Browser displays the page, select "Edit | View Source"
| | | here is the .HTML code:
<!DOCTYPE HTML PUBLIC "-//W3C//DTD HTML 4.01 Transitional//EN">
<html xmlns="http://www.w3.org/1999/xhtml">
<head>
<meta http-equiv="content-type" content="text/html; charset=iso-8859-1" />
<link href="Application.css" type="text/css" rel="stylesheet" />
<meta name="keywords"
content="Delphi articles, training, development" />
<title>
my_page_title
</title></head>
<body>
<!-- ... ooo -->
</body>
</html>
|
|
5 - Comment 5.1 - RAD Studio functionalities Usually for each paper we concentrate on a specific goal. In our case, the main topic was "Master Pages". So we should not have presented how to fill a
bulleted list, or set the TABLE properties. However, whenever we use Delphi 2006 or its successor RAD Studio, we discover new functionalities. Therefore, in the hope to present those along with the main topic of this
article, we did detail all actions used to build our pages.
5.2 - DIV versus TABLE The .CSS templates favor the DIV approach. I personally fell very
miserable when using .HTML DIV, having very disturbing results and never knowing what the final result might be. In addition, we only use
Internet Explorer, but who knows what it will look like with Fox or Opera Browsers. .HTML TABLES never disappointed us. It took some time to
understand the whole SPAN business, but since then, its all rock, rattle and roll !
5.3 - Other Master Page Techniques
We were far from exhaustive about Master Pages. We could have presented - using relative pathes
- nested Master Pages
- dynamic Master Pages
- specifying Master Pages in configuration pages
- communication with the Master Page
However we present those techniques in our Asp.Net 2.0 trainings
6 - Download the Asp.Net Sources Here are the source code files: The .ZIP file(s) contain: - the main program (.DPROJ, .DPR, .RES), the main form (.PAS, .ASPX), and
any other auxiliary form or files
- any .TXT for parameters, samples, test data
- all units (.PAS .ASPX and other) for units
Those .ZIP - are self-contained: you will not need any other product (unless expressly
mentioned).
- will not modify your PC in any way beyond the path where you placed the .ZIP (no registry changes, no path outside from the container path creation etc).
To use the .ZIP:
- create or select any folder of your choice.
- unzip the downloaded file
- using Delphi, compile and execute
To remove the .ZIP simply delete the folder.
The Pascal code uses the Alsacian notation, which prefixes identifier by program area: K_onstant, T_ype, G_lobal, L_ocal, P_arametre, F_unction, C_lass etc. This notation is presented in the Alsacian Notation paper.
As usual:
- please tell us at fcolibri@felix-colibri.com if you found some errors, mistakes, bugs, broken links or had some problem downloading the file. Resulting corrections will
be helpful for other readers
- we welcome any comment, criticism, enhancement, other sources or reference suggestion. Just send an e-mail to fcolibri@felix-colibri.com.
- or more simply, enter your (anonymous or with your e-mail if you want an answer) comments below and clic the "send" button
- and if you liked this article, talk about this site to your fellow developpers, add a link to your links page ou mention our articles in your blog or newsgroup posts when relevant. That's the way we operate:
the more traffic and Google references we get, the more articles we will write.
7 - References Here are some references concerning Asp.Net and RAD Studio First, a couple of videos:
If you want to watch those .SWF with pause, playback, snapshots etc, you can look at our Shockwave Flash Player article
For CSS layout, you will find within the Delphi layouts a YUI example. YUI stands for Yahoo User Interface, which is a library available at SourceForge with lots of documentation, templates, scripts for
building web pages. The most insteresting for CSS layout is the Yahoo Grids which lets you interactively build a page layout.
We found the most accurate articles about Master Pages on the MSDN site. For instance:
And on our side:
- this section contains other Asp.Net (1.4) articles
- Delphi Asp.Net 1.0 and 2.0 Trainings : as you might have noticed, we regularily offer Delphi training sessions, among which some
dedicated to RAD Studio in general, and Asp.Net in particular.
8 - The author Felix John COLIBRI works at the Pascal
Institute. Starting with Pascal in 1979, he then became involved with Object Oriented Programming, Delphi, Sql, Tcp/Ip, Html, UML. Currently, he is mainly
active in the area of custom software development (new projects, maintenance, audits, BDE migration, Delphi
Xe_n migrations, refactoring), Delphi Consulting and Delph
training. His web site features tutorials, technical papers about programming with full downloadable source code, and the description and calendar of forthcoming Delphi, FireBird, Tcp/IP, Web Services, OOP / UML, Design Patterns, Unit Testing training sessions.
|