|
Asp.Net 2.0 Security : Users, Roles, Profiles - Felix John COLIBRI. |
- abstract : Asp.Net 2.0 offers a vaslty improved support for handling security: new Login Controls, and services for managing Users, grouping
Users in Roles, and storing User preferences in Profiles
- key words : Asp.Net 2.0 Security - Membership - Roles - Profiles -
security Providers - Blackfish - CLASS HELPERs
- software used : Windows XP Home, Rad Studio 2007 (build 2852.9797)
- hardware used : Pentium 2.800Mhz, 512 M memory, 140 G hard disc
- scope : Rad Studio 2007
- level : Delphi Web developer
- plan :
1 - Introduction
Many web sites must manage the Users which read the web pages: only clearly identified Users should be allowed to access certain resources. The User management tasks are quite obvious for message boards, social network
sites, web portals, or eCommerce. The site management must include user accounts, and ways to authenticate the incoming User (check who he really is) and define which resources he should be allowed to get access to.
Asp.Net 1.x already had defined how to authenticate and authorize Users. But all the User management, the Login interface, the storing of those informations had to be coded by the developer.
Asp.Net 2.0 takes a big step forward by including - User management
- the specification of Roles (groups of Users for authorization purposes)
- handling of Profiles (personal User properties)
And we have - dedicated web controls for handling the most obvious tasks (Login, changing the password etc)
- default behaviour specified by parameter files
- programmatic support for handling more specific cases
We first will review the security basics, then will move along to present Asp.Net 2.0 security services.
2 - Basic Asp.Net 1.x Security 2.1 - Authentication 2.1.1 - Authentication Steps To add authentication, the steps are the following:
- in all the pages for which we want to check the user credentials, including eventually the Default.Aspx, we check whether the User is authenticated. This is usually performed in OnPageLoad:
procedure TDefault.Page_Load(sender: System.Object;
e: System.EventArgs);
begin
if not User.Identity.IsAuthenticated
then Response.Redirect('LoginForm.aspx')
else Label1.Text:= 'Welcome: '+ User.Identity.Name;
end; // Page_Load
| - in the Web.Config file, we add two information
- we want to use Forms Authentication (as opposed to "Windows", "Passport", or any other)
- we want to redirect any user to the login form that we specify
Here is an example:
<?xml version="1.0" encoding="utf-8" ?>
<configuration>
<system.web>
<authentication mode="Forms">
<forms
name="my_login_cookie"
loginUrl="LoginForm.aspx"
timeout="3">
</forms>
</authentication>
</system.web>
</configuration>
| - the login form itself, LoginForm.Aspx asks the User to enter his credentials (name and password in our case), and decide, based on some logic, whether this user is considered authenticated
function TLoginForm.f_are_user_and_pass_valid(
p_user_name, p_password: String): Boolean;
begin
Result:= (p_user_name = 'my_user') and (p_password = 'my_pass');
end; // f_are_user_and_pass_valid
procedure TLoginForm.login__Click(sender: TObject;
e: System.EventArgs);
begin
if f_are_user_and_pass_valid(
user_textbox_.Text, password_textbox_.Text)
then FormsAuthentication.RedirectFromLoginPage(
user_textbox_.Text, False);
end; // login__Click
| Where - the function f_are_user_and_pass_valid decides, based on hard coded
string litteral, whether some user name and password are correct or not
- this function is called by the LoginButton.OnClick, and if the result is True, the RedirectFromLoginPage send to the User the page he first
asked for (Default in our case)
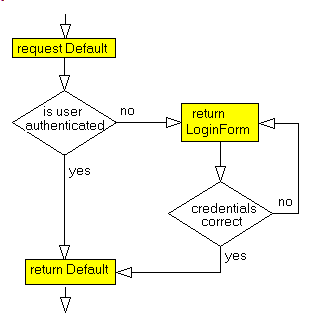
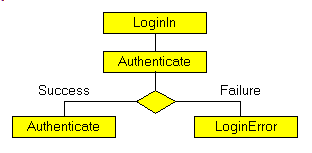
2.1.2 - Authentication Logic The authentication logic looks like this:
2.1.3 - Tracing the Authentication Steps Here is the scenario of a non-authenticated user requesting Default.Aspx, traced using our Cassini Spy tracing tool:
- Cassini (or any other HTTP Server is started)
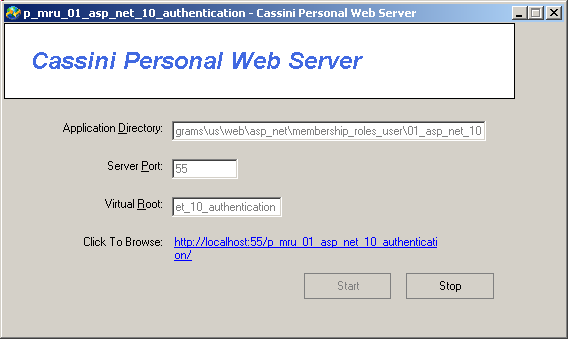
- using Internet Explorer (or any suitable Web Browser), the user requests a page from our site. For instance, Default.Aspx
When the User sends his request, the HTTP request is sent to the Server (partial trace)
-> | GET /p_92_forms_authentication/Default.Aspx HTTP/1.1
-> | Accept: image/gif, image/x-xbitmap, ...ooo...
-> | User-Agent: Mozilla/4.0 (compatible; MSIE 6.0; ...ooo...
-> | Host: localhost:81
-> | Connection: Keep-Alive
-> |
-> | | - the server loads Default, User.Identity.IsAuthenticated returns False,
the Server returns an error 302, asking the Browser to redirect to Login.Aspx
<- | HTTP/1.1 302 Found
<- | Server: Cassini/1.0.0.0
<- | Date: Sun, 04 Nov 2007 06:45:03 GMT
<- | X-AspNet-Version: 1.1.4322
<- | Location: /p_92_forms_authentication/LoginForm.Aspx
<- | Set-Cookie: ASP.NET_SessionId=tvol0y45oij1do45l0opot45; path=/
<- | Cache-Control: private
<- | Content-Type: text/html; charset=utf-8
<- | Content-Length: 158
<- | Connection: Close
<- |
<- |
<- | <html><head><title>Object moved</title></head><body>
<- | <h2>Object moved to <a href='/p_92_forms_authentication/
LoginForm.Aspx'>here</a>.</h2>
<- | </body></html>
<- |
|
- the browser requests the redirected page (we hardly see this in the Browser):
-> | GET /p_92_forms_authentication/LoginForm.Aspx HTTP/1.1
-> | Accept: image/gif, image/x-xbitmap, image/jpeg, ...ooo...
-> | User-Agent: Mozilla/4.0 (compatible; MSIE 6.0; ...ooo...
-> | Host: localhost:81
-> | Connection: Keep-Alive
-> | Cookie: ASP.NET_SessionId=tvol0y45oij1do45l0opot45
-> |
-> | | - the Server sends back the LoginForm.Aspx:
<- | HTTP/1.1 200 OK
<- | Server: Cassini/1.0.0.0
<- | Date: Sun, 04 Nov 2007 06:45:03 GMT
<- | X-AspNet-Version: 1.1.4322
<- | Cache-Control: private
<- | Content-Type: text/html; charset=utf-8
<- | Content-Length: 974
<- | Connection: Close
<- |
<- |
<- | <!DOCTYPE HTML PUBLIC "-//W3C//DTD HTML 4.0 Transitional//EN">
<- | <html>
<- | <head>
<- | <title></title>
<- | </head>
<- | <body ms_positioning="GridLayout">
<- | <form name="_ctl0" method="post"
action="LoginForm.Aspx" id="_ctl0">
<- | <input type="hidden" name="__VIEWSTATE"
value="dDw3ODA0Mj ...ooo... U6r" />
<- | <span id="Label1" style="Z-INDEX: 3; ...ooo... />
<- | <input name="user_textbox_" type="text"
id="user_textbox_" style=" ...ooo... />
<- | <span id="Label2" style="Z-INDEX: ...ooo... />
<- | <input name="password_textbox_" type="text"
id="password_textbox_" style=" ...ooo... />
<- | <input type="submit" name="login_button_" value="Login"
id="login_button_" style=" ...ooo... />
<- | </form>
<- | </body>
<- | </html> | which is displayed like this: 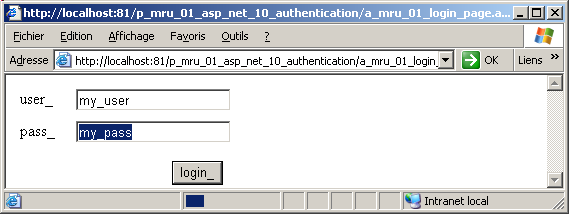
- the user type his user name "my_user" and his password "my_pass" and click "Login"
-> | POST /p_92_forms_authentication/LoginForm.Aspx HTTP/1.1
-> | Accept: image/gif, image/x-xbitmap, image/jpeg ...ooo...
-> | Referer: http://localhost:81/p_92_forms_authentication/
LoginForm.Aspx
-> | Content-Type: application/x-www-form-urlencoded
-> | User-Agent: Mozilla/4.0 (compatible; MSIE 6.0; ...ooo...
-> | Host: localhost:81
-> | Content-Length: 124
-> | Connection: Keep-Alive
-> | Cache-Control: no-cache
-> | Cookie: ASP.NET_SessionId=tvol0y45oij1do45l0opot45
-> |
-> | __VIEWSTATE=dDw3ODA0MjA4 ...ooo...
4BNmJU6r&user_textbox_=my_user
&password_textbox_=my_pass&login_button_=Login
| which contains the credentials (non crypted because we did not ask for it) - the Server asks the Browser to redirect to Default.Aspx
<- | HTTP/1.1 302 Found
<- | Server: Cassini/1.0.0.0
<- | Date: Sun, 04 Nov 2007 06:45:11 GMT
<- | X-AspNet-Version: 1.1.4322
<- | Location: /p_92_forms_authentication/default.aspx
<- | Set-Cookie: logincookie=FBD8A89 ...ooo...0765F4A667; path=/
<- | Cache-Control: private
<- | Content-Type: text/html; charset=utf-8
<- | Content-Length: 1162
<- | Connection: Close
<- |
<- | <!DOCTYPE HTML PUBLIC "-//W3C//DTD HTML 4.0 Transitional//EN">
<- | <html>
<- | <head>
<- | <title></title>
<- | </head>
<- | <body ms_positioning="GridLayout">
<- | <form name="_ctl0" method="post"
action="LoginForm.Aspx" id="_ctl0">
...ooo... same as previous LoginForm
...ooo... but with User and Pass filled
<- | </form>
<- | </body>
<- | </html> | - since this is a redirection request, the Browser asks for the redirected page:
-> | GET /p_92_forms_authentication/default.aspx HTTP/1.1
-> | Accept: image/gif, image/x-xbitmap, image/jpeg, image/pjpeg, application/x-shockwave-flash, */*
-> | Referer: http://localhost:81/p_92_forms_authentication/LoginForm.Aspx
-> | User-Agent: Mozilla/4.0 (compatible; MSIE ...ooo...
-> | Host: localhost:81
-> | Connection: Keep-Alive
-> | Cache-Control: no-cache
-> | Cookie: ASP.NET_SessionId=tvol0y45oij1do45l0opot45;
logincookie=FBD8A8940 ...ooo...
-> |
-> | |
- the Server returns, at long last, the Default.Aspx page:
<- | HTTP/1.1 200 OK
<- | Server: Cassini/1.0.0.0
<- | Date: Sun, 04 Nov 2007 06:45:11 GMT
<- | X-AspNet-Version: 1.1.4322
<- | Cache-Control: private
<- | Content-Type: text/html; charset=utf-8
<- | Content-Length: 490
<- | Connection: Close
<- |
<- |
<- | <!DOCTYPE HTML PUBLIC "-//W3C//DTD HTML 4.01 Transitional//EN">
<- | <html>
<- | <head>
<- | <title></title>
<- | </head>
<- | <body>
<- | <form name="_ctl0" method="post" action="default.aspx" id="_ctl0">
<- | <input type="hidden" name="__VIEWSTATE"
value="dDwyMDQw ...ooo...COAfH2XUVkKIvVc=" />
<- |
<- | <span id="Label1">Welcome: my_user</span>
<- | </form>
<- | </body>
<- | </html> | and the user sees: 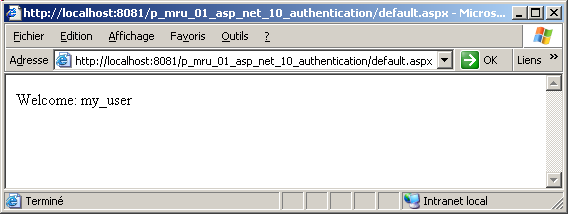
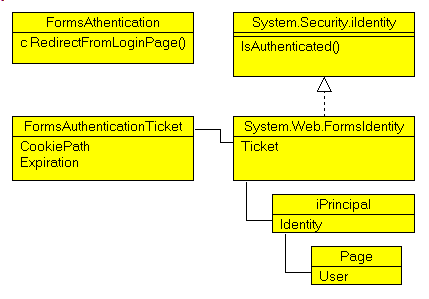
2.1.4 - UML CLASS Diagrams
We can sum-up the CLASSes we used with the following Class diagram:
2.2 - Authorization
Once your site has checked that the user really is the person he claims to be, you can decide which resource (page, folder, file etc) he is allowed to use. This is called Authorization. For folder authorization, we can be set up using Web.Config:
- for each folder we want to protect, we create the <authorization section and write a combination of <allow and <deny tags
- if the user is not allowed to access some resource, he is sent back to the login page
The rules to allow or deny are the following - the rules are analyzed in sequential order, and the first which is true
exits (the rules after this one are not checked)
- the two wildcards are
- ? for ANONYMOUS
- * for ALL
Here is an example: 
| we add the following section to Web.Config (in the root page):
<configuration>
<system.web>
<authentication mode="Forms">
<forms
name="my_login_cookie"
loginUrl="LoginForm.aspx"
timeout="3">
<credentials passwordFormat= "Clear">
<user name="my_user" password="my_pass" />
<user name="joe" password="joe_pass" />
<user name="ann" password="ann_pass" />
</credentials>
</forms>
</authentication>
<authorization>
<deny users="?" />
<allow users="my_user" />
<allow users="my_user,joe,ann" />
<deny users="ann" />
</authorization>
</system.web>
</configuration>
| |
| | we create a my_login.aspx page, which contains 2 Textboxes and one Button, which checks the user and pass:
procedure TLoginForm.login__Click(sender: TObject;
e: System.EventArgs);
begin
if FormsAuthentication.Authenticate(user_textbox_.Text,
password_textbox_.Text)
then FormsAuthentication.RedirectFromLoginPage(
user_textbox_.Text, False);
end; // login__Click
| | | |
all pages are now protected by the Asp.Net checks, and there is no need to write explicit checks. For instance, in the Default.Page_Load, we have:
procedure TDefault.Page_Load(sender: System.Object;
e: System.EventArgs);
begin
Label1.Text:= 'Welcome: '+ User.Identity.Name;
end; // Page_Load
| |  |
when we run the project, the login is presented. Only MY_USER and JOE will see the Default.Aspx,
|
Please note: - authentication can ONLY be places in the root Web.Config, but authorization
can be placed in any folder of our site
- the test User.Identity.IsAuthenticated in each page is no longer necessary
- we could hash the password in Web.Config, to avoid people on the Server
having access to Web.Config to see those passes
- we could write code to place the user, password, authorization in some database, instead of placing them in Web.Config
3 - Membership and User Management 3.1 - Asp.Net 2.0 Membership Services User management is about handling user credential (user-name, password, and
maybe other items, like e-mail, preferences etc). It involves - creating, updating, deleting user accounts
- enabling the developer to include visual controls for doing so.
Asp.Net 2.0 offers
- predefined controls for Login, Logout, registration etc. So we no longer have to create forms with the user name and password TextBoxes and "Login" button
- a pre-defined API for managing Users, which includes
- a set of CLASSes
- an implementation of the persistence of the users (saving the information on disc)
3.2 - Initializing Membership
When Membership in place, access to the pages will be protected by User / Passwords. This information is usually stored on disc. So someone has to initialize the store, at least with a first User / Pass.
For Delphi, by default, the data is stored in a Blackfish database. So, initializing this data amounts to adding some rows to the user table. This can be done - using the Data Explorer
- using a Delphi project (Win32, Vcl.Net or Asp.Net)
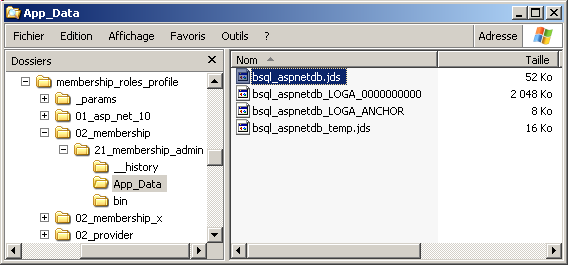
3.2.1 - Creating the Membership database
This Database is created automatically by Delphi when you run any Asp.Net application once. Let's create this project:
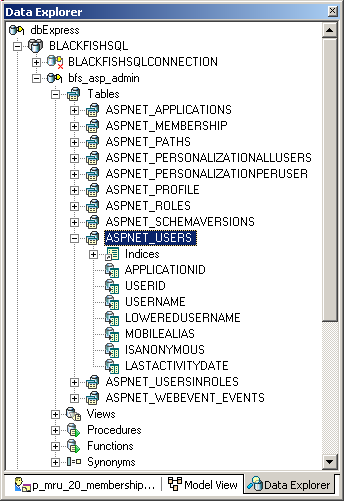
We can examine this database using the Data Explorer:
3.2.2 - Creating the Database with ASPNET_REGDB.EXE
The Membership database is created automatically when we run any Asp.Net project once. Delphi simply creates the APP_DATA path, creates a new empty .JDS database,
and initializes the empty TABLEs. This TABLE creation is performed by running a Delphi .EXE which is placed by the Delphi installation in the .Net Framework directory:
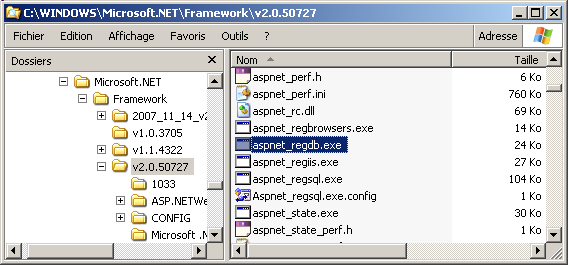
You may notice that there is an ASPNET_REGSQL.EXE in the same directory, and this one if from Microsoft, and it will create Sql Server tables.
If your Delphi version does not create the bsql_aspnet.jds database, you can create the database using any technique (the Data Explorer, or any Win32 or Vcl.Net code).
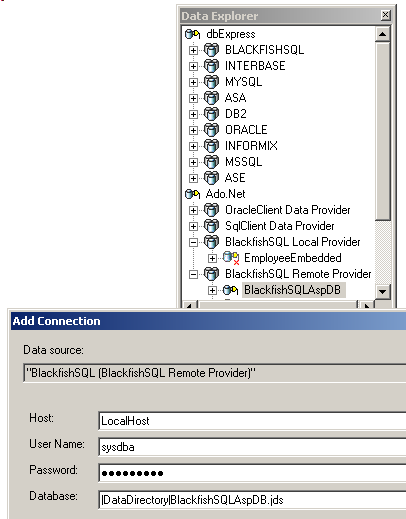
Here is an example where we will create the same database in a temporary folder MY_APP_DATA | |
select "Data Explorer | dbExpress | BLACKFISHSQL | right click | Add New Connection"
| | |
enter a connection name, like "bfs_membership_base" click "Ok"
| | | a new node is created in the treeview
| |
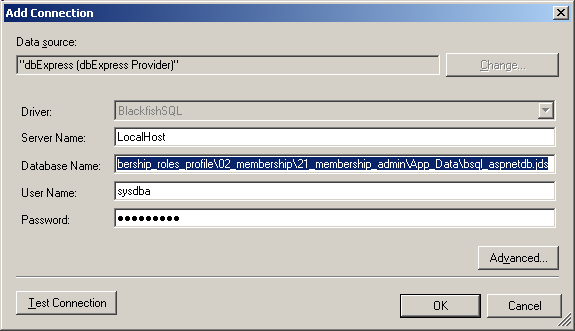
| select "bfs_asp_admin | Modify Connection", and enter the host and .jds path, like: - LocalHost
- C:\programs\us\web\asp_net\membership_roles_profile\
02_membership\21_membership_admin\my_app_data\bfs_membership.jds
| | | click "Advanced" and toggle "Create" to True
|
| | click "Ok"
| | | click "Test Connection"
| |
| an empty Blackfish database is created
| | | click "Ok" to save the new connection
|
And here is how to create the empty Membership TABLEs in this database: | |
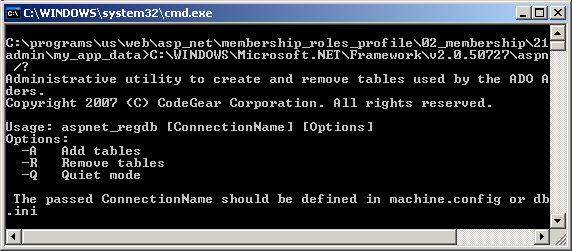
open Notepad, and ask aspnet_regdb to display its commands in a command-line box:
C:\WINDOWS\Microsoft.NET\Framework\v2.0.50727\aspnet_regdb.exe /? | | | |
save this under aspnet_regdb_help.bat (is is in the downloadable .ZIP) and run it
| | | here are the aspnet_regdb commands:
 | | |
since this help talks about MACHINE.CONFIG, here is this file's location: 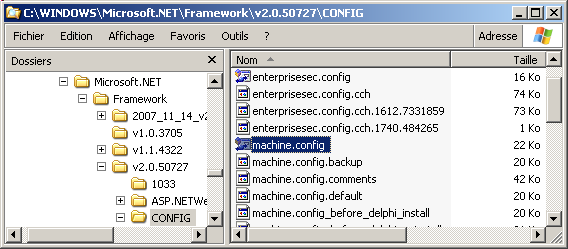 and this file, after Delphi installation, contains a Blackfish entry,
with the BlackfishSQLAspDB connection name:
<?xml version="1.0" encoding="UTF-8"?>
<configuration>
...ooo...
<connectionStrings>
<add name="BlackfishSQLAspDB" connectionString="host "...ooo... />
<add name="LocalSqlServer" connectionString="data " ..ooo... />
</connectionStrings>
...ooo...
</configuration>
|
|
Now we can create the Membership TABLEs in this database: | | open Notepad, and type the line which will execute aspnet_regdb in order do
create the empty TABLEs (Ed: the command on a single line):
C:\WINDOWS\Microsoft.NET\Framework\v2.0.50727\aspnet_regdb.exe
bfs_membership_base -A
pause | Save this under a .BAT name and start the .BAT | | |
the table is created 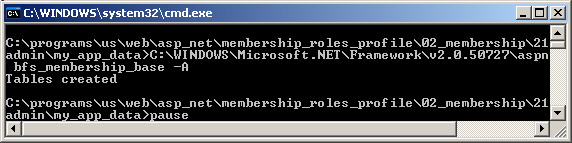 And the .Jds size jumped from 52 K to 272 k
|
Instead of using the name of our connection ("bfs_membership_base") we could have used the MACHINE.CONFIG name, which is BlackfishSQLAspDB. In fact this is also the name of a default Ado.Net provider connection (Ed:: partial)
 Also note that the database is hardcoded, and still works for any of our Asp.Net project. This works because the database name uses the
|DataDirectotry| "macro", which stands for "the App_Data subdirectory of the current project".
3.2.3 - Creating a Database and User manually
Finally, we could as well create the TABLEs ourselves. For the Sql Server engine, Microsoft provided the scripts: 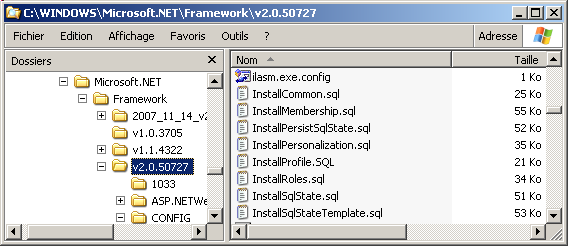
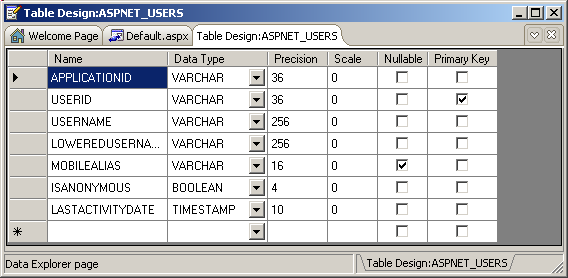
But for Delphi, we have to extract them from the current table. You can either use a script extractor (we published several of those), or use the Dbx4 metadata facilities, or, for simple projects like this, simply look at the
Data Explorer description:
Base on this view, an adequate script would be:
CREATE TABLE aspnet_users
(
applicationid CHAR(36) NOT NULL,
usreid CHAR(36) NOT NULL,
username VARCHAR(256) NOT NULL PRIMARY KEY,
loweredusername VARCHAR(256) NOT NULL,
mobliealias VARCHAR(16),
isanonymous boolean NOT NULL,
lastactivitydata TIMESTAMP NOT NULL
)
|
Using this script, we can create the ASPNET_USERS Table by several means: - using the Data Explorer Active Query Builder (see our
Dbx4 Programming paper)
- using code from any Delphi application
Since we are in Internet country, we will use an Asp.Net application, with the DataStore connection and command: | |
on the previously create blank Asp.Net application, select "Design", and in the Object Inspector, select "DOCUMENT" and then set PageLayout to GridLayout
| |
| make sure the "Project Manager | References" contains the following assemblies (Ed: for this step and the other steps presented later):
Borland.Data.DbxCommon.Dll
Borland.Data.CommonDriver.Dll
Borland.Data.AdoDbxClient.Dll
Borland.Data.BlackfishSql.LocalClient.Dll
and if not, add them ("right click | Add reference" etc)
| |
| select "Tools Palette | BlackfishSQL | DataStoreConnection", drag it on the Form and select "Object Inspector | ConnectionString | Ellipsis", and
in the dialog, select the "bfs_membership_manual.jds" database: 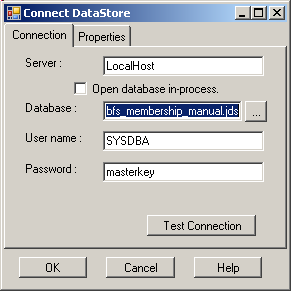 test it and close | |
| select "Tools Palette | BlackfishSQL | DataStoreCommand", drag it on the Form and set its Connection to DataStoreConnection1
|
| | drag a Button on the Form, and in its Click event, create the ASPNET_USERS Table:
const k_create_aspnet_users_request=
'CREATE TABLE aspnet_users'
+ ' ('
+ ' applicationid CHAR(36) NOT NULL,'
+ ' usreid CHAR(36) NOT NULL,'
+ ' username VARCHAR(256) NOT NULL PRIMARY KEY,'
+ ' loweredusername VARCHAR(256) NOT NULL,'
+ ' mobliealias VARCHAR(16),'
+ ' isanonymous BOOLEAN NOT NULL,'
+ ' lastactivitydata TIMESTAMP NOT NULL'
+ ' )' ;
procedure execute_datastore_command(p_c_datastore_command: DataStoreCommand;
p_request: String);
// -- assumes the connection is open
begin
with p_c_datastore_command do
begin
CommandText:= p_request;
ExecuteNonQuery;
end; // with p_c_datastore_command
end; // execute_datastore_command
procedure TDefault.create_user_table__Click(sender: System.Object;
e: System.EventArgs);
begin
DataStoreConnection1.Open;
execute_datastore_command(DataStoreCommand1,
k_create_aspnet_users_request);
DataStoreConnection1.Close;
end; // create_user_table__Click
| | | |
your USES clause should contain the following UNITs (Ed: for this and for the next steps below):
System.Data.Common
Borland.Data.DataStore
Borland.Data.AdoDbxClientProvider; |
| | run and click on the Button
| | | the Table is created
If you select the Data Explorer, and refresh the "bfs_membership_manual" connection, you will also see the Table
|
For the rest of the presentation, we will use the App_Data database.
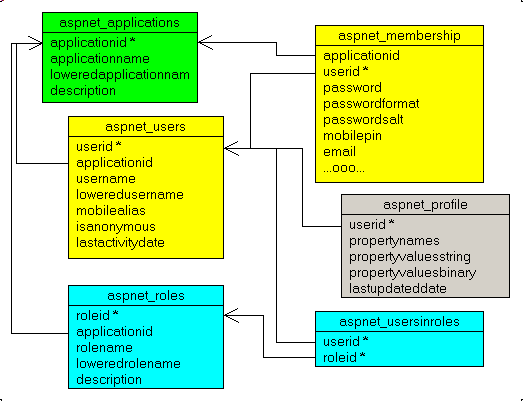
3.2.4 - The Delphi Security Tables Before using the user Table, or any other Table, we must understand the relationships between those Tables. Here is a simplified schema of the database:
And - the ASPNET_APPLICATIONS is there to allow the same database to be used by several Asp.Net applications. This can be later used by using the user
PLUS the application for deciding what to authorize or deny
- the ASPNET_USERS mainly contains the User name
- in a separate Table, the ASPNET_MEMBERSHIP contains the User password, with
lots of similar informations (the view above is truncated for this Table)
If we want to group users in Roles, we add the role management Tables: - ASPNET_ROLES define the role name
- ASPNET_USERINROLES allow to link users in roles, in a typical n to n fashion (a user can have many roles, and a role obviously contains many users)
In addition, we can add user Profiles which mainly handle User preferences
- for a given User, the ASPNET_PROFILE contains lists of properties (what the User likes)
There are other Tables which are less important and were not included in this schema.
Please note:
- all ID's are 36 character strings. Looking at the Sql Server scripts, the type is "uniqueidentifier" and is exactly the size of a GUID
- we will not use GUIDs which are quite cumbersome to handle, but use a simple ID scheme:
- 100x for Applications
- 200x for Users
- 300x for Roles
3.3 - Creating the First User 3.3.1 - Entering new Users
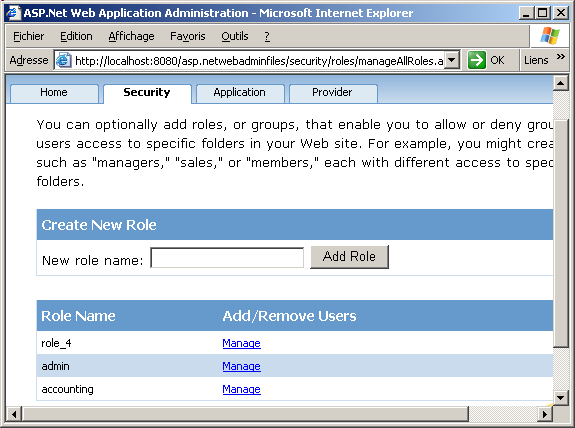
Just to experiment how the Membership framework will work, we must have some userpass in our database. There are several ways to do this: - using the Microsoft Asp.Net web administration pages
- or directly inserting data in our database Tables
- using the Data Explorer
- by code
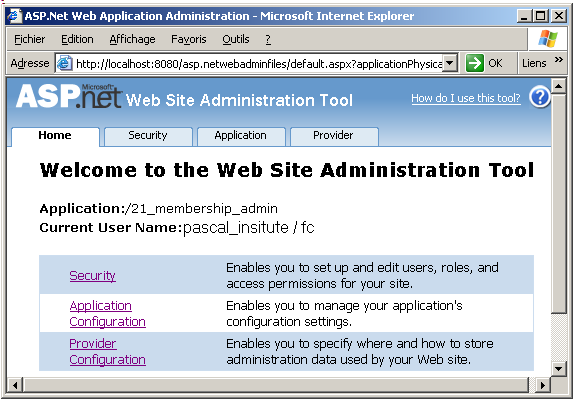
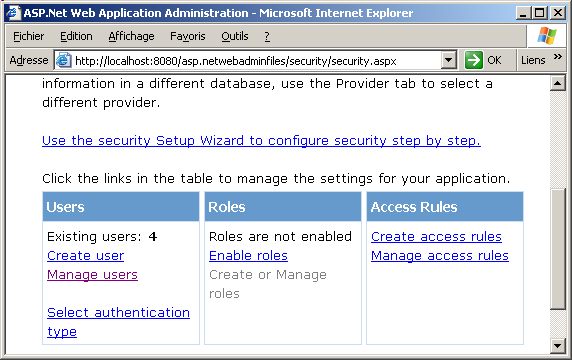
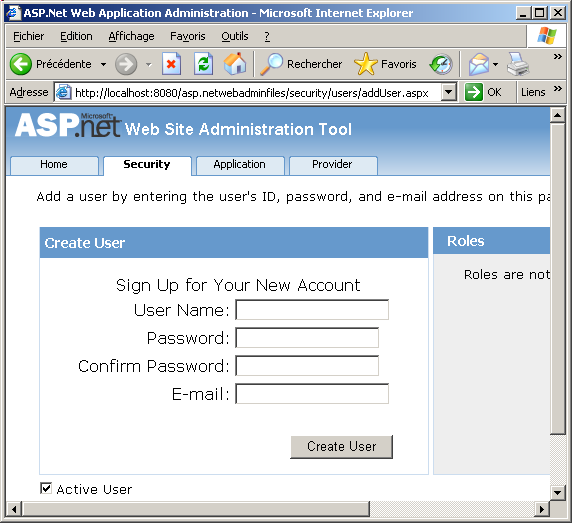
3.3.2 - The Microsoft Asp.Net Configuration application Here is how to use the configuration utility:
Please note:
- all the Asp.Net administration pages are in source code in the following directory:
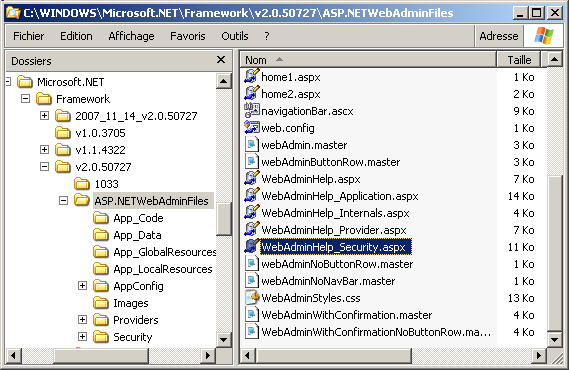
- whenever we start the admin tool, there is some delay, since it has to find our security database and recompile the complete tool
3.3.3 - Direct Database User Entry with the Data Explorer
We can enter it using the Data Explorer: | | select "Data Explorer | dbExpress | BLACKFISHSQL | bfs_asp_admin | Tables
| ASPNET_APPLICATIONS | right click | Retrieve Data From Table" | | | the ASPNET_APPLICATIONS empty Table is displayed | |
| enter "my_app my_app 1001"  and select "right click | Update"
|
Please note - the "Retrieve Data From Table" menu caption which allows Table inserts is quite strange. In fact, in our Dbx4 or Blackfish tutorials, we never succeeded, always trying to insert after the Table had been displayed using
a double click.
3.3.4 - Direct Database User Entry with Delphi code Rather than using either the Asp.Net configuration tool or the Database
Explorer, we prefer to use Delphi code. This turns out to be a simple Asp.Net database exercise, but one never has enough of those.
First we will add a row to the ASPNET_USERS Table. All the rows are NOT NULL, so we must fill them all. To do this, we will use a parametrized query:
INSERT INTO aspnet_users
(applicationid, userid, username, loweredusername,
isanonymous, lastactivitydata)
VALUES (1001, ?, ?, ?, False, ? )
| And here is the code: |
| reopen the previously created application "membership_admin" which created the ASPNET_USERS Table
| | |
drop a new DataStoreCommand and, in the Object Inspector
- rename it "insert_user_command_"
- connect Connection to DataStoreConnection1
- select "Parameters | ellipsis" and in the Parameter editor, add four parameters, three of type VarChar, and the last of type TimeStamp
| |
| add two Textboxes for the user id and user name, and a Button, and in the Click event, add a new user to the Table:
const k_add_user_request=
'INSERT INTO aspnet_users'
+ ' (applicationid, userid, username, loweredusername,'
+ ' isanonymous, lastactivitydata)'
+ ' VALUES (1001, ?, ?, ?, False, ? )'
;
procedure TDefault.add_user__Click(sender: System.Object;
e: System.EventArgs);
begin
DataStoreConnection1.Open;
insert_user_comand_.CommandText:= k_add_user_request;
insert_user_comand_.Prepare;
insert_user_comand_.Parameters[0].Value:= id_textbox_.Text;
insert_user_comand_.Parameters[1].Value:= user_name_textbox_.Text;
insert_user_comand_.Parameters[2].Value:= user_name_textbox_.Text;
insert_user_comand_.Parameters[3].Value:= DateTime.Now;
insert_user_comand_.ExecuteNonQuery;
DataStoreConnection1.Close;
end; // add_user__Click
|
| | |
run and enter some users
|
To be able to start anew, we also added buttons for - dropping the Table
- deleting all rows
- displaying the users in a TextBox
Here is a snapshot of the application, after listing our users: 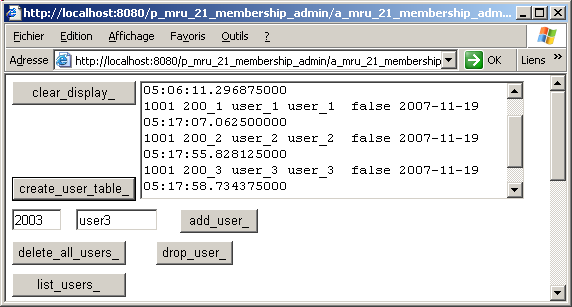
Please note
- we froze the application code to the 1001 value, but, of course, you could also use a Textbox to enter this value
- we could not enter the dates in the Data Explorer, but since we do it by
code this is of little importance
- we chose to create the parameters in the Object Inspector, but they could also have been created by code (this is done in some of our later examples)
So far we entered an Application, a couple of users, but we also must fill the ASPNET_MEMBERSHIP Table which mainly contains the passwords. We used the same technique, and added to this application the possibility to
create this membership table, and enter some value. Here is the creation request:
CREATE TABLE aspnet_membership
(
applicationid CHAR(36) NOT NULL,
userid CHAR(36) NOT NULL PRIMARY KEY,
password VARCHAR(128) NOT NULL,
passwordformat INTEGER DEFAULT 0 NOT NULL,
passwordsalt VARCHAR(128) NOT NULL,
mobilepin VARCHAR(16),
email VARCHAR(256),
loweredemail VARCHAR(256),
passwordquestion VARCHAR(256),
passwordanswer VARCHAR(128),
isapproved boolean NOT NULL,
islockedout boolean NOT NULL,
createdate TIMESTAMP NOT NULL,
lastlogindate TIMESTAMP NOT NULL,
lastpasswordchangeddate TIMESTAMP NOT NULL,
lastlockoutdate TIMESTAMP NOT NULL,
failedpasswordattemptcount INTEGER NOT NULL,
failedpasswordattemptwindowstart TIMESTAMP NOT NULL,
failedpasswordanswerattemptcount INTEGER NOT NULL,
failedpasswordanswerattemptwindowstart TIMESTAMP NOT NULL,
comment VARCHAR(10)
)
|
and the insertion request (we enter only the mandatory fields):
INSERT INTO aspnet_membership
(applicationid, userid,
password, passwordformat, passwordsalt
, isapproved, islockedout
, createdate, lastlogindate, lastpasswordchangeddate
, lastlockoutdate
, failedpasswordattemptcount, failedpasswordattemptwindowstart
, failedpasswordanswerattemptcount
, failedpasswordanswerattemptwindowstart
)
VALUES
(
1001, ?,
?, ?, ?
, True, False
, ?, ?, ?, ?
, 0, ?
, 0, ?
);
|
In fact, the application .ZIP source code that you can dowload from our web site, contains code for creating, dropping, adding, deleting and listing the three Tables involved in membership management (application, users, membership).
3.3.5 - Managing the users The Asp.Net application presented above, allowed us to directly enter the user and his password. In fact, behind the scenes, both the user and membership Tables are updated in sync.
We wrote an application which does the same, using the Tables already created. Here is a snapshot: 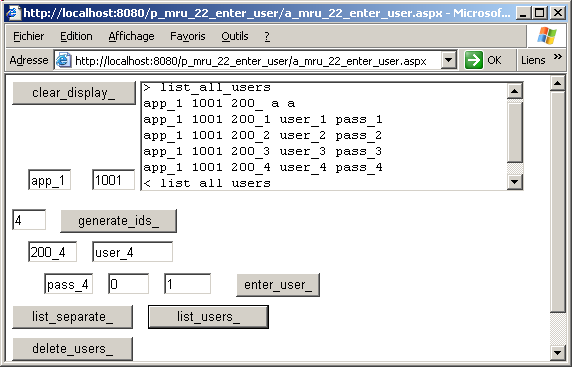
The code simply uses the separate inserts of the previous application, and makes sure that the entered values are synchronized (same applicationid and same userid for each entry). To use this application |
| enter an application id and name
| | | enter the user id, name and password
|
The "generate ids" is there to quickly enter new users: we click on this button to generate a new value (say 7) and this will initialize the user id, name and password (200_7, user_7, pass_7) and increment the seed id.
Naturally you can enter more meaningful values instead of our artificial "user_4" etc.
3.4 - Membership Providers 3.4.1 - Provider definition The Membership facilities work based on "Membership Providers". Providers
specify a contract to manage some information: - the provider user can make some calls, usually based on some predefined abstract CLASSes
- the provider implementor writes the code which stores and transfer the
information, by implementing a descendent of the base provider CLASS and saving the data on disc.
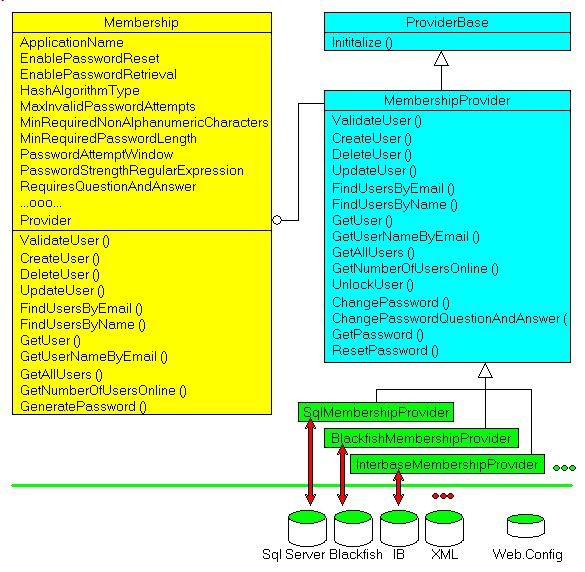
3.4.2 - The Membership Provider System In the case of Membership:
- the basic contract is defined by the ABSTRACT MembershipProvider CLASS
- Microsoft provided an SqlMembershipProvider implementation, and CodeGear
wrote a BlackfishMembershipProvider and an InterbaseMembershipProvider
- for specific behaviour, it is of course possible to write other MembershipProviders: some will save the data as .XML file, some will use
ODBC as data access, or even .TXT files
Each of those providers manages the security data (user names, password, e-mail etc) to its own persistent media: Sql Server for the SqlMembershipProvider,
BlackfishSql for the BlackfishMembershipProvider etc. At the developper level, we use a Membership CLASS which only calls the methods defined in the ABSTRACT CLASS. The consequence is that if we create
any other descendent of the MembershipProvider, our Asp.Net code should not be modified in any way. We decoupled the Membership calls of our applications from the way the data is stored on disc.
This can be represented with the following diagram:
A couple of notes - the database schema used to persist the security data on disc is irrelevant.
The developer code should only call the Membership methods, and the providers will take care of talking to the database.
- in fact we could use different Tables that those presented above, if we are
willing to write a MembershipProviders which talks to those Tables
- therefore directly reading and writing data to the ASPNET_APPLICATIONS, ASPNET_USERS and ASPNET_MEMBERSHIP Tables is not a good idea. The schema we
presented is the one implemented by Delphi, and it closely follows the Microsoft schema. But those could change in the future, whereas the ABSTRACT MembershipProvider CLASS should remain more stable.
For instance using the Asp.Net Configuration application should be safe. We directly wrote to the Tables because we felt it was quicker (= could be replayed very easy).
3.4.3 - The Web.Config Membership entries
To specify which MembershipProvider should be used, we must add some entries to Web.Config - a <membership section
- if we use some database, a <connectionString section
and, of course, the <authentication and <authorization sections
Here is the default Web.Config (Ed : truncated):
<configuration>
<connectionStrings>
<remove name="BlackfishSqlAspNet"/>
<add name="BlackfishSqlAspNet"
connectionString="database=|DataDirectory|bsql_aspnetdb.jds;" ...ooo...
providerName="Borland.Data.BlackfishSQL.RemoteClient" />
</connectionStrings>
<system.web>
<authorization>
<deny users="?" />
</authorization>
<authentication mode="Forms">
<forms name="my_cookie" loginUrl="my_login.aspx">
</forms>
</authentication>
<membership defaultProvider="AspNetAdoMembershipProvider">
<providers>
<remove name="AspNetAdoMembershipProvider" />
<add
name="AspNetAdoMembershipProvider"
type="Borland.Web.Security.AdoMembershipProvider,
Borland.Web.Provider, Version=11.0.5000.0,
Culture=neutral, PublicKeyToken=91d62ebb5b0d1b1b"
connectionStringName="BlackfishSQLAspNet"
applicationName="/"
enablePasswordRetrieval="false"
enablePasswordReset="true"
requiresQuestionAndAnswer="true"
requiresUniqueEmail="false"
passwordFormat="Hashed"
maxInvalidPasswordAttempts="50"
minRequiredPasswordLength="8"
minRequiredNonalphanumericCharacters="1"
passwordAttemptWindow="10"
passwordStrengthRegularExpression="" />
</providers>
</membership>
</system.web>
</configuration>
|
Here is another example with our own MembershipProvider:
<configuration xmlns="http://schemas.microsoft.com/.NetConfiguration/v2.0">
<connectionStrings>
<add
name="my_connection"
connectionString="host=LocalHost;database=C:\programs\us\web\asp_net\
membership_roles_profile\_data\bfs_membership_manual.jds;
user=sysdba;password=masterkey"
providerName="Borland.Data.BlackfishSQL.RemoteClient"/>
</connectionStrings>
<system.web>
<authorization>
<deny users="?" />
</authorization>
<authentication mode="Forms" />
<membership defaultProvider="my_membership">
<providers>
<remove name="my_membership"/>
<add
name="my_membership"
type="u_c_membership_provider.c_membership"
requiresQuestionAndAnswer="true"
connectionStringName="my_connection"
applicationName="/"
/>
</providers>
</membership>
</system.web>
</configuration>
|
And:
- the <connectionString section specify database connections. In our case, there is only the MembershipProvider database
- the <membership section contains
- a provider name (any name will do)
- the MembershipProvider CLASS
- eventually, the database to use
As you see, our MembershipProvider database is located outside the Asp.Net
application path (not in the APP_DATA or each application), which allows us to avoid reinitializing the whole thing for every of our samples. In addition, the .ZIP will contain the corresponding MembershipProviders .DLLs (but you can
easily revert to the default Delphi MembershipProviders)
3.5 - Using the Membership CLASS 3.5.1 - The Membership CLASS Once the MembershipProvider is in place, we can
- either directly call Membership methods
- or use predefined Microsoft login components which indirectly use the Membership CLASS
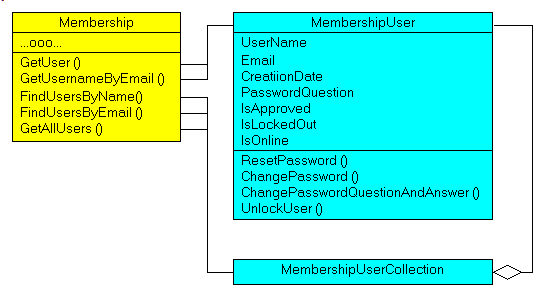
3.5.2 - The MembershipUser CLASS
We can retrieve information about the current logged in User, or find a user, even retrieve all Users using the Membership CLASS. Many of the querying functions return a MembershipUser instance, or a
MembershipUserCollection. This can be represented like this (Ed: partial): The MembershipUser CLASS allows us to perform many usual User management tasks:
- change the password
- find a User using his email (when he forgot his password)
But this CLASS will not return the password, which is hidden inside the
persistent data, and only used by to MembershipProvider to return the ValidateUser result.
3.5.3 - Using the Membership CLASS in code Here is an example which displays all the users
| | select the Default.Aspx page, drop a TextBox and a Button which displays all the users in the TextBox:
procedure TDefault.list_users__Click(sender: System.Object;
e: System.EventArgs);
var l_c_membership_user_collection: MemberShipUserCollection;
l_i_user_enumerator: iEnumerator;
begin
l_c_membership_user_collection:= MemberShip.GetAllUsers();
l_i_user_enumerator:= l_c_membership_user_collection.GetEnumerator;
while l_i_user_enumerator.MoveNext do
with l_i_user_enumerator.Current as MembershipUser do
display(UserName+ ' '+ PasswordQuestion);
end; // list_users__Click
|
|
Note that we could have bound the MemberShipUserCollection directly to some Grid component.
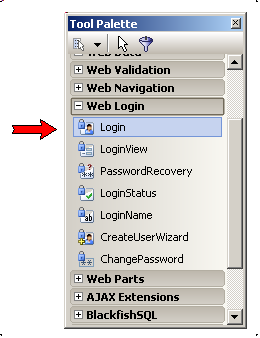
3.6 - The Asp.Net 20 Login Controls The login components cover most of the tasks that we had to manually create for
user management: - the most obvious ones:
- Login which simply let the User enter his credentials (exactly like we did in our first example)
- LoginView which is a templated (parametrized) version of the same
- LoginStatus which allows to logout, or, for anonymous users, to login
- PasswordRecovery which does what the name says
- ChangePassword allows a User to change his password
- LoginName is used to display the name of the User: "Hello SuchAndSuch, we are very happy to have you onboard, winds are East-North East, the
ground temperature is 55" etc
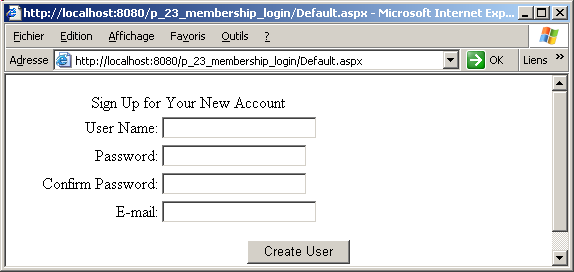
- CreateUserWizard is a multi page component for creating new users
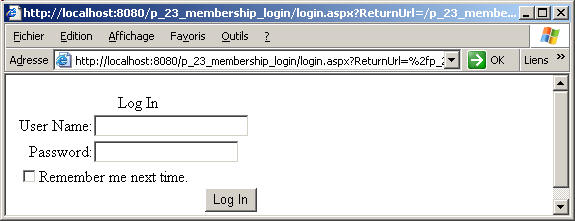
3.7 - The Login Component
The most obvious component is the Login component. Two TextBoxes, a Button and your done. Well, not quite. This is a deluxe version of the usual login. You naturally
have labels which specify what the TextBoxes should contain, but also a validator, and many configurable features.
Here is a simple example of using this control:
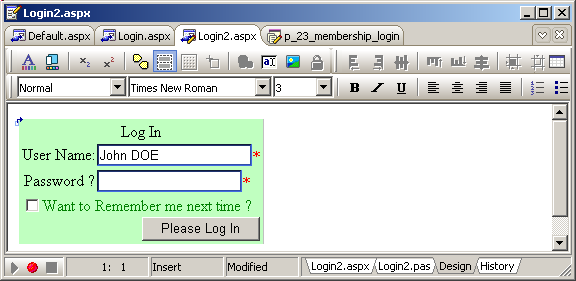
3.7.1 - Customizing the Login We can customize the Login in many ways
Here is how to check non-empty user name input and add an e-mail input:
< %@ Page language="c#" Debug="true" Codebehind="Login3.pas"
AutoEventWireup="false" Inherits="Login3.TLogin3" % />
< !DOCTYPE HTML PUBLIC "-//W3C//DTD HTML 4.01 Transitional//EN" />
<html>
<body>
<form runat="server">
<asp:Login id="Login1" runat="server" width="80px"
backcolor="#C0C0FF">
<LayoutTemplate>
<table cellspacing="1" cellpadding="1"
width="300" border="1">
<tr>
<td>
User name
</td>
<td>
<asp:textbox id="UserName" runat="server"/>
</td>
<asp:RequiredFieldValidator
id="RequiredFieldValidator1"
runat="server"
ControlToValidate="UserName"
errormessage="Username cannot be blank"/>
</tr>
<tr>
<td>
Password
</td>
<td>
<asp:textbox id="Password" runat="server"/>
</td>
</tr>
</table>
</LayoutTemplate>
<asp:Button id="Login" runat="server"
text="Login" CommandName="Login"/>
</asp:Login>
</form>
</body>
</html>
| which will look like this: 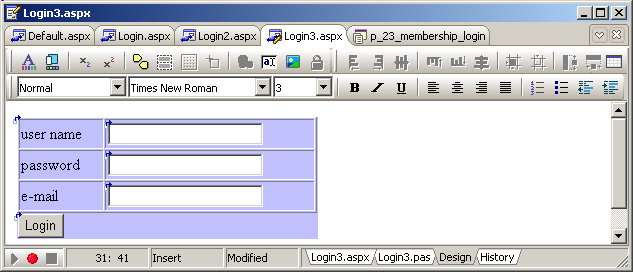
Sure, nothing fancy, but if the user does not enter his name, he will receive an accurate error message. We could of course add more sophisticated validation, using regular expression validators (only letters etc)
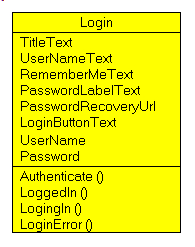
3.7.2 - Login Control Properties and Events The Login control has several properties and events (Ed: partial)
The events fire in the following order:
Here is an example which redirects the user to the URL specified in the
Login.PasswordRecoveryUrl if the error count exceeds 5:
procedure TLogin4.Page_Load(sender: System.Object;
e: System.EventArgs);
begin
// -- initialize the error count
if Not IsPostBack
then ViewState['my_error_count']:= '0';
end; // Page_Load
procedure TLogin4.Login1_LoginError(sender: System.Object;
e: System.EventArgs);
var l_error_count: Integer;
begin
// -- increase the error count
l_error_count:= Convert.ToInt32(ViewState['my_error_count'])+ 1;
ViewState['my_error_count']:= l_error_count.ToString;
// -- redirect if more than 5
if l_error_count> 5
then Response.Redirect(Login1.PasswordRecoveryURL);
end; // Login1_LoginError
|
3.8 - The LoginStatus Control This control simply displays
- either a "Logout" hyperlink
- or a "Login" hyperlink
When the user is authenticated, the page containing this control displays "logout". Clicking the hyperlink will logout, and if we have initialized the
LoginStatus.LogoutPageUrl property the user is then redirected to this page. When the user is not authenticated, the page will display "login", and clicking this link will redirect the user to the default login page.
3.8.1 - The ChangePassword, LoginName, PasswordRecovery and LoginView Controls Those controls behave exactly as anybody would expect them to behave. Just a couple of comments:
- the PasswordRecovery uses SMTP to sent the lost password to the User and this is configured once again using Web.Config
- the LoginView is a TEMPLATEd control allows to display different elements
based on the status of the user (logged in or not) or even based on the user role. So it uses the TEMPLATE technique, but what is displayed depends on the User status
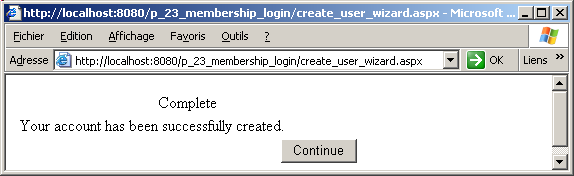
3.8.2 - The CreateUserWizard Control
Finally we are going to examine the CreateUserWizard which is a new feature of Asp.Net 2.0 Wizard controls are a kind of elaborate MultiView control. They contain steps
corresponding to different pages, and the navigation is automatically built-in. We configure those controls using the "Smart Tabs", which are some kind of menus (actually windows) which are opened and closed using the right-top arrow of the control.
For the CreateUserWizard, there are two mandatory "steps" - one step (page) for entering the User parameters (name, password, e-mail) etc
- another step which reports any error (duplicate user name etc) or success,
and lets the User navigate to some other page
Here are the steps:
Of course there are numerous configuration possibilities of the content of the steps, and of the number of steps.
4 - Authorization and Roles
4.1 - Using Roles When our site only accepts a couple of Users, we can specify the credentials in Web.Config. For more important sites, the use of some security database is obvious.
In addition to storing user names and passwords (authentication), we usually also specify which pages each User is allowed to request (authorization). Here also, Web.Config can be used with individual User references, but for many
Users, we can group them in Roles. For instance "Admin", "Guest", "Accounting" etc. Those roles can the be used anywhere the user name were used for authorization purposes.
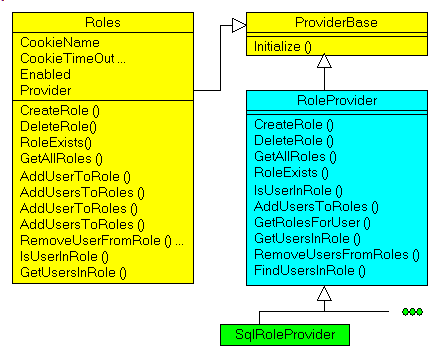
4.2 - Role service architecture
The Roles services are structured exactly like the Membership services, using: - a RoleProvider which is an ABSTRACT CLASS defining the available methods
- a Roles CLASS which we can use to manage the roles
Here is the UML Class Diagram of those CLASSes (Ed: partial):
Please note
- those CLASSes are MUCH simpler to implement, since they are mainly handling STRINGs or ARRAY OF STRINGs
- this is probably the reason why there is no separate "role" CLASS (whereas
there was a "user" CLASS)
4.3 - Creating the Roles Table As explained above, the mainstream developer does not need to create the Roles
table and to fill them by code: he should stay above the RolesProvider layer, and only use either the Asp.Net configuration tool, or the Roles CLASS.
Nevertheless, we included a .ZIP source file which creates the Tables and drops them, and a second application which fills some value by directly writing into the Role Tables.
There are two Tables involved: ASPNET_ROLES and ASPNET_USERSINROLES. The general schema has been presented above.
To create the ASPNET_ROLES Table, we can use the following request:
CREATE TABLE aspnet_roles
(
applicationid CHAR(36) NOT NULL,
roleid CHAR(36) NOT NULL PRIMARY KEY,
rolename VARCHAR(256) NOT NULL,
loweredrolename VARCHAR(256) NOT NULL,
description VARCHAR(256)
)
| and to create the ASPNET_USERSINROLES:
CREATE TABLE aspnet_usersinroles
(
userid CHAR(36) NOT NULL,
roleid CHAR(36) NOT NULL
)
|
The content of the application which contains those requests parallels the application we used for memberships. You can download it below
Here is a snapshot of this application: 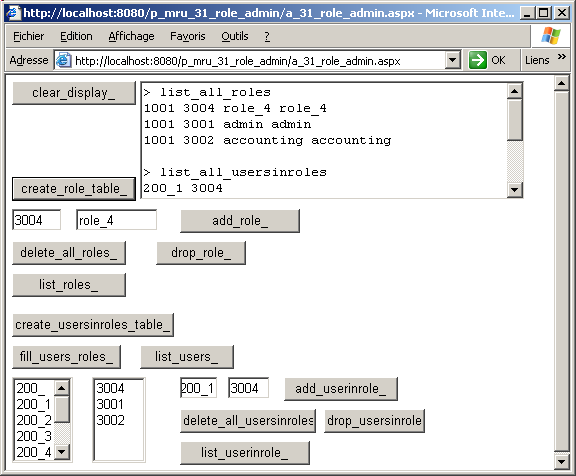
4.4 - Adding Roles and Linking them to Users
4.4.1 - Using the Asp.Net Configuration tool We can use the same Microsoft configuration utility that we already used for entering new USERS:
4.4.2 - Using Delphi Code
Once the Tables are created, we can use Sql requests to fill the Role values and the link between Users and Roles. To add a new Role we simply send an INSERT INTO request.
To allocate Roles to Users, we added two ListBoxes which display the userid and roleid available. To enter a new (user role) combination, we simply select a Role and a User and click on the Button.
Here are some explanation about this application: - to fill both ListBoxes, we use the following code:
procedure TDefault.fill_users_roles__Click(sender: System.Object;
e: System.EventArgs);
begin
DataStoreConnection1.Open;
general_command_.CommandText:=
'SELECT userid, username FROM aspnet_users';
DataStoreDataAdapter1.SelectCommand:= general_command_;
DataStoreDataAdapter1.Fill(DataSet1.Tables[0]);
user_listbox_.DataSource:= DataSet1.Tables[0].DefaultView;
user_listbox_.DataTextField:= 'username';
user_listbox_.DataValueField:= 'userid';
general_command_.CommandText:=
'SELECT roleid, rolename FROM aspnet_roles';
DataStoreDataAdapter1.SelectCommand:= general_command_;
DataStoreDataAdapter1.Fill(DataSet1.Tables[1]);
roles_listbox_.DataSource:= DataSet1.Tables[1].DefaultView;
roles_listbox_.DataTextField:= 'rolename';
roles_listbox_.DatavalueField:= 'roleid';
DataBind;
DataStoreConnection1.Close;
end; // fill_users_roles__Click
|
- this code is called for the first request of the page:
procedure TDefault.Page_Load(sender: System.Object;
e: System.EventArgs);
begin
if not IsPostBack
then fill_users_roles__Click(Nil, Nil);
end; // Page_Load
| - the code to insert the link is the following:
const k_add_userinrole_request=
'INSERT INTO aspnet_usersinroles'
+ ' (userid, roleid'
+ ' ) '
+ ' VALUES (?, ?)'
;
procedure TDefault.add_userinrole___Click(sender: System.Object;
e: System.EventArgs);
var l_user_id: String;
l_role_id: String;
procedure display_selected_values;
begin
with user_listbox_.SelectedItem do
l_user_id:= Value;
with roles_listbox_.SelectedItem do
l_role_id:= Value;
end; // display_selected_values
begin // add_userinrole___Click
display_selected_values;
if do_add_checkbox_.Checked
then begin
DataStoreConnection1.Open;
l_request:= k_add_userinrole_request;
display(l_request);
insert_usersinroles_command_.CommandText:=
k_add_userinrole_request;
insert_usersinroles_command_.Prepare;
insert_usersinroles_command_.Parameters[0].Value:= l_user_id;
insert_usersinroles_command_.Parameters[1].Value:= l_role_id;
insert_usersinroles_command_.ExecuteNonQuery;
DataStoreConnection1.Close;
end;
end; // add_userinrole___Click
| - and here is a snapshot of this second Roles application:
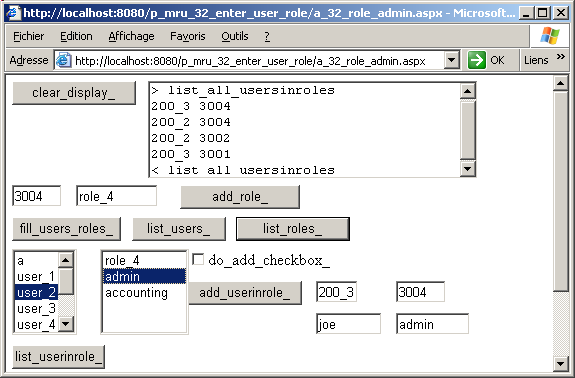
Note that - we used the traditional Asp.Net 1.x DataBinding route rather then the
more recent GridViewDataSource route, but of course the latter is also possible
- our ListBoxes display the names, but their value field contains the ID's which are used to fill the ASPNET_USERSINROLES Table. When we include in the
ListBox both DataTextField and DataValueField, those Textboxes in fact play the role of a LookupListBox
- there is no ListBox.OnClick: we can select items in the ListBoxes, and
only when we send the page to the Server (by clicking on any Button) are the selected items available. In our code example, we used the ListBox.SelectedItem to grab the userid and roleid.
4.5 - Authorization Rules 4.5.1 - User Authorization Rules We already presented the ground rules for allowing or denying access to some resources:
- the <authorization section of Web.Config contains a sequence of
- <allow users sections telling which Users you want to accept
- <deny users sections telling which Users you want to refuse
and - in each section, we can put either a single User, or comma delimited lists
- there are two wildcards:
- * (star) for "any"
- ? (question mark) for "anonymous"
- the rule sequence is evaluated from top to bottom, and the first success stops the evaluation rule
Therefore
- here is how to deny anonymous, but accept anybody else:
<configuration>
<system.web>
<authorization>
<deny users="?" />
<allow users="*" />
</authorization>
</system.web>
</configuration> |
and anonymous users are thrown out by the first rule, other users accepted by the second - the ordering is very important. This rule will accept everybody:
<configuration>
<system.web>
<authorization>
<deny users="?" />
<allow users="*" />
</authorization>
</system.web>
</configuration> |
since the first rule always suceeds, and the second rule is never analyzed
To grant access to specific directories, we can place Web.Config files in the directories, with rules specific to each directory (but this cannot be done for
authentication, which is always at the root level). There are additional possibilities to specify the User PC, or to allow / deny not only complete directories but also individual files.
Now the interesting part: it would be foolish to try to allow or deny individual users to some pages. But this is not the case for Roles. So we can build a set of Roles when we create the site, and gradually assign those
Roles to the Users. Here is an example:
<configuration>
<system.web>
<authorization>
<deny users="?" />
<allow users="Bill G" />
<allow roles="Accounting" />
<deny roles="Marketing,Sales" />
<allow users="*" />
</authorization>
</system.web>
</configuration>
|
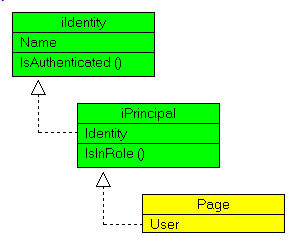
4.6 - Using Code for Authorization 4.6.1 - Using the Page properties As was explained at the start of the paper, each Page contains a User
property which implements the iPrincipal INTERFACE. This INTERFACE has an IsInRole FUNCTION which can be used in our code:
if User.IsInRole('Accounting')
then // -- ...ooo...
else // -- |
The iPrincipal INTERFACE contains an Identity property, which implements iIdentity. This INTERFACE has an IsAuthenticated method which can be used to check authentication
The following figure summarizes those relationships:
4.6.2 - The Roles CLASS
Of course we can use the Roles CLASS presented earlier. This CLASS gives us complete control over Role management from our application (creating Roles, Deleting them, assign Users to Roles etc)
Here is an example of adding all authenticated Users to the "Employee" Role:
procedure TDefault.add_users_to_employee_role___Click(sender: System.Object;
e: System.EventArgs);
begin
If User<> Nil
then begin
if User.Identity.IsAuthenticated and Roles.Enabled
then begin
If not Roles.IsUserInRole('Employee') and Roles.RoleExists('Employee')
then Roles.AddUserToRole(User.Identity.Name, 'Employee');
end;
end
else display('User Nil');
end; // add_users_to_employee_role___Click
|
5 - Profiles
5.1 - Why use Profiles The Profiles allow us to store property lists about each User. Those lists are saved in the Security database, and can be later retrieved to adapt the
content or aspect of the pages according to the User preferences. The detail of the Profile of each User is free: we may store addresses (street, city etc), or presentation preferences, birthday date etc.
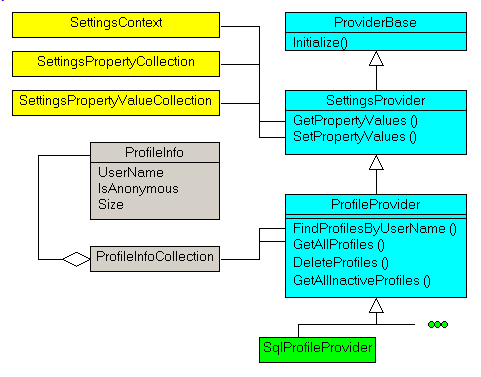
5.2 - The Profile architecture Once again, the structure uses a Provider system which can be represented like this:
5.3 - Creating the Profile Table The Sql request for creating an empty ASPNET_PROFILE Table is the following:
CREATE TABLE aspnet_profile
(
userid CHAR(36) NOT NULL,
propertynames VARCHAR NOT NULL,
propertyvaluesstring VARCHAR NOT NULL,
propertyvaluesbinary VARCHAR NOT NULL,
lastupdateddate TIMESTAMP NOT NULL
)
|
This deserves some explanation: - the propertynames field stores the name, format, position and length of each Profile element
- the propertyvaluesstring and propertyvaluesbinary store the (string or binary) content of each element
- aside from the first and last column, the name, string and binary columns
are all BLOBS. For BlackfishSql, this is defined as VARCHAR without any size (if you add one parameter, it is the maximum size. You can
use 2 sizing parameters, the minimum being 14, but using no value at all works just fine)
The downloadable .ZIP project
will contain the code to create, drop and delete the content of the ASPNET_PROFILE Table.
5.4 - Profile content Storage Structure Having only "generic" content fields (not separate columns for each element)
keeps the format open, at the cost of much parsing at processing. First let's look at the rules: - The Profile elements you want to use are specified in Web.Config, as a list of entries, one for each element.
Lets assume that we want to store person addresses: FirstName, Street etc. Our Profile section in Web.Config could look like this:
<configuration>
<system.web>
<profile>
<properties>
<add name="FirstName" defaultValue="John DOE"/>
<add name="Street" defaultValue="1, Main Street"/>
<add name="City"/>
<add name="Zip"/>
<add name="State"/>
</properties>
</profile>
</system.web>
</configuration>
| Note that
- the elements of each profile are called "properties"
- the main information for each property is its Name
- we can optionally add default values, format or serialization information, even specific providers
- when we add a Profile, add a row to the ASPNET_PROFILE Table. In this row, we must place the values in the string or binary fields, and the name field encodes the format, position and size of this information.
Let's take a simple example:
5.5 - Adding Values to the Profile With the previously defined Profile properties, to add a new row is simply a matter of placing a Textbox for each property on a Form, and computing the
concatenated values and the name format string. Here is our code: - for adding a new Profile:
const k_add_profile_request=
'INSERT INTO aspnet_profile'
+ ' (userid, propertynames'
+ ' , propertyvaluesstring, propertyvaluesbinary'
+ ' , lastupdateddate)'
+ ' VALUES (?, ?, ?, ?, ? )'
;
type t_array_of_string= array of string;
procedure array_to_profile_strings(p_property_name_array, p_property_array: t_array_of_string;
var pv_property_string, pv_value_string: String);
// -- assumes all types are String (not binary)
var l_property_index: Integer;
l_property_name, l_property_value: String;
l_property_length, l_position: Integer;
begin
pv_property_string:= ''; pv_value_string:= '';
l_position:= 0;
for l_property_index:= 0 to Length(p_property_array)- 1 do
begin
l_property_name:= p_property_name_array[l_property_index];
l_property_value:= p_property_array[l_property_index];
l_property_length:= Length(l_property_value);
pv_value_string:= pv_value_string+ l_property_value;
if pv_property_string<> ''
then pv_property_string:= pv_property_string+ ':';
pv_property_string:= pv_property_string+ l_property_name
+ ':S:'+ l_position.ToString+ ':' + l_property_length.ToString;
Inc(l_position, l_property_length);
end; // for l_property_index
end; // array_to_profile_strings
procedure TDefault.add_profile__Click(sender: System.Object;
e: System.EventArgs);
var l_property_name_array: t_array_of_string;
l_property_value_array: t_array_of_string;
procedure fill_property_arrays;
begin
SetLength(l_property_name_array, 5);
SetLength(l_property_value_array, 5);
l_property_name_array[0]:= 'Name';
l_property_value_array[0]:= firstname_textbox_.Text;
l_property_name_array[1]:= 'Street';
l_property_value_array[1]:= street_textbox_.Text;
l_property_name_array[2]:= 'City';
l_property_value_array[2]:= city_textbox_.Text;
l_property_name_array[3]:= 'Zip';
l_property_value_array[3]:= zip_textbox_.Text;
l_property_name_array[4]:= 'State';
l_property_value_array[4]:= state_textbox_.Text;
end; // fill_property_arrays
var l_property_name_string, l_property_value_string: String;
begin // add_profile__Click
// -- compute the values
fill_property_arrays;
array_to_profile_strings(l_property_name_array,
l_property_value_array,
l_property_name_string, l_property_value_string);
// -- insert into
DataStoreConnection1.Open;
insert_profile_comand_.CommandText:= k_add_profile_request;
insert_profile_comand_.Prepare;
insert_profile_comand_.Parameters[0].Value:= userid_textbox_.Text;
insert_profile_comand_.Parameters[1].Value:= l_property_name_string;
insert_profile_comand_.Parameters[2].Value:= l_property_value_string;
insert_profile_comand_.Parameters[3].Value:= '';
insert_profile_comand_.Parameters[4].Value:= DateTime.Now;
insert_profile_comand_.ExecuteNonQuery;
DataStoreConnection1.Close;
end; // add_profile__Click
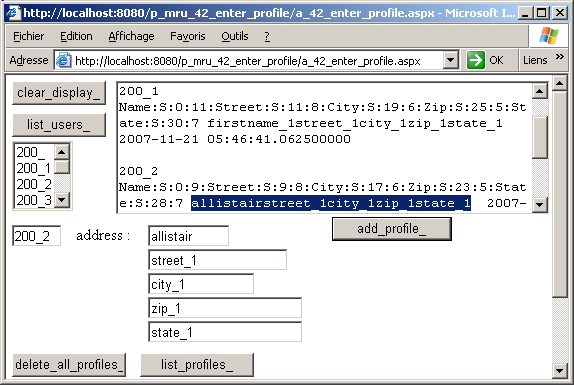
| - for listing all the Profiles we use our generic DataReader procedure
- here is a snapshot of the application, with the propertyvaluesstring hilighted in the top TextBox
5.6 - Using Profiles in our Applications If we want to use the Profiles in our Asp.Net application, which the reason why we added Profiles in the first place, is not that obvious:
- we can use the ASPNET_PROFILE Tables, as we did above, but this is not very portable, since the Table format could change. This is the reason why ProfileProviders were introduced. Nevertheless, this still is an option
- we can try to somehow access the Profile properties of the current user
5.6.1 - Web.Config Profile tag To access the ASPNET_PROFILE Table, we must configure the Web.Config file to
use the correct ProfileProvider. This configuration, as with Membership and Roles, is automatically created by Delphi. Here is our own Web.Config which works with our own ProfileProvider:
<configuration>
<connectionStrings>
<add
name="my_connection"
connectionString="database=C:\programs\us " ...ooo...
providerName="Borland.Data.BlackfishSQL.RemoteClient"/>
</connectionStrings>
<system.web>
<profile enabled="true" defaultProvider="my_profile">
<providers>
<remove name="my_profile"/>
<add name="my_profile"
type="u_c_profile_provider.c_profile_provider"
connectionStringName="my_connection"
applicationName="/"/>
</providers>
<properties>
<add name="FirstName" defaultValue="DOE"/>
<add name="Street" defaultValue="1, Main Street"/>
<add name="City"/>
<add name="Zip"/>
<add name="State"/>
</properties>
</profile>
</system.web>
</configuration>
|
5.6.2 - The dynamic Profile CLASS The Microsoft Help tell us that once we specified the Profile properties in Web.Config, the Asp.Net framework generates a profileCommon CLASS on the
fly, before compiling the rest of the project, and we can use this class using this dynamic Profile object. We could write:
procedure TDefault.button1_Click(sender: System.Object;
e: System.EventArgs);
begin
Profile.Street:= '2 Broadway St';
if Profile.FirstName= 'William MILLER'
then ...
end; // button1_Click
|
This looks very nice. However this works for .CS pages (a file with both C# code and .Aspx template tags, which is supported by Visual Studio uses), but not for Web Applications (separate .ASPX and .PAS files), which is the only
kind supported by Delphi.
5.6.3 - Getting ProfileInfo Here how to extract information about all Profiles:
procedure TDefault.get_all_profiles_info__Click(sender: System.Object;
e: System.EventArgs);
var l_c_profile_info_collection: ProfileInfoCollection;
l_profile_count: Integer;
l_i_user_enumerator: iEnumerator;
begin
l_c_profile_info_collection:=
ProfileManager.GetAllProfiles(ProfileAuthenticationOption.All,
0, 10, l_profile_count);
display('count '+ l_c_profile_info_collection.Count.ToString);
l_i_user_enumerator:= l_c_profile_info_collection.GetEnumerator;
while l_i_user_enumerator.MoveNext do
with l_i_user_enumerator.Current as ProfileInfo do
display(UserName);
end; // get_all_profiles_info__Click
| and information about one user:
procedure TDefault.list_user_profile_info__Click(sender: System.Object;
e: System.EventArgs);
var l_c_profile_info_collection: ProfileInfoCollection;
l_profile_count: Integer;
l_i_user_enumerator: iEnumerator;
begin
l_c_profile_info_collection:=
ProfileManager.FindProfilesByUserName(ProfileAuthenticationOption.All,
username_textbox_.Text,
0, 10, l_profile_count);
display('count '+ l_c_profile_info_collection.Count.ToString);
l_i_user_enumerator:= l_c_profile_info_collection.GetEnumerator;
while l_i_user_enumerator.MoveNext do
with l_i_user_enumerator.Current as ProfileInfo do
display(UserName);
end; // list_user_profile_info__Click
| All we get are User names.
5.6.4 - Listing the property names, default and actual values To get information about the Profile properties, we must somehow get access to the Profile data.
We could not use the "Profile dynamic CLASS", but there are two other ways: - thru HttpContext.Current.Profile
- or by creating an instance of ProfileBase
So, here is how to get the list of all available property names (those in Web.Config):
procedure TDefault.list_property_names__Click(sender: System.Object;
e: System.EventArgs);
var l_c_profile_base: ProfileBase;
l_i_enumerator: iEnumerator;
l_c_settings_property: SettingsProperty;
begin
l_c_profile_base:= HttpContext.Current.Profile;
l_i_enumerator:= l_c_profile_base.Properties.GetEnumerator;
while l_i_enumerator.MoveNext do
begin
l_c_settings_property:= l_i_enumerator.Current as SettingsProperty;
display(l_c_settings_property.Name);
end;
end; // list_property_names__Click
|
The default values (defined in Web.Config) can be retrieved with:
procedure TDefault.get_property_default_value__Click(sender: System.Object;
e: System.EventArgs);
var l_i_property_enumerator: iEnumerator;
l_c_settings_property: SettingsProperty;
l_property_name: String;
l_property_default_value: String;
begin
display('default.prop.Count '
+ DefaultProfile.Properties.Count.ToString);
l_property_name:= property_name_textbox_.Text;
if DefaultProfile.Properties.Count> 0
then begin
if assigned(DefaultProfile.Properties.Item[l_property_name])
then l_property_default_value:=
DefaultProfile.Properties.Item[l_property_name].DefaultValue.ToString
else display('no_'+ l_property_name);
display(l_property_name+ '_default_value '+ l_property_default_value);
end
else display('count < 0');
end; // get_property_default_value__Click
|
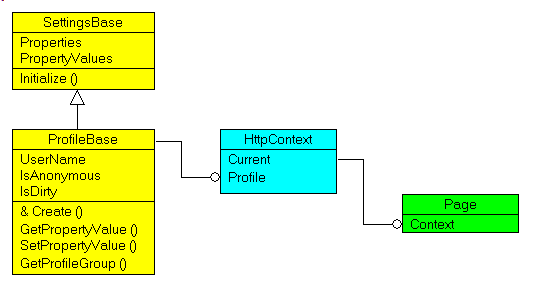
Finally, the real value of a property can be fetched using the Profile from the HttpContext. The relationship between our Page and HttpContext is the following:
Therefore, to get Profile values, we can - use Page.Context.Profile
- use HttpContext.Current.Profile (HttpContext is a CLASS, and Current returns an instance of this CLASS. We must use Current, since this is a Singleton)
- directly create a ProfileBase, using the Create METHOD (it is not a CONSTRUCTOR, hence the "&")
Here is an example:
procedure TDefault.get_property_value__Click(sender: System.Object;
e: System.EventArgs);
var l_c_profile_base: ProfileBase;
l_property_name: String;
l_property_value: String;
l_user_name: String;
begin
l_property_name:= property_name_textbox_.Text;
l_c_profile_base:= HttpContext.Current.Profile;
l_property_value:=
l_c_profile_base.GetPropertyValue(l_property_name).ToString;
display(l_property_name+ ' is '+ l_property_value);
// -- alternate way:
l_user_name:= User.Identity.Name;
l_c_profile_base:= ProfileBase.&Create(l_user_name);
l_property_value:=
l_c_profile_base.GetPropertyValue(l_property_name).ToString;
display('user '+ l_user_name+ ' '+ l_property_name
+ ' is '+ l_property_value);
end; // get_property_value__Click
|
5.6.5 - The Application Snapshot
Here is a snapshot of our application (user "user_1" and password "pass_1") after listing the names, the default values and the actual values : 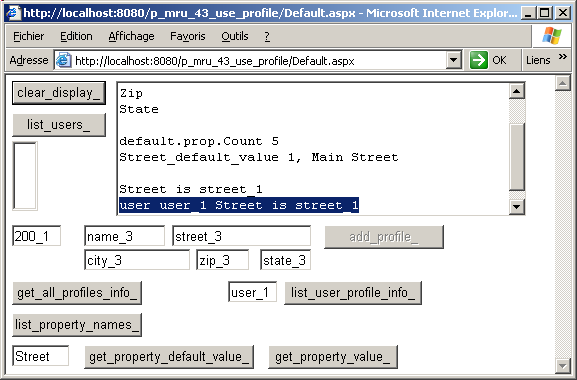
5.7 - Allowing Anonymous Access Profile information can be read by anonymous Users. Since this is easier to use, we will remove the mandatory Login, by simply changing the
<authorization section:
<configuration>
<system.web>
<authorization>
<allow users="*" />
</authorization>
</system.web>
</configuration>
|
However we then will only see the Profile of "anonymous". So, in order to be able to see the Profile of other Users, we must be able to force a Login.
This is easily done by adding a LoginStatus control on the Form. And at the same time, we also can add a LoginName control, which displays the User name when he is logged in (empty for anonymous)
Therefore, we created a new project, with a LoginStatus and a LoginName controls.
5.8 - Direct ProfileBase and Profile properties access 5.8.1 - Direct ProfileBase access The use of
procedure TDefault.get_property_value__Click(sender: System.Object;
e: System.EventArgs);
var l_c_profile_base: ProfileBase;
l_property_name: String;
l_property_value: String;
l_user_name: String;
begin
l_property_name:= property_name_textbox_.Text;
l_c_profile_base:= HttpContext.Current.Profile;
l_property_value:=
l_c_profile_base.GetPropertyValue(l_property_name).ToString;
display(l_property_name+ ' is '+ l_property_value);
// -- alternate way:
l_user_name:= User.Identity.Name;
l_c_profile_base:= ProfileBase.&Create(l_user_name);
l_property_value:=
l_c_profile_base.GetPropertyValue(l_property_name).ToString;
display('user '+ l_user_name+ ' '+ l_property_name
+ ' is '+ l_property_value);
end; // get_property_value__Click
| is quite cumbersome, and it certainly would be better to be able to simply call Profile.
This can be easily done by creating a PROPERTY whose getter uses those steps to reach the ProfileBase. And instead of putting this PROPERTY inside our
tDefault Page, we can create an ancestor Delphi Page and let our tDefault inherit from this one. Here is how to proceed: | |
select "profile_class.dll | Add New | Delphi for .Net | New Files | Unit", and rename the unit U_C_BASE_PAGE_WITH_PROFILE
| | |
write the code which contains the ProfileBase PROPERTY:
unit u_c_base_page_with_profile;
interface
uses System.Web.Profile, System.Web.UI;
type c_page_with_profile=
Class(Page)
Public
function f_c_profile_base: ProfileBase;
Published
property MyProfile: ProfileBase read f_c_profile_base;
end; // c_page_with_profile
implementation
function c_page_with_profile.f_c_profile_base: ProfileBase;
begin
Result:= Self.Context.Profile;
end; // f_c_profile_base
end. // u_c_base_page_with_profile
| | | |
select the Default.Pas, and
- add our new UNIT to the USES clause
- replace System.Web.UI.Page by our c_base_page_with_profile
The partial header looks like this:
unit Default;
interface
uses System.Collections, // -- ...ooo...
, u_c_base_page_with_profile ;
type
// TDefault = class(System.Web.UI.Page)
TDefault = class(c_page_with_profile)
strict private
procedure Page_Load(sender: System.Object;
// -- ...ooo...
| | | |
add a new Button which will display some Profile property values:
procedure TDefault.my_profile_property_value_Click(sender: System.Object;
e: System.EventArgs);
var l_property_name: String;
l_property_value: String;
begin
l_property_name:= property_name_textbox_.Text;
l_property_value:= MyProfile.GetPropertyValue(l_property_name).ToString;
display(l_property_name+ ' is '+ l_property_value);
end; // my_profile_property_value__Click
|
|
Please note
- you can rename MyProfile as "Profile", to mimick the Microsoft behaviour.
5.8.2 - Direct ProfileBase properties access In a similar fashion, calling:
VAR my_property_value: System.Object;
my_property_value:= MyProfile.GetPropertyValue('Street');
|
is not very easy, and we would prefer:
my_property_value:= MyProfile.Street;
|
This can be done by using CLASS HELPERS:
| | select "profile_class.dll | Add New | Delphi for .Net | New Files | Unit", and rename the unit U_C_PERSON_PROFILE_HELPER
| |
| write the code which will add Delphi PROPERTYes corresponding to our Profile properties (Ed: only two properties implemented in the display)
unit u_c_person_profile_helper;
interface
uses System.Web.Profile ;
Type c_person_profile_helper=
Class helper for ProfileBase
Public
function GetMyProfile(p_user_name: String): ProfileBase;
function get_first_name: String;
procedure set_first_name(p_first_name: String);
function get_street: String;
procedure set_street(p_street: String);
Published
property FirstName: String read get_first_name write set_first_name;
property Street: String read get_street write set_street;
// -- ...ooo...
end; // c_person_profile_helper
implementation
function c_person_profile_helper.GetMyProfile(p_user_name: String): ProfileBase;
begin
Result:= ProfileBase.&Create(p_user_name);
end; // GetMyProfile
// -- getters and setters
function c_person_profile_helper.get_first_name: String;
begin
Result:= GetPropertyValue('FirstName').ToString;
end; // get_first_name
procedure c_person_profile_helper.set_first_name(p_first_name: String);
begin
SetPropertyValue('FirstName', p_first_name);
end; // set_first_name
function c_person_profile_helper.get_street: String;
begin
Result:= GetPropertyValue('Street').ToString;
end; // get_street
procedure c_person_profile_helper.set_street(p_street: String);
begin
SetPropertyValue('Street', p_street);
end; // set_street
function c_person_profile_helper.get_city: String;
begin
Result:= GetPropertyValue('City').ToString;
end; // get_city
// -- ...ooo...
end. // u_c_person_profile_helper
| | | |
select the Default.Pas file, and just after the IMPLEMENTATION, add a USES clause which import our U_C_PERSON_PROFILE_HELPER UNIT | | |
Add a couple of Buttons and TextBoxes which use the direct access to our Profile properties:
unit Default;
interface
// -- ...ooo...
implementation
uses u_c_person_profile_helper;
// -- ...ooo...
procedure TDefault.profile_firstname__Click(sender: System.Object;
e: System.EventArgs);
var l_user_name: String;
begin
l_user_name:= MyProfile.UserName;
if l_user_name= ''
then l_user_name:= 'empty_user= anonymous';
display(l_user_name+ '.FirstName is '+ MyProfile.FirstName.ToString);
display(l_user_name+ '.Street is '+ MyProfile.Street.ToString);
end; // profile_firstname__Click
// -- TextBox display and update
procedure TDefault.get_profile;
begin
name_textbox_.Text:= MyProfile.FirstName.ToString;
street_textbox_.Text:= MyProfile.Street.ToString;
// -- ...ooo...
end; // get_profile
procedure TDefault.update_profile;
begin
MyProfile.FirstName:= name_textbox_.Text;
end; // update_profile
end. // Default
|
| | | compile, run
| | |
select "Login", and enter "user_2" and "pass_2" (or any User you created)
| | | then click the Buttons
| |
| here is the result 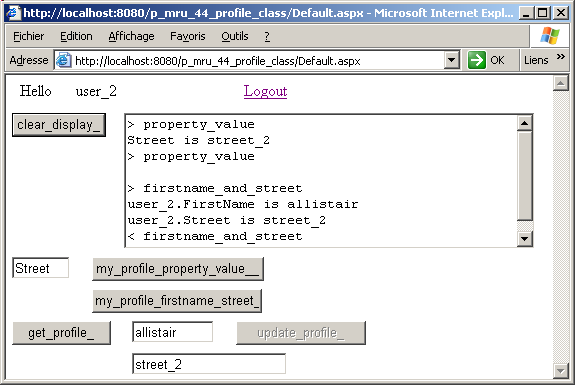
|
Please note
- we used CLASS HELPERS since the .Net Framework expects a ProfileBase CLASS, and we cannot coax him to use our own ProfileBase descendent. CLASS HELPERS are a Delphi "feature" allowing us to piggyback our
additions to an existing CLASS.
5.9 - Profile Improvements Please note - we used CLASS HELPERS since the .Net Framework expects a ProfileBase
CLASS, and we cannot coax him to use our own ProfileBase descendent. CLASS HELPERS are a Delphi "feature" allowing us to piggyback our additions to an existing CLASS.
- the Profile is handled somehow differently from the Users or Roles:
- first of all it has a separate Assembly
- in order to keep the property list open, its the coding as value bundles is quite special.
- there is a possibility to create a CLASS which represents the properties defined in Web.Config.
- given the effort required to extract the Profile and its PROPERTY values
from the Profile service, and since the information is persisted in a database anyway, we would have saved an considerable amount of time by storing this information in an ASPNET_PERSON Table, using traditional
database techniques and strongly typed DataSets.
- we could also group PROPERTYes in groups, like this:
<configuration>
<system.web>
<profile enabled="true" defaultProvider="my_profile">
<providers>
<remove name="my_profile"/>
<add name="my_profile"
type="u_c_profile_provider.c_profile_provider"
connectionStringName="my_connection"
applicationName="/"/>
</providers>
<properties>
<add name="FirstName" defaultValue="DOE"/>
<add name="Street" defaultValue="1, Main Street"/>
<add name="City"/>
<add name="Zip"/>
<add name="State"/>
<group name="Employee" />
<add name="Department" />
<add name="Position" />
</group>
</properties>
</profile>
</system.web>
</configuration>
| We then could use the ProfileBase.GetProfileGroup() to get the group, and
could even create a PROPERTY in the base page, and create another CLASS HELPER to access the group properties using a double dot notation : MyProfile.Person.Department.
6 - Comments
6.1 - Asp.Net 2.0 Security This has been a 2 week long trip into Asp.Net security. And we are fully aware that we only scratched the surface. For Asp.Net 1.x, Msdn offers a 600
page+ .PDF manual on the same topic, which, of course does not include the new Asp.Net 2.0 Membership etc topics. In most Asp.Net books, usually more than 25 % of the pages are dedicated to security.
However mastering security is the key to any commercial site.
6.2 - The Rad Studio 2007
We used the beta test version build 2852.9797 from early November 2007. We could not make the Security work out of the box. More accurately, the Asp.Net Configuration utility did not recognize the Delphi security
providers. Reinstalling twice would not help. And still some other developers seem to have no problem. So we must have goofed somewhere during the installation.
6.2.2 - Custom Security Providers work around
In order to write this paper, we simply wrote the three security providers. This explains the structure of our examples: - the first examples (21_membership, 31_roles, 41_profiles) created the ASPNET_xxx Tables
- the second examples (22_ 32_, 42_) directly accessed those Tables to fill them with some values (and, to some extent, were used to write some of our provider methods)
- the third examples (23_, 33_, 43_) used our providers to present the
security features using the Asp.Net 2.0 Security services. Those are the ones we would normally use in a commercial Asp.Net 2.0 application
Therefore:
- you can naturally run the first and second examples, but they directly manipulate the database Tables, which is not recommended
- the third set of examples contain
- in the BIN, our provider .DLLs
- in the main folder, the Web.Config tailored to use our providers and database
However, our providers are incomplete (we included the core functionality to be
able to use them, and 75 % of the methods), and far from being fully tested. You may run the examples, but testing some functionalities not presented in this paper may not work.
We would advise you
- to get the commercial version of Rad Studio 2007, with the working Delphi
providers
- in all 3 examples using the Security Services (23_, 33_, 43_)
- remove all the .DLLs from the BIN (if they are still there, Asp.Net may complain about duplicate functions)
- keep the default Web.Config (generated when you run an Asp.Net project once)
6.2.3 - Our experience of Rad Studio 2007 Having use Rad Studio 2007 during a couple of weeks, here are some of comments:
Among the mistakes we made - since naming many controls is sometimes slow, we usually copied the previous project in a new folder, renamed the files using the Project Manager, and
started modifying this one. But the new BIN now contains two .DLLs, we had duplicate methods. Therefore NEVER copy the BIN
7 - Download The Security Source Code
Here are the source code files:
Two comments:
- please read the warning about the current version of those examples
- the examples which requires a username / password can use the "a" user and
"a" password. This works if you use our database. Of course if you fill your own database, you can initialize any username / password.
The .ZIP file(s) contain:
- the main program (.DPROJ, .DPR, .RES), the main form (.PAS, .ASPX .CONFIG), and any other auxiliary form or files
- any .TXT for parameters, samples, test data
- all units (.PAS .ASPX and other) for units
Those .ZIP
- are self-contained: you will not need any other product
- will not modify your PC in any way beyond the path where you placed the .ZIP (no registry changes, no path outside from the container path creation etc).
We used the following path:
C:\programs\us\web\asp_net\membership_roles_profile\
and this is hard coded in the connection strings.
To use the .ZIP: - create or select a folder
- unzip the downloaded file
- using Delphi, compile and execute
To remove the .ZIP simply delete the folder.
The Pascal code uses the Alsacian notation, which prefixes identifier by
program area: K_onstant, T_ype, G_lobal, L_ocal, P_arametre, F_unction, C_lass etc. This notation is presented in the Alsacian Notation paper.
As usual:
- please tell us at fcolibri@felix-colibri.com if you found some errors, mistakes, bugs, broken links or had some problem downloading the file. Resulting corrections will
be helpful for other readers
- we welcome any comment, criticism, enhancement, other sources or reference suggestion. Just send an e-mail to fcolibri@felix-colibri.com.
- or more simply, enter your (anonymous or with your e-mail if you want an answer) comments below and clic the "send" button
- and if you liked this article, talk about this site to your fellow developpers, add a link to your links page ou mention our articles in
your blog or newsgroup posts when relevant. That's the way we operate: the more traffic and Google references we get, the more articles we will write.
8 - References We mainly used
- the Asp.Net 2.0 help
- the Microsoft MSDN site
- Google to solve some problems not explained in the Help
To present Asp.Net Security, we used techniques or tools presented in the
following articles from this site: - for database access
- for monitoring the data exchange when security is in place:
9 - The author
Felix John COLIBRI works at the Pascal Institute. Starting with Pascal in 1979, he then became involved with Object Oriented Programming, Delphi, Sql, Tcp/Ip, Html, UML. Currently, he is mainly
active in the area of custom software development (new projects, maintenance, audits, BDE migration, Delphi
Xe_n migrations, refactoring), Delphi Consulting and Delph
training. His web site features tutorials, technical papers about programming with full downloadable source code, and the description and calendar of forthcoming Delphi, FireBird, Tcp/IP, Web Services, OOP / UML, Design Patterns, Unit Testing training sessions.
|