|
Delphi Asp.Net 2.0 Databases - Felix John COLIBRI. |
- abstract : Dbx4, Ado.Net Db and AdoDbxClient data access to InterBase and Blackfish Sql databases for Asp.Net 2.0 applications - Using the
ListBox and GridView for display and editing
- key words : Dbx4 - Ado.Net Db - AdoDbxClient - InterBase - Blackfish Sql - datareader - DataSource - GridView
- software used : Windows XP Home, Rad Studio 2007
- hardware used : Pentium 2.800Mhz, 512 M memory, 140 G hard disc
- scope : Rad Studio 2007
- level : Delphi developer
- plan :
1 - Asp.Net 2.0 database access 1.1 - Ado.Net and Asp.Net With Rad Studio, we can develop Asp.Net application, and the purpose of
this paper is to present how to acess Sql engine data in order to display them in Asp.Net pages.
1.2 - ADO.Net 1.0 Data Providers
Ado.Net introduced the "Data Providers" for database access. In Win32, the basic idea was to build generic layers, like the BDE, dbExpressDataSnap, Ado or Zeos, which would let the developer use the same components and code,
irrespective of the target Sql Engine. Ado.Net on the other hand came up with the Data Providers wich were tailored to fit the different Database types. By default, Ado.Net offered:
- for Sql Server access, the Sql data provider (with SqlConnection, SqlCommand, SqlDataReader, SqlDataAdapter, SqlParameters, even SqlType for parameters)
- for Oracle, we had the Oracle Data Provider (OraConnection, OraCommand etc)
- and the remainder could be handle in a mixed bag called OleDb Provider, or ODBC Provider
Of course Microsoft did not take too much time to build a specific Data Provider for Interbase. For Delphi 8 (and for the next versions as well),
we, could use OleDb, wich like other OleDb stuff left the developer alone to find somewhere the correct connection string (usually googling around long enough to find someone who published the string with all those magic values).
With Delphi 2005, Borland offered a Data Provider of their ow, the BDP (Borland Data Provider), which we could use to access InterBase, and
also all other databases. One could use this bona fide .Net Data Provider with any kind of .Net compliant language (Prolog, Fortran) to access some database.
At the time, we published several articles telling in detail how on could use this BDP with InterBase, Firebird etc.
1.3 - Ado.Net 2.0 Data Access
With Ado.Net 2.0 the situation on the .Net side is very similar: there are still separate providers for Sql Server, Oracle, OleDb and ODBC. The first
two are present in the Rad Studio Data Explorer, under the Ado.Net node. To accomodate the new Blackfish Sql embedded database engine, CodeGear added
two additional Ado.Net providers: a local and a remote Blackfish Sql Data Providers The BDP node was completely removed from the Data Explorer, and the BDP is
considered "deprecated". To replace the BDP, CodeGear introduced the AdoDbxClient, which is a new Ado.Net provider implementation that we can use to handle all Sql Servers
available with DbExpress: InterBase, MySql, etc and Blackfish as well. This AdoDbxClient uses the new low-level DbExpress 4 (Dbx4 for short) driver
layer, and we can use the Dbx4 components to connect to databases and execute Sql statements. We have presented this kind of programming in the
Delphi Dbx4 programming article.
To recap: - for Blackfish, we can use
- the Ado.Net Blackfish local or remote providers
- the AdoDbxClient provider
- for Sql Server or Oracle:
- the Microsoft Ado.Net Sql Server or Oracle Ado.Net providers
- the AdoDbxClient provider
- for Interbase or other Sql engines:
- the AdoDbxClient provider
In addition - one can still try the ODBC route
- we will also show how we can use the low-level Dbx4 components, mainly for
code handling (no databinding to Web Controls).
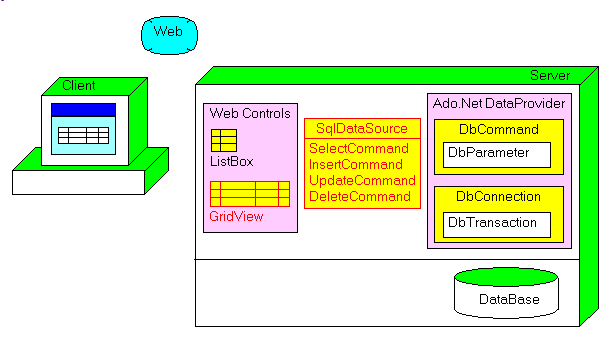
The general schema of the Data Providers is the following:
1.4 - Data Access Components Once we have selected a Data Provider, we will use the component set of this provider. We described in great detail the component sets and their use in several
articles (Ado.Net and Sql Server,
Interbase and the BDP, even Firebird). Without detailing each piece of the Ado.Net pipeline, the following schema sums it all up:
and:
- the xxx_Connection contains the database address, the user and password, and is used to connect to the database
- the xxx_command will contain the Sql request. This request may be
parametrized and use xxx_parameters
- the xxx_datareader is mainly used to read rows for code handling
- the DataAdapter is a intermediate component between the connected components and the in-memory DataSet
- the DataSet contains DataTables, Relations, DataViews
- those in-memory data can then linked (data bound) to the visual controls
1.5 - Ado.Net and Asp.Net
We will present how to include in our Asp.Net pages two databases: - InterBase, for which no dedicated Asp.Net provider is available
- Blackfish where we can use the same components as those used for
InterBase, plus the dedicated Blackfish Ado.Net providers
We used the following setup: - the DbxConnections.Ini (c:\Shared Documents\RAD Studio\dbExpress) was
copied and saved in another folder, just in case
- we created a _data folder and copied the Interbase EMPLOYEE.GDB database, as well as the EMPLOYEE.JDS Blackfish database)
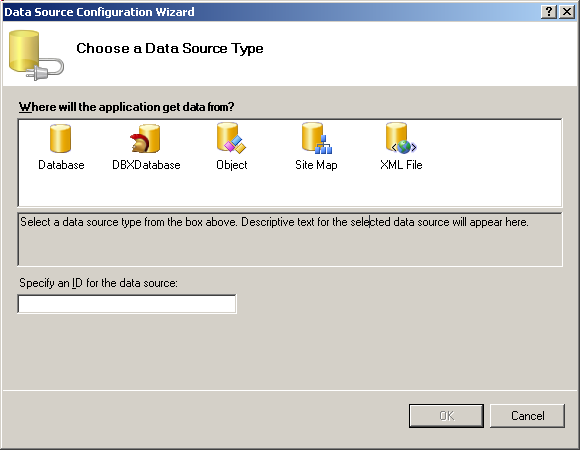
2 - Asp.Net 2.0 and InterBase 2.1 - Using the dbx DbExpress 4 access components 2.1.1 - Create an Interbase Dbx Connection
As explained before, we can use the DbxConnection, DbxCommand, DbxDataReader driver-level access components to read and write data, even from Asp.Net.
To use those components, we first have to create a Dbx4 connection. This can be done with those steps:
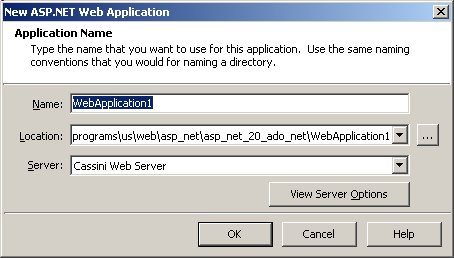
2.1.2 - Test the connection Now create the project and test the connection:
Not related to Asp.Net database programming, we usually add a TextBox to the Form to be able to follow the action:
First we will simply connect to Interbase:
 | from the Tools Palette, drag a Button on the Form, create its OnClick event, and create a tDbxConnection:
const k_connection_name= 'DBX_EMPLOYEE_7_IB_DAN';
procedure TDefault.connect_dbx__Click(sender: TObject;
e: System.EventArgs);
var l_c_dbx_connection_factory: TDBXConnectionFactory;
l_c_dbx_properties: TDBXProperties;
l_c_dbx_connection: tDbxConnection;
begin
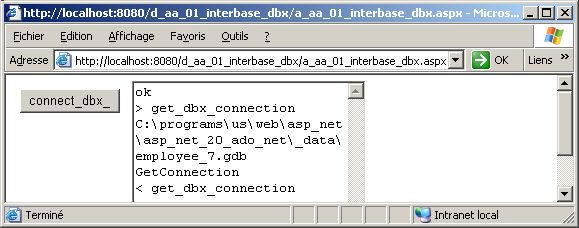
display('> get_dbx_connection');
l_c_dbx_connection_factory:=
TDBXConnectionFactory.GetConnectionFactory;
l_c_dbx_properties:=
l_c_dbx_connection_factory.GetConnectionProperties(k_connection_name);
display(l_c_dbx_properties.Values['Database']);
display('GetConnection');
l_c_dbx_connection:=
l_c_dbx_connection_factory.GetConnection(l_c_dbx_properties );
display('< get_dbx_connection');
end; // connect_dbx__Click
|
| | | in the Project Manager, select "interbase_dbx | References | right click | Add Reference"
|
 | the "Add Reference" dialog is displayed, and all available assemblies are displayed: 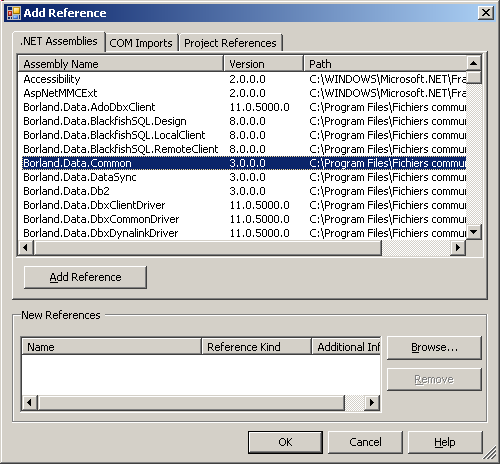 | | | select Borland.Data.Common.Dll and Borland.Data.Dbx.DynalinkDriver.Dll and click "Add Reference" and "Ok"
|
| | the assembly references are added to our project: 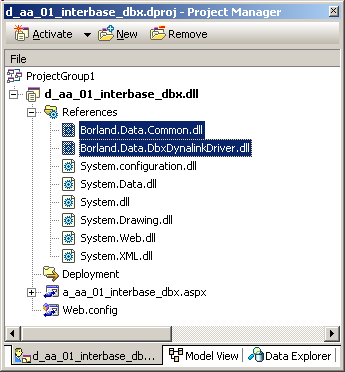 |
| | select the ".PAS" tab, and in the IMPLEMENTATION add the USES import for Borland.Data.Common and Borland.Data.DBXCommon | |
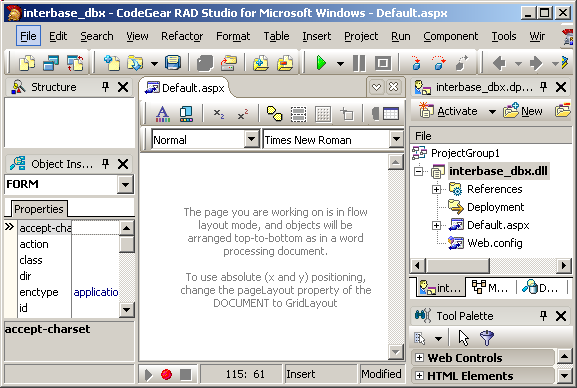
| compile
| | | here is the result:
|
Note that - if you do not add the references, the project still compiles, but you will
receive a "Unable to cast object of type 'Borland.Data.TDBXDynalinkDriverLoader' to type 'Borland.Data.TDBXDriverLoader'", which, of course, means "add the DynalinkDriver reference"
- we cannot "Open" the tDbxConnection. Creating it automatically calls a PROTECTED Open.
2.1.3 - Read and display the rows
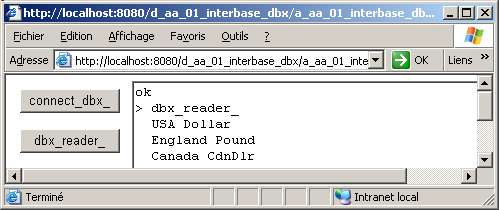
We now will use a tDbxReader to read and fetch the rows of a Table, COUNTRY in our case: | |
from the Tools Palette, drag a Button on the Form, create its OnClick event, create a tDbxConnection, create a tDbxReader and display the row values in the TextBox:
function f_c_dbx_connection(p_connection_name: WideString): tDbxConnection;
var l_c_dbx_connection_factory: TDBXConnectionFactory;
l_c_dbx_properties: TDBXProperties;
begin
l_c_dbx_connection_factory:=
tDBXConnectionFactory.GetConnectionFactory;
l_c_dbx_properties:=
l_c_dbx_connection_factory.GetConnectionProperties(p_connection_name);
Result:= l_c_dbx_connection_factory.GetConnection(l_c_dbx_properties );
end; // f_c_dbx_connection
procedure TDefault.dbx_reader__Click(sender: TObject; e: System.EventArgs);
var l_c_dbx_connection: tDbxConnection;
l_c_dbx_command: tDbxCommand;
l_c_dbx_reader: tDbxReader;
l_column_index: Integer;
l_row_display: String;
begin
l_c_dbx_connection:= f_c_dbx_connection(k_connection_name);
l_c_dbx_command:= l_c_dbx_connection.CreateCommand;
l_c_dbx_command.Text:= 'SELECT * FROM country';
l_c_dbx_reader:= l_c_dbx_command.ExecuteQuery;
while l_c_dbx_reader.Next do
begin
l_row_display:= ' ';
for l_column_index:= 0 to l_c_dbx_reader.ColumnCount- 1 do
l_row_display:= l_row_display
+ l_c_dbx_reader.Value[l_column_index].GetAnsiString+ ' ';
display(l_row_display);
end; // while l_c_dbx_reader.Next
end; // dbx_reader__Click
| | | | compile
| | | here is the result:
|
Please note
2.2 - Using the generic Db Ado.Net access components 2.2.1 - Connect using DbConnection
A more general approach would be to use Ado.Net compatible components, which will allow us to bind our access components to the bindable Web Controls.
First let's try to connect to the Interbase database:
Please note that:
- to create the DbConnection, DbProviderFactories requires the name of an Ado.Net provider. Since Rad Studio only offers those for Sql Server,
Oracle and BlackFish, we use the generic AdoDbxClient implementation, which implements the Ado.Net providers, and this for all Sql engines listed under "DbExpress". And among those we have InterBase
So in fact we are creating a AdoDbxClient connection, but will here only use the generic Ado.Net possibilities - we wanted to use the connection name. This did not succeed. In fact, the
DbxConnections.Ini is a totally Dbx4 feature, and is not available to the more general Ado.Net level
Since we cannot use the connection name, we used the connection string.
- we placed the connection string required by the Ado.Net provider in a CONST. We were very surprised to receive an error because this string was greater then 255 Characters. Well it's nearly since the time of the Apple ][
that we had not seen this message !
This explains why we did split the string in two. - and then we also had to add the password to the connection string, since it is not in the "Advanced Properties" label.
- we also closed the connection, since we are not supposed to leave this DbConnection open
2.2.2 - Display the Rows We will then display the rows of some Table: |
| from the Tools Palette, drag a Button on the Form, create its OnClick event, create a DbConnection, create a DbDataReader and display the row
values in the TextBox:
procedure TDefault.db_reader__Click(sender: TObject; e: System.EventArgs);
var l_c_db_provider_factory: DbProviderFactory;
l_c_db_connection: DbConnection;
l_c_db_command: DbCommand;
l_c_db_datareader: DbDataReader;
l_row_display: String;
l_column_index: Integer;
begin
l_c_db_provider_factory:=
DbProviderFactories.GetFactory(k_ib_provider_name);
l_c_db_connection:= l_c_db_provider_factory.CreateConnection();
l_c_db_connection.ConnectionString:=
k_ib_connection_string_1+ k_ib_connection_string_2;
l_c_db_command:= l_c_db_connection.CreateCommand();
l_c_db_command.CommandText:= 'SELECT * FROM country';
l_c_db_connection.Open;
l_c_db_datareader:= l_c_db_command.ExecuteReader;
while l_c_db_datareader.Read do
begin
l_row_display:= ' ';
for l_column_index:= 0 to l_c_db_datareader.FieldCount- 1 do
l_row_display:= l_row_display
+ l_c_db_datareader.Item[l_column_index].ToString+ ' ';
display(l_row_display);
end; // while l_c_db_datareader.Read
l_c_db_connection.Close;
end; // db_reader__Click
|
| | | compile
| | | the rows of COUNTRY are displayed
|
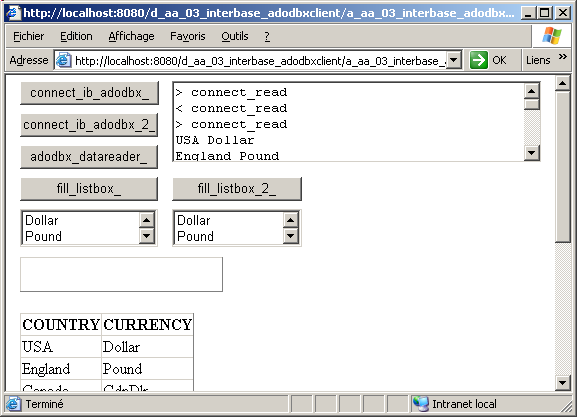
2.2.3 - Fill a ListBox Since the DbDataReader implements the enumerable interface, we can use it to fill the values of bindable Web Controls. Here is how to do it by code:
| | from the Tools Palette, drag a Listbox on the Form
| | |
drag a Button on the Form, create its OnClick event, create a DbConnection, create a DbDataReader and connect the ListBox.DataSource and ListBox.DataTextField:
function f_c_db_datareader(p_c_db_connection: DbConnection;
p_select_request: String): DbDataReader;
// -- receives an OPEN connection
var l_c_db_command: DbCommand;
begin
l_c_db_command:= p_c_db_connection.CreateCommand();
l_c_db_command.CommandText:= p_select_request;
Result:= l_c_db_command.ExecuteReader;
end; // f_c_db_datareader
procedure TDefault.fill_listbox__Click(sender: TObject;
e: System.EventArgs);
var l_c_db_provider_factory: DbProviderFactory;
l_c_db_connection: DbConnection;
l_c_db_datareader: DbDataReader;
begin
l_c_db_provider_factory:=
DbProviderFactories.GetFactory(k_ib_provider_name);
l_c_db_connection:= l_c_db_provider_factory.CreateConnection();
l_c_db_connection.ConnectionString:=
k_ib_connection_string_1+ k_ib_connection_string_2;
l_c_db_connection.Open;
l_c_db_datareader:= f_c_db_datareader(
l_c_db_connection, 'SELECT * FROM country');
ListBox1.DataSource:= l_c_db_datareader;
ListBox1.DataTextField:= 'COUNTRY';
DataBind;
end; // fill_listbox__Click
| | | |
compile
| | | the rows of COUNTRY are displayed 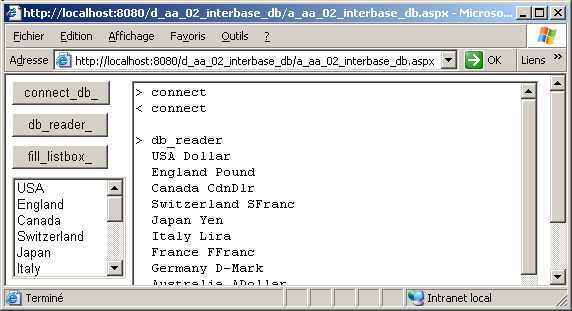
|
Please note - we did not use a FUNCTION which returns the DbConnection, since we prefer
to keep the Open and Close in the same method. In this case a DbConnection creation FUNCTION would not have much to do
- we created a FUNCTION which returns a DataReader however
- the DataBind technique is the old Asp.Net 1 technique. We are now supposed to use DataSources, and this will be demonstrated below. The old technique still works however.
In addition, when we use DataBind, we can select when to do the binding (when NOT Page.IsPostBack, for instance), and avoid doing this at each round trip, and we might even disable the ViewState. We will not develop
those very common Asp.Net techniques in this article.
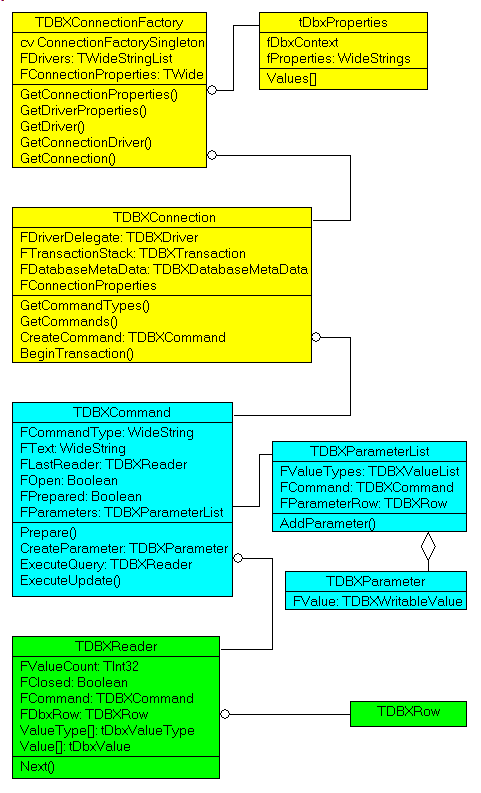
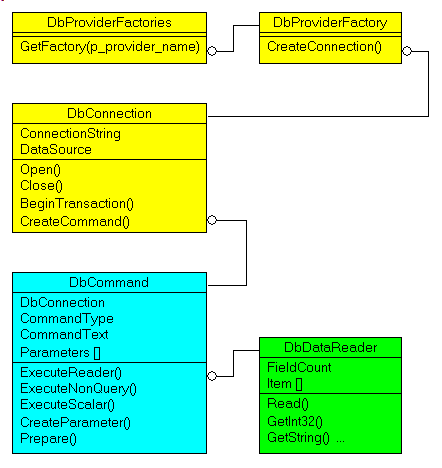
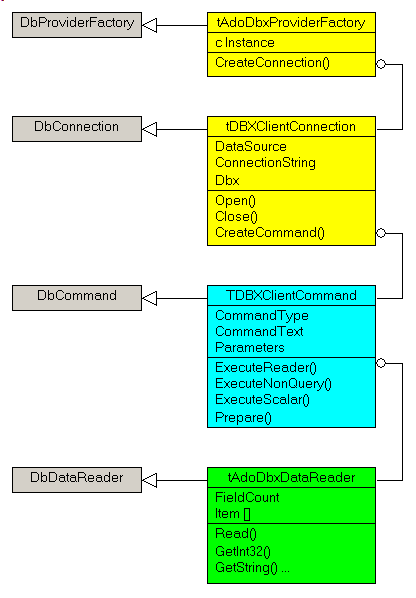
And here is the (shortened) UML Class diagram of the Db components we used in our examples:
2.3 - The AdoDbxClient access components 2.3.1 - AdoDbxClient
The third route is the AdoDbxClient Ado.Net provider. This brand new component suite was created to have the Ado.Net provider for
all the Dbx accessible Sql engines. We have the full source code, and in addition it works for both .Net and .Win32.
2.3.2 - Testing the AdoDbxClient connection Here is how to test the connection:
2.3.3 - Connect using the Connection Name
The tAdoDbxConnection.ConnectionString can also be initialized by using the connection name, and setting this value in a "key=value" fashion: | |
from the Tools Palette, drag a Button on the Form, create its OnClick event, create a tAdoDbxConnection, and open it:
const k_ib_connection_name= 'DBX_EMPLOYEE_7_IB_DAN';
procedure TDefault.connect_ib_adodbx_2__Click(sender: TObject;
e: System.EventArgs);
var l_c_ado_dbx_connection: tAdoDbxConnection;
begin
l_c_ado_dbx_connection:= TAdoDbxProviderFactory.Instance.CreateConnection
as TAdoDbxConnection;
l_c_ado_dbx_connection.ConnectionString:=
'ConnectionName='+ k_ib_connection_name;
l_c_ado_dbx_connection.Open;
l_c_ado_dbx_connection.Close;
end; // connect_ib_adodbx_2__Click
| | | |
run
| | | the connection is open and closed
|
2.3.4 - Using tAdoDbxCommand and tAdoDbxDataReader
To read the rows and display them, or otherwise handle the values, we can use the following code: | |
from the Tools Palette, drag a Button on the Form, create its OnClick event, create a tAdoDbxConnection, and open it, then create a command and create the tAdoDbxDataReader:
function f_c_ado_dbx_connection_from_string(p_connection_string: WideString):
TAdoDbxConnection;
begin
Result:= TAdoDbxProviderFactory.Instance.CreateConnection
as TAdoDbxConnection;
Result.ConnectionString := p_connection_string;
end; // f_c_ado_dbx_connection_from_string
procedure TDefault.adodbx_datareader__Click(sender: TObject;
e: System.EventArgs);
var l_c_ado_dbx_connection: tAdoDbxConnection;
l_c_ado_dbx_command: tAdoDbxCommand;
l_c_ado_dbx_reader: tAdoDbxDataReader;
l_row_display: String;
l_column_index: Integer;
begin
l_c_ado_dbx_connection:= f_c_ado_dbx_connection_from_string(
k_ib_connection_string_1+ k_ib_connection_string_2);
l_c_ado_dbx_command:= l_c_ado_dbx_connection.CreateCommand
as tAdoDbxCommand;
l_c_ado_dbx_command.CommandText:= 'SELECT * FROM country';
l_c_ado_dbx_connection.Open;
l_c_ado_dbx_reader:= l_c_ado_dbx_command.ExecuteReader
as TAdoDbxDataReader;
while l_c_ado_dbx_reader.Read do
begin
l_row_display:= '';
for l_column_index:= 0 to l_c_ado_dbx_reader.FieldCount- 1 do
l_row_display:= l_row_display
+ l_c_ado_dbx_reader.GetString(l_column_index)+ ' ';
display(l_row_display);
end; // while l_c_db_datareader.Read
l_c_ado_dbx_connection.Close;
end; // adodbx_datareader__Click
|
| | | run
| | |
the rows of COUNTRY are displayed
|
2.3.5 - Filling a ListBox The same technique as the one used with the DbConnection can be used to fill a ListBox: |
| from the Tools Palette, drag a Listbox on the Form
| | |
drag a Button on the Form, create its OnClick event, create the connection, the tAdoDbxDataReader and connect the ListBox.DataSource and ListBox.DataTextField:
function f_c_ado_dbx_datareader(p_c_adodbx_connection: tAdoDbxConnection;
p_select_request: String): tAdoDbxDataReader;
// -- the connection must be open
var l_c_ado_dbx_command: tAdoDbxCommand;
begin
l_c_ado_dbx_command:= p_c_adodbx_connection.CreateCommand
as tAdoDbxCommand;
l_c_ado_dbx_command.CommandText:= p_select_request;
Result:= l_c_ado_dbx_command.ExecuteReader as TAdoDbxDataReader;
end; // f_c_ado_dbx_datareader
procedure TDefault.fill_listbox__Click(sender: TObject;
e: System.EventArgs);
var l_c_ado_dbx_connection: tAdoDbxConnection;
begin
l_c_ado_dbx_connection:= f_c_ado_dbx_connection_from_string(
k_ib_connection_string_1+ k_ib_connection_string_2);
l_c_ado_dbx_connection.Open;
ListBox1.DataSource:= f_c_ado_dbx_datareader(
l_c_ado_dbx_connection,
'SELECT * FROM country');
ListBox1.DataTextField:= 'CURRENCY';
DataBind;
l_c_ado_dbx_connection.Close;
end; // fill_listbox__Click
|
| | | compile
| | |
the rows of COUNTRY are displayed
|
Using the tAdoDbxConnection component The Tools Palette also contains tAdoDbx Provider components:

So lets try to connect using those components: | |
drag the tAdoDbxConnection on the Form
| | | the component is placed below the designer:
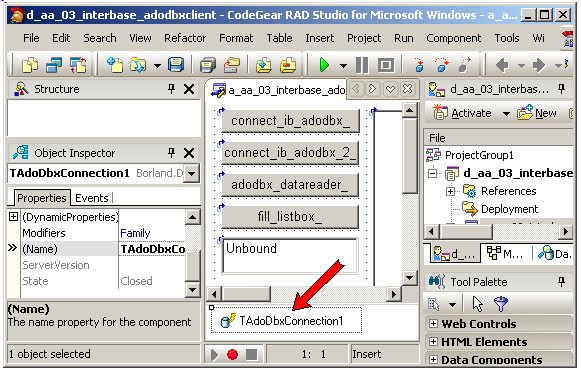 | | |
fill the ConnectionString with the connection string (copied and pasted from the Data Explorer), or set the individual properties of the connection string | |
| drop a tAdoDbxCommand, set its Connection property to AdoDbxConnection1, and its CommandText to some Sql request, like "SELECT * FROM country"
|
| | from the Tools Palette, drag a Listbox on the Form
| | |
drag a Button on the Form, create its OnClick and connect the ListBox2.DataSource and ListBox2.DataTextField:
procedure TDefault.fill_listbox_2__Click(sender: TObject;
e: System.EventArgs);
begin
tAdoDbxConnection1.Open;
ListBox2.DataSource:= tAdoDbxCommand1.ExecuteReader
as TAdoDbxDataReader;
ListBox2.DataTextField:= 'CURRENCY';
DataBind;
tAdoDbxConnection1.Close;
end; // fill_listbox_2__Click
|
| | | compile
| | | the rows of COUNTRY are displayed
|
Please Note - we CANNOT drag the DBX_EMPLOYEE_7_IB_DAN connection from the Data Explorer to the Form. And we cannot drag one of its Tables. This is only
available for Win32 or Vcl.Net applications
- there is no Connected property which would allow us to check the connection, or any connection editor with a "Test" button
- the AdoDbx_xxx objects have a funny T before the component name.
- there is also a tAdoDbxDataAdapter, but we could not figure out how to use it, since it has no SelectCommand or similar property
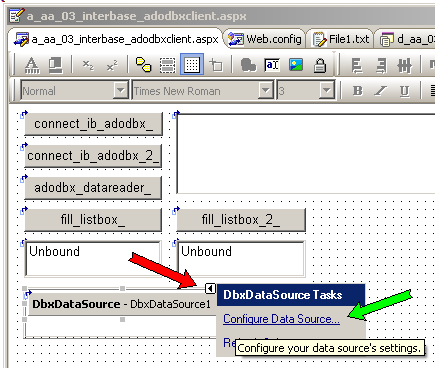
2.3.6 - Using DataSources One of the main innovation of Asp.Net 2.0 is the DataSource technique. Instead of calling DataBind to fill the Web Controls, we use the new
DataSource component and this component takes care of the databinding part. There are several DataSources: - by default, the SqlDataSource was offered to handle Sql Server data
types. It also works with Blackfish, but not for InterBase when the Table uses some types with different formats than Sql Server
- so CodeGear created a DbxDataSource, which can handle InterBase Tables, and this is the one we will use
- there are also other DataSources, used to implement the "Provider Model":
Those mainly allows us to fill data structures like Site Maps, Memberships or other from different sources, or otherwise allow us to implement business
logic. We will not present those in this article
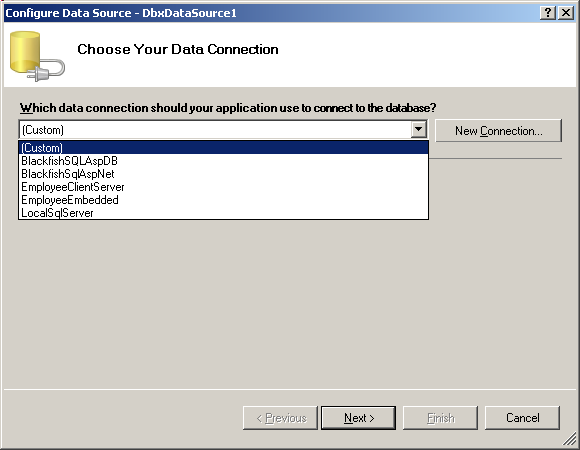
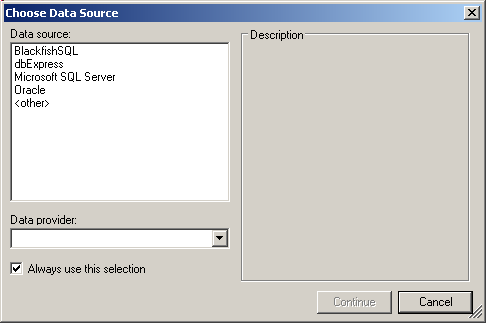
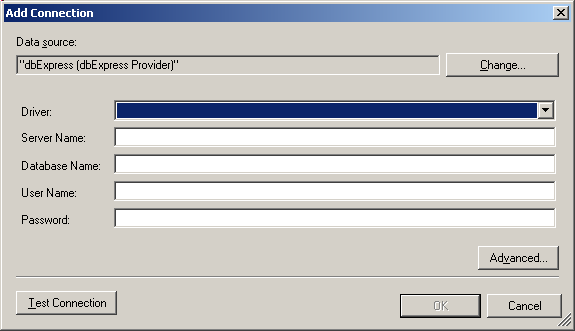
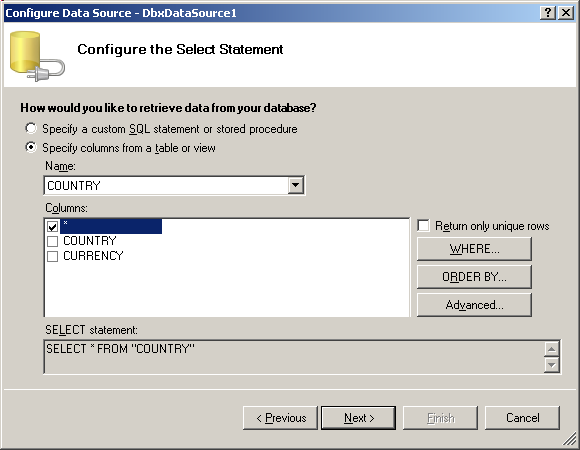
In order to use the DbxDataSource, there are two approaches - drop an xxx_DataSource, initialize it, and then connect it to some
databindable Web Control (ListBox, GridView etc)
- directly drop a Web Control and use its smart tab to create and initialize the DataSource and connect the Web Control to it
Here is the first approach:
Please note that - you CANNOT drag any DataSource on the Form if you are using the GridLayout. You will see a red error "the DataSource has no style
property". This means that in GridLayout, the designer adds a STYLE attribute, and since the non-visible DataSource component have no such
attribute, you will get this error. We circumvented this by using an HTML Table, but only for presenting this paper. First we should use FlowLayout, and second, leaving the DataSource at the top left position is not such a big problem
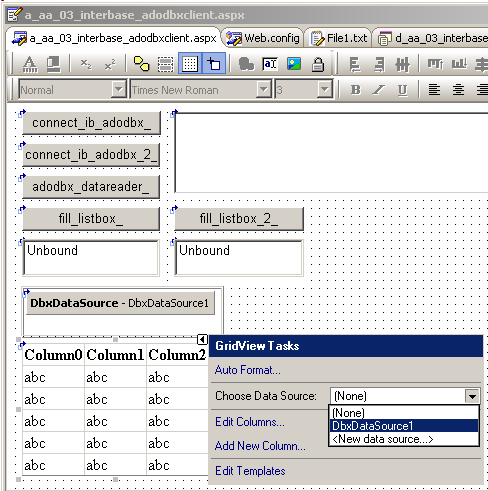
Now we add any bindable Web Control, for instance a GridView:
The other way to use the DataSource is to start with a bindable Web Control, and use its smart tab menu to create and initialize the DataSource:
Note that
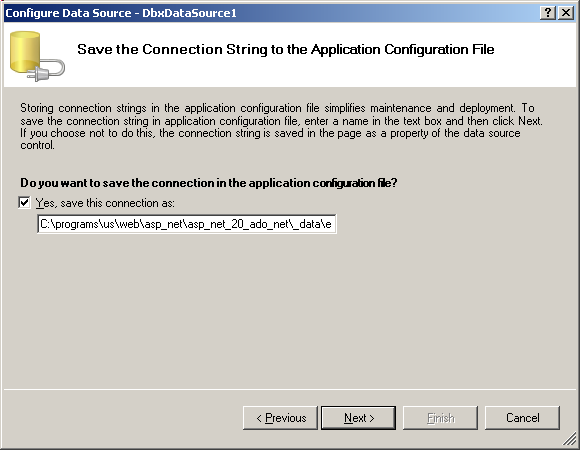
- when we accepted to "save the connection in the configuration file", it was saved in the Web.Config file.
By selecting "Project Manager | Web.Config" you can view this file in the IDE. Here is a (shortened) version of this file:
<?xml version="1.0" encoding="utf-8" ?>
<configuration>
<connectionStrings>
<add name="BlackfishSqlAspNet"
connectionString="database=|DataDirectory|bsql_aspnetdb.jds; ...ooo..."
providerName="Borland.Data.BlackfishSQL.RemoteClient" />
<add name="C:\programs\us\web\asp_net\asp_net_20_ado_net\
_data\employee_7.gdbConnectionString"
connectionString="DriverName=Interbase;DriverUnit=DBXDynalink; ...ooo... "
providerName="Borland.Data.AdoDbxClient" />
</connectionStrings>
<system.data>
<!-- ... ooo -->
</system.data>
<!-- ... ooo -->
</configuration>
| If you now try to use another connection, those connections will be presented along with the Ado.Net connections already presented in the Data Explorer.
You may also notice that each entry has a name connectionString and providerName attribute. We will use
those to set the connection later in this article.
2.3.7 - AdoDbxClient UML Class Diagram And here is the (shortened) AdoDbxClient CLASS Diagram, extracted from Borland.Data.AdoDbxClientProvider.Pas:
This diagram clearly shows that the AdoDbxClient is an implementation of the Ado.Net provider
3 - Asp.Net 2.0 and Blackfish Sql 3.1 - Using the dbx DbExpress 4 access components 3.1.1 - Create a BlackFish Dbx Connection
As we already presented in the Blackfish Sql paper, we can use the DbxConnection, DbxCommand, DbxDataReader driver-level access
components to read and write data, even from Asp.Net. To use those components, we first have to create a Dbx4 connection. This can be done with steps similar to those explained for Interbase:
Note that - for some not well understood reason, we received an error "cannot change employee.jds database log file ...". We renamed the file employee_2.jds and
this solved the problem (but what we did wrong is still mysterious)
3.1.2 - Test the connection Now create the project and test the connection: |
| select "File | New | Asp.Net Web Application", BLACKFISH_DBX
| | | add the TextBox and display method
|
First we will simply connect to BlackfishSql: | | from the Tools Palette, drag a Button on the Form, create its OnClick
event, and create a tDbxConnection:
const k_blackfish_dbx_connection_name= 'dbx_employee_jds';
procedure TDefault.connect_jds_dbx__Click(sender: TObject;
e: System.EventArgs);
var l_c_dbx_connection_factory: TDBXConnectionFactory;
l_c_dbx_properties: TDBXProperties;
l_c_dbx_connection: tDbxConnection;
begin
l_c_dbx_connection_factory:=
TDBXConnectionFactory.GetConnectionFactory;
l_c_dbx_properties:=
l_c_dbx_connection_factory.GetConnectionProperties(k_blackfish_dbx_connection_name);
display(' '+ l_c_dbx_properties.Values['Database']);
l_c_dbx_connection:= l_c_dbx_connection_factory.GetConnection(l_c_dbx_properties );
end; // connect_jds_dbx__Click
| | | |
in the Project Manager, select "blackfish_dbx.dll | References | right click | Add Reference"
| | | the "Add Reference" dialog is displayed
| | | select Borland.Data.Common.Dll and Borland.Data.DbxCommonDriver.Dll and add them
| |
| select the ".PAS" tab, and in the IMPLEMENTATION add the USES import for Borland.Data.Common and Borland.Data.DBXCommon | |
| compile
| | | the Blackfish Dbx connection is created
|
3.1.3 - Read Rows with the DbxReader We can also display the values of the rows of the COUNTRY Table: | |
from the Tools Palette, drag a Button on the Form, create its OnClick event, and create a tDbxConnection, create DbxCommand, and with a DbxReader display the values:
function f_c_dbx_connection(p_connection_name: WideString): tDbxConnection;
var l_c_dbx_connection_factory: TDBXConnectionFactory;
l_c_dbx_properties: TDBXProperties;
begin
l_c_dbx_connection_factory:= TDBXConnectionFactory.GetConnectionFactory;
l_c_dbx_properties:=
l_c_dbx_connection_factory.GetConnectionProperties(p_connection_name);
Result:= l_c_dbx_connection_factory.GetConnection(l_c_dbx_properties );
end; // f_c_dbx_connection
procedure TDefault.display_dbxreader__Click(sender: TObject;
e: System.EventArgs);
var l_c_dbx_connection: tDbxConnection;
l_c_dbx_command: tDbxCommand;
l_c_dbx_reader: tDbxReader;
l_column_index: Integer;
l_row_display: String;
begin
l_c_dbx_connection:= f_c_dbx_connection(k_blackfish_dbx_connection_name);
l_c_dbx_command:= l_c_dbx_connection.CreateCommand;
l_c_dbx_command.Text:= 'SELECT * FROM country';
l_c_dbx_reader:= l_c_dbx_command.ExecuteQuery;
while l_c_dbx_reader.Next do
begin
l_row_display:= ' ';
for l_column_index:= 0 to l_c_dbx_reader.ColumnCount- 1 do
l_row_display:= l_row_display
+ l_c_dbx_reader.Value[l_column_index].GetAnsiString+ ' ';
display(l_row_display);
end; // while l_c_dbx_reader.Next
end; // display_dbxreader__Click
| | | |
compile
| | | the values are displayed
|
3.2 - BlackFish and Ado.Net
3.2.1 - Ado.Net Providers Unlike InterBase, Blackfish does have direct Ado.Net providers, which are displayed in the Data Explorer:
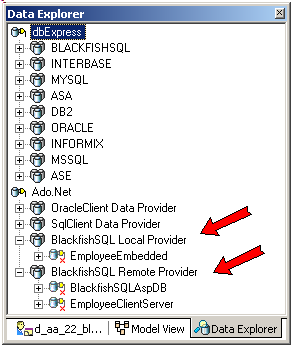
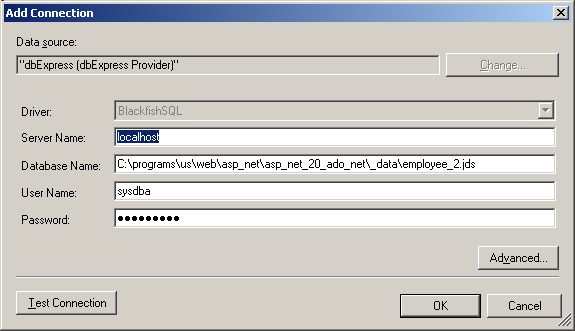
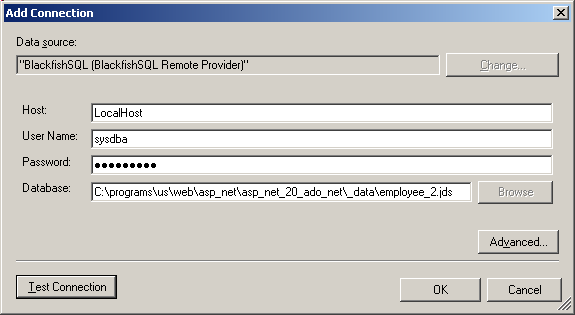
We will first add a Remote Provider entry for our EMPLOYEE_2.JDS database:
3.2.2 - Test the DbConnection Now create the project and test the connection: | |
select "File | New | Asp.Net Web Application", BLACKFISH_DB
| | | add the TextBox and display method
|
First we will simply connect to Blackfish Sql: | | from the Tools Palette, drag a Button on the Form, create its OnClick
event, and create a DbConnection:
const k_bfs_anr_provider_name= 'Borland.Data.BlackfishSQL.RemoteClient';
// -- taken from Data Explorer + password
k_bfs_bfs_connection_string= 'host=LocalHost;user=sysdba'
+ ';database=C:\programs\us\db\blackfishsql\_data\employee.jds'
+ ';password=masterkey';
procedure TDefault.connect_jds_an_remote__Click(sender: TObject;
e: System.EventArgs);
var l_c_db_provider_factory: DbProviderFactory;
l_c_db_connection: DbConnection;
begin
l_c_db_provider_factory:=
DbProviderFactories.GetFactory(k_bfs_anr_provider_name);
l_c_db_connection:= l_c_db_provider_factory.CreateConnection();
l_c_db_connection.ConnectionString:= k_bfs_bfs_connection_string;
l_c_db_connection.Open;
l_c_db_connection.Close;
end; // connect_jds_an_remote__Click
| | | |
in the Project Manager, select "blackfish_dbx.dll | References | right click | Add Reference"
| | | the "Add Reference" dialog is displayed
| | | select Borland.Data.Common.Dll and add this assembly
| | |
select the ".PAS" tab, and in the IMPLEMENTATION add the USES import for Borland.Data.Common | | | compile
| |
| the Blackfish DbConnection is opened and closed
|
Please note - since the creation of the DbConnection uses the provider name and the
connection string, there is no real need to create an entry in the Data Explorer: the code never uses the connection NAME. However this entry was used to get the connection STRING
3.2.3 - Read Rows with the DbDataReader We can also display the values of the rows of the COUNTRY Table: | |
from the Tools Palette, drag a Button on the Form, create its OnClick event, and create a DbConnection, create DbCommand, and with a DbDataReader display the values:
procedure TDefault.display_datareader__Click(sender: TObject; e: System.EventArgs);
var l_c_db_provider_factory: DbProviderFactory;
l_c_db_connection: DbConnection;
l_c_db_command: DbCommand;
l_c_db_datareader: DbDataReader;
l_row_display: String;
l_column_index: Integer;
begin
l_c_db_provider_factory:= DbProviderFactories.GetFactory(k_bfs_anr_provider_name);
l_c_db_connection:= l_c_db_provider_factory.CreateConnection();
l_c_db_connection.ConnectionString:= k_bfs_bfs_connection_string;
l_c_db_connection.Open;
l_c_db_command:= l_c_db_connection.CreateCommand();
l_c_db_command.CommandText:= 'SELECT * FROM country';
l_c_db_datareader:= l_c_db_command.ExecuteReader;
while l_c_db_datareader.Read do
begin
l_row_display:= ' ';
for l_column_index:= 0 to l_c_db_datareader.FieldCount- 1 do
l_row_display:= l_row_display
+ l_c_db_datareader.Item[l_column_index].ToString+ ' ';
display(l_row_display);
end; // while l_c_db_datareader.Read
l_c_db_connection.Close;
end; // display_datareader__Click
|
| | | compile
| | | the values are displayed
|
3.2.4 - DataBind a ListBox We could fill a ListBox from the DbDataReader, as we did with the InterBase example.
3.2.5 - Using the DataStore components
The Tools Palette contains data access components for Blackfish: 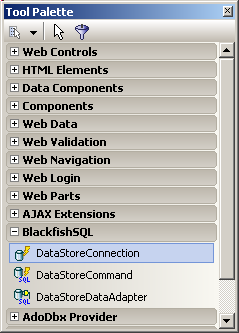
The "DataStore" is the new generic name for the CodeGear embedded database. This all started with JDataStore (a Java thingy), and was rewritten for .Net and renamed NDataStore and later Blackfish. So the "DataStore" comes from
those times.
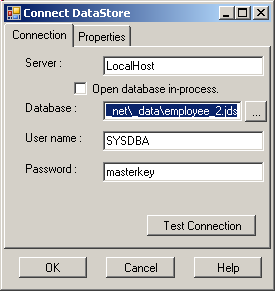
Here is how to use the DataStoreConnection component:
We can also use a DataStoreCommand component, and will have - to set its Connection property (to DataStoreConnection1)
- type some Sql request ("SELECT * FROM country")
And, in a similar vein, a DataStoreDataAdapter, which behaves somehow like the Windows Forms DataAdapter: | |
drag a DataStoreDataAdapter on the Form
| | | in the component tray, select "DataStoreDataAdapter1 | right click |
configure Data Adapter"
| | | the configuration dialog is displayed (Ed: right part of this huge dialog truncated):
 | | |
add the connection, select the Table, the rows and click "Generate Sql" (on the right, in the truncated part). You may look at the data, using the "Preview Data" tab Then click "Ok" | |
| select "Tools Palette | DataComponents" 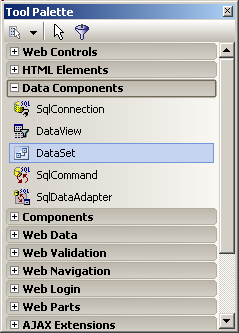 and drag a DataSet on the Form |
| | from the Tools Palette, drag a ListBox on the Form | | |
from the Tools Palette, drag a Button on the Form, create its OnClick event, and fill DataSet1 and databind it to ListBox1
procedure TDefault.fill_and_databiind__Click(sender: TObject;
e: System.EventArgs);
begin
DataStoreDataAdapter1.Fill(DataSet1);
ListBox1.DataSource:= DataSet1.Tables[0].DefaultView;
ListBox1.DataTextField:= 'COUNTRY';
DataBind;
end; // fill_and_databiind__Click
| | | |
run
| | | here is a snapshot of clicking all our buttons: 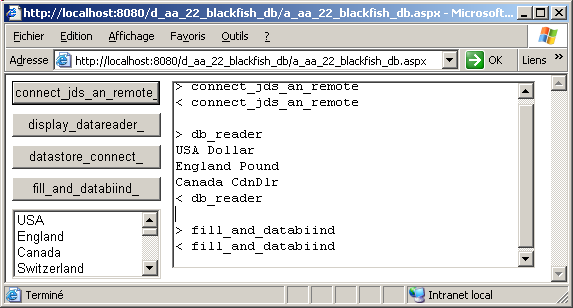
|
Please Note - you cannot create a DataSet from the "Configure DataStore" dialog (like we could do with Windows Forms). But since we still need to call DataBind, this is not very important.
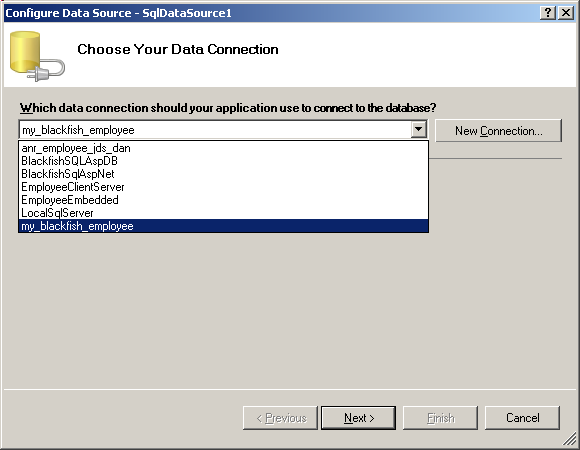
- you can also start the connecting process with the bindable Web Control, and, using the smart tab, create the SqlDataSource and initialize it
- instead of using the existing blackfish remote connection, we can select
"create a new connection", and fill this with the usual parameters. This has been demonstrated for Interbase above (where this was the only route, since there was no InterBase Ado.Net provider)
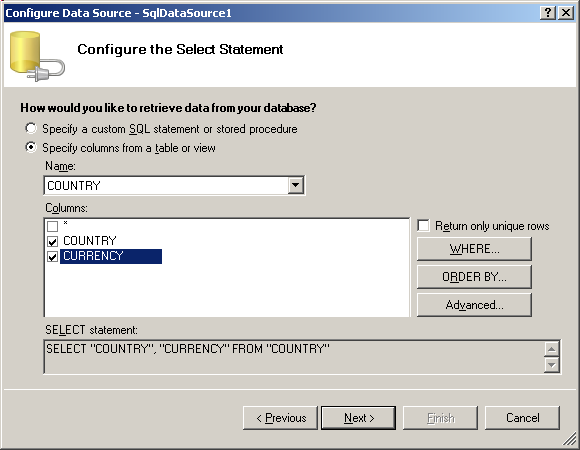
3.2.6 - Using SqlDataSource We can also use the new Ado.Net 2.0 SqlDataSource to automatically bind some Web Controls to our BlackfishSql database. And this time, we can use the
original SqlDataSource, since the BlackfishSql data types are aligned to the .Net data types (which is not the case for InterBase). Here is an example:
The Web.Config now contains our new connection:
<?xml version="1.0" encoding="utf-8" ?>
<configuration>
<connectionStrings>
<add name="BlackfishSqlAspNet"
connectionString="database=|DataDirectory|bsql_aspnetdb.jds;protocol=TCP;
host=localhost;user=SYSDBA;password=masterkey;create=true"
providerName="Borland.Data.BlackfishSQL.RemoteClient" />
<add name="C:\programs\us\web\asp_net\asp_net_20_ado_net\_data\
employee_2.jdsConnectionString"
connectionString="host=LocalHost;database=C:\programs\us\web\asp_net\
asp_net_20_ado_net\_data\employee_2.jds;user=sysdba;password=masterkey"
providerName="Borland.Data.BlackfishSQL.RemoteClient" />
</connectionStrings>
<!-- ...ooo... -->
</configuration>
|
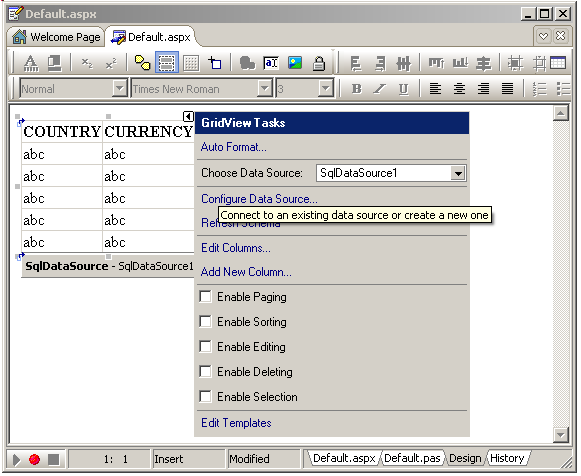
And we can now bind this SqlDataSource to a bindable Web Control, like the GridView: | | drag a GridView on the Form
|
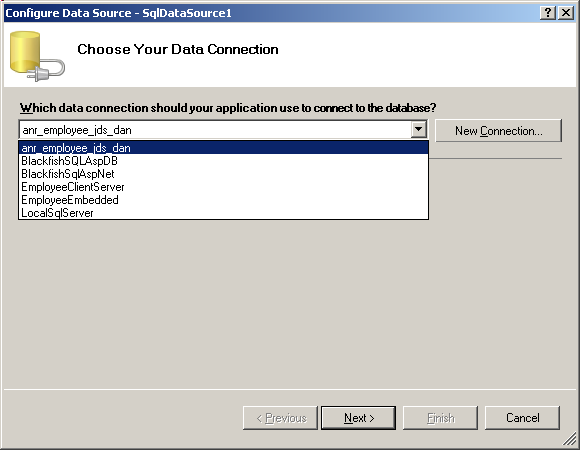
| | select "smart tab | Choose Data Source" and in the combobox select SqlDataSouce1
| |
| run
| | | here is the display:
|
3.3 - Blackfish and AdoDbxClient 3.3.1 - tAdoDbxConnection We connect using tAdoDbxConnection in the same way as we did with Interbase.
Here is the code of the connection using the connection STRING and the connection NAME:
const k_bfs_connection_string_2= 'drivername=BLACKFISHSQL;user_name=sysdba'
+ ';port=2508;create=False;readonlydb=False;hostname=localhost;'
+ 'database=C:\programs\us\web\asp_net\asp_net_20_ado_net\'
+ '_data\employee_2.jds'
+ ';password=masterkey';
procedure TDefault.connect_bfs_adodbx__Click(sender: TObject;
e: System.EventArgs);
var l_c_ado_dbx_connection: tAdoDbxConnection;
begin
l_c_ado_dbx_connection:=
TAdoDbxProviderFactory.Instance.CreateConnection as TAdoDbxConnection;
l_c_ado_dbx_connection.ConnectionString := k_bfs_connection_string_2;
l_c_ado_dbx_connection.Open;
l_c_ado_dbx_connection.Close;
end; // connect_bfs_adodbx__Click
const k_dbx_bfs_connection_name= 'DBX_EMPLOYEE_JDS';
procedure TDefault.connect_bfs_adodbx_2__Click(sender: TObject;
e: System.EventArgs);
var l_c_ado_dbx_connection: tAdoDbxConnection;
begin
l_c_ado_dbx_connection:=
TAdoDbxProviderFactory.Instance.CreateConnection as TAdoDbxConnection;
l_c_ado_dbx_connection.ConnectionString:=
'ConnectionName='+ k_dbx_bfs_connection_name;
l_c_ado_dbx_connection.Open;
l_c_ado_dbx_connection.Close;
end; // connect_bfs_adodbx_2__Click
|
If our connection string is not correct, we will receive the following error:
"Borland.Data.TDBXError: C:\programs\us\db\blackfishsql\_dataemployee_2.jds database not found or fileName property set to null."
Displaying the data with an AdoDbxDataReader, and databinding this to a
tListBox behaves just like it did for InterBase.
3.4 - Using Web.Config 3.4.1 - Application Parameters All our connection parameters have been hardwired either in the
DbxConnections.Ini or even in CONST in the code. This is supposed to be bad programming. Instead we should use the .XML Web.Config file to store this kind of information.
3.4.2 - Get connection from Web.Config
The key is to use the ConfigurationManager CLASS (new in Asp.Net 2.0) which has two NameValueCollection properties - AppSettings
- ConnectionStrings
In our case, if we store the connection parameters in <connectionStrings>, we will be able to grab the parameters back in our code.
First, we must fill the <connectionStrings> tag:
For Blackfish, the parameters are quite easy, host, file name, user and password. But for Interbase, or Sql Server, nobody in his right mind would ever dare type those parameters by hand. One would copy them from some place,
like the Data Explorer.
First let's fetch those parameters in code and display them: | |
drag a Button on the Form, and display the different attributes of this new connection (Name, connectionString and providerName):
procedure TDefault.display_connection_strings__Click(sender: TObject;
e: System.EventArgs);
begin
with ConfigurationManager.ConnectionStrings['my_blackfish_employee'] do
begin
display(Name);
display(connectionString);
display(providerName);
end; // with ConfigurationManager
end; // display_connection_strings__Click
| | | |
run
| | | TextBox1 will redisplay the Web.Config connectionString values
|
3.4.3 - Testing the Connection We then can create FUNCTIONs which will return the connection parameters, and use those in our code: | |
drag a Button on the Form, and create a DbDataReader which will display the row values of the COUNTRY table, using both providerName and connectionStrings properties of the ConfigurationManager:
const k_web_config_connection_name= 'my_blackfish_employee';
function f_provider_name(p_web_config_name: String): String;
begin
Result:= ConfigurationManager.ConnectionStrings[p_web_config_name]
.providerName;
end; // f_provider_name
function f_connection_string(p_web_config_name: String): String;
begin
Result:= ConfigurationManager.ConnectionStrings[p_web_config_name]
.connectionString;
end; // f_connection_string
function f_c_db_datareader(p_c_db_connection: DbConnection;
p_select_request: String): DbDataReader;
// -- receives an OPEN connection
var l_c_db_connection: DbConnection;
l_c_db_command: DbCommand;
begin
l_c_db_command:= p_c_db_connection.CreateCommand();
l_c_db_command.CommandText:= p_select_request;
Result:= l_c_db_command.ExecuteReader;
end; // f_c_db_datareader
procedure TDefault.display_datareader__Click1(sender: TObject; e: System.EventArgs);
var l_c_db_provider_factory: DbProviderFactory;
l_c_db_connection: DbConnection;
l_c_db_datareader: DbDataReader;
l_row_display: String;
l_column_index: Integer;
begin
l_c_db_provider_factory:=
DbProviderFactories.GetFactory(f_provider_name(k_web_config_connection_name));
l_c_db_connection:= l_c_db_provider_factory.CreateConnection();
l_c_db_connection.ConnectionString:=
f_connection_string(k_web_config_connection_name);
l_c_db_connection.Open;
l_c_db_datareader:= f_c_db_datareader(
l_c_db_connection, 'SELECT * FROM country');
ListBox1.DataSource:= l_c_db_datareader;
ListBox1.DataTextField:= 'COUNTRY';
DataBind;
end; // display_datareader__Click1
| | | |
run
| | | TextBox1 will display the COUNTRY values
|
3.4.4 - Using Web.Config in DataSource
Even better: the Web.Config connections are recognized by the DataSources. Well, if we can read Web.Config at run time, there is no reason why they could not do the same at design time:
4 - Asp.Net 2.0 generic Database Access
To write generic code, one solution is to use the AdoDbxClient layer which recognizes both InterBase, Blackfish, and all the other dbExpress compatible Sql engines.
We let the user of our project place in Web.Config the connection string of his choice. More precisely, we prepare different connection strings, and comment them all but one out. Our code will then test the uncommented connection
string, and connect to the corresponding Sql Engine.
Here is our Web.Config:
<?xml version="1.0" encoding="utf-8" ?>
<configuration>
<connectionStrings>
<add
name="my_employee"
connectionString="DriverName=Interbase;DriverUnit=DBXDynalink;
DriverPackageLoader=TDBXDynalinkDriverLoader,DbxDynalinkDriver100.bpl;
DriverAssemblyLoader=Borland.Data.TDBXDynalinkDriverLoader,
Borland.Data.DbxDynalinkDriver,Version=11.0.5000.0,Culture=neutral,
PublicKeyToken=91d62ebb5b0d1b1b;
MetaDataPackageLoader=TDBXInterbaseMetaDataCommandFactory,
DbxReadOnlyMetaData100.bpl;
MetaDataAssemblyLoader=Borland.Data.TDBXInterbaseMetaDataCommandFactory,
Borland.Data.DbxReadOnlyMetaData,Version=11.0.5000.0,Culture=neutral,
PublicKeyToken=91d62ebb5b0d1b1b;GetDriverFunc=getSQLDriverINTERBASE;
LibraryName=dbxint30.dll;VendorLib=GDS32.DLL;BlobSize=-1;CommitRetain=False;
Database=C:\programs\us\web\asp_net\asp_net_20_ado_net\_data\employee_7.gdb;
ErrorResourceFile=;LocaleCode=0000;Password=masterkey;RoleName=RoleName;
ServerCharSet=;SQLDialect=3;Interbase TransIsolation=ReadCommited;
User_Name=sysdba;WaitOnLocks=True;Trim Char=False"
providerName="Borland.Data.AdoDbxClient" />
<!-- <add name="my_employee"
connectionString="drivername=BLACKFISHSQL;user_name=sysdba;port=2508; create=False;readonlydb=False;hostname=localhost; database=C:\programs\us\web\asp_net\asp_net_20_ado_net\_data\employee_2.jds; password=masterkey;"
providerName="Borland.Data.BlackfishSQL.RemoteClient" /> -->
</connectionStrings>
<!-- ...ooo... -->
</configuration>
|
Please note: - for InterBase, we first started with the connection string that the
DataSource wrote in Web.Config in a previous example:
<add
name="my_employee"
connectionString="host=LocalHost;
database=C:\programs\us\web\asp_net\asp_net_20_ado_net\_data\employee_2.jds;
user=sysdba;password=masterkey"
providerName="Borland.Data.BlackfishSQL.RemoteClient" />
| This caused the following error "Borland.Data.TDBXError:
DriverAssemblyLoader property not set". We tried to add in the "References" all kind of assemblies with no success. So we simply copied the full fledged connection string, with warts and all. And it worked.
- for BlackfishSql, instead of inserting the complete database path, we can use the |DataDirectory| "macro", which stands for local App_Data path:
<connectionStrings>
<add
name="my_blackfisht"
connectionString="database=|DataDirectory|employee_2.jds;
protocol=TCP;host=localhost;user=SYSDBA;password=masterkey;create=true"
providerName="Borland.Data.BlackfishSQL.RemoteClient" />
</connectionStrings>
...ooo...
| The App_Data folder is created automatically. If we use this macros, we should copy the .JDS in this directory. The target directory of
|DataDirectory| can be configured
Now we will use the informations from Web.Config: | |
here is the UNIT which returns the provider name, connection string etc:
unit u_generic_connection_helper;
interface
uses Borland.Data.AdoDbxClientProvider;
function f_provider_name: String;
function f_connection_string: String;
function f_c_adodbx_connection: tAdoDbxConnection;
function f_c_ado_dbx_datareader(p_c_ado_dbx_connection: tAdoDbxConnection;
p_select_request: String): tAdoDbxDataReader;
function f_connection_kind: Integer;
var g_connection_kind: Integer;
implementation
uses System.Configuration, System.Web.Configuration;
function f_provider_name: String;
var l_c_connection_string_settings: ConnectionStringSettings;
begin
l_c_connection_string_settings:=
WebConfigurationManager.ConnectionStrings['my_employee'];
Result:= l_c_connection_string_settings.providerName;
end; // f_provider_name
function f_connection_string: String;
var l_c_connection_string_settings: ConnectionStringSettings;
begin
l_c_connection_string_settings:=
WebConfigurationManager.ConnectionStrings['my_employee'];
Result:= l_c_connection_string_settings.connectionString;
// Result:= Result+ ';password=masterkey';
end; // f_connection_string
function f_c_adodbx_connection: tAdoDbxConnection;
begin
Result:= TAdoDbxProviderFactory.Instance.CreateConnection as TAdoDbxConnection;
Result.ConnectionString:= f_connection_string;
end; // f_c_adodbx_connection
function f_c_ado_dbx_datareader(p_c_ado_dbx_connection: tAdoDbxConnection;
p_select_request: String): tAdoDbxDataReader;
// -- receives an OPEN connection
var l_c_ado_dbx_command: tAdoDbxCommand;
begin
l_c_ado_dbx_command:= p_c_ado_dbx_connection.CreateCommand as tAdoDbxCommand;
l_c_ado_dbx_command.CommandText:= p_select_request;
Result:= l_c_ado_dbx_command.ExecuteReader as TAdoDbxDataReader;
end; // f_c_db_datareader
function f_connection_kind: Integer;
var l_connectionstring_count: Integer;
l_c_connection_string_settings: ConnectionStringSettings;
begin
l_connectionstring_count:= WebConfigurationManager.ConnectionStrings.Count;
if l_connectionstring_count> 0
then begin
l_c_connection_string_settings:=
WebConfigurationManager.ConnectionStrings['my_employee'];
if Assigned(l_c_connection_string_settings)
then
with l_c_connection_string_settings do
begin
if System.String.Compare(ProviderName,
'Borland.Data.AdoDbxClient')= 0
then g_connection_kind:= 1 else
if System.String.Compare(ProviderName,
'Borland.Data.BlackfishSQL.RemoteClient')= 0
then g_connection_kind:= 2 else
end;
end;
end; // f_connection_kind
initialization
g_connection_kind:= f_connection_kind;
end.
| | | |
in the main project, drop a Button which displays some of the available function results:
procedure TDefault.display_connection_strings__Click(sender: TObject;
e: System.EventArgs);
begin
display(f_provider_name);
display(f_connection_string);
display('kind '+ f_connection_kind.ToString);
end; // display_connection_strings__Click
| | | |
drop another Button which will open a AdoDbxDataReader and link this to a ListBox:
procedure TDefault.display_datareader__Click(sender: TObject;
e: System.EventArgs);
var l_c_ado_dbx_connection: tAdoDbxConnection;
l_c_ado_dbx_datareader: tAdoDbxDataReader;
begin
l_c_ado_dbx_connection:=
TAdoDbxProviderFactory.Instance.CreateConnection as TAdoDbxConnection;
l_c_ado_dbx_connection.ConnectionString:=
f_connection_string;
l_c_ado_dbx_connection.Open;
l_c_ado_dbx_datareader:= f_c_ado_dbx_datareader(
l_c_ado_dbx_connection, 'SELECT * FROM country');
ListBox1.DataSource:= l_c_ado_dbx_datareader;
ListBox1.DataTextField:= 'COUNTRY';
DataBind;
l_c_ado_dbx_connection.Close;
end; // display_datareader__Click
|
|
Note that - the f_connection_kind function simply returns an index (1 for Interbase, 2 for Blackfish etc) and this could be used to tailor some computations to
the Sql Server used
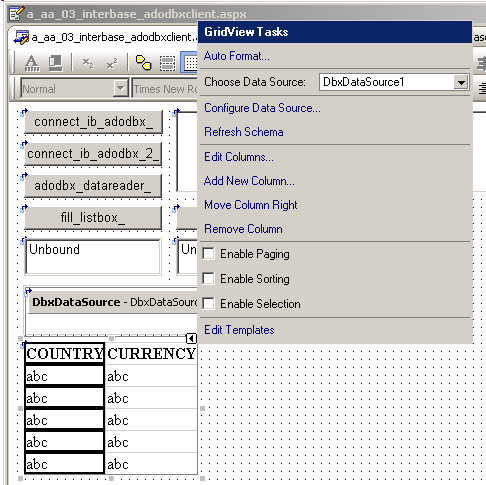
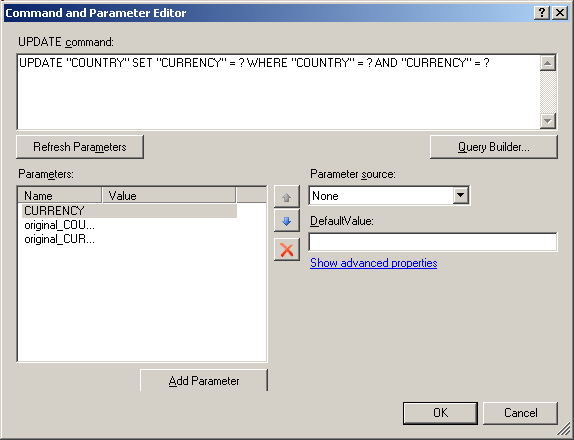
5 - Edit Database 5.1 - Using a GridView and the SqlDataSource We will first use the much heralded "GridView / DataSource" route:
And:
In addition, all the the Sql statements have been saved in the .ASPX template:
<%@ Page language="c#" Debug="true" Codebehind="Default.pas"
AutoEventWireup="false" Inherits="Default.TDefault" %>
<!DOCTYPE HTML PUBLIC "-//W3C//DTD HTML 4.01 Transitional//EN">
<html>
<head runat="server">
<title></title>
</head>
<body>
<form runat="server">
<asp:GridView id="GridView1" runat="server" autogeneratecolumns="False"
datasourceid="SqlDataSource1" datakeynames="COUNTRY">
<Columns>
<asp:BoundField readonly="True" datafield="COUNTRY"
sortexpression="COUNTRY" headertext="COUNTRY"></asp:BoundField>
<asp:BoundField datafield="CURRENCY"
sortexpression="CURRENCY" headertext="CURRENCY"></asp:BoundField>
</Columns>
</asp:GridView>
<asp:SqlDataSource id="SqlDataSource1" runat="server"
deletecommand='DELETE FROM "COUNTRY"
WHERE "COUNTRY" = ? AND "CURRENCY" = ?'
connectionstring="<%$ ConnectionStrings:C:\programs\us\web\asp_net\
asp_net_20_ado_net\_data\employee_2.jdsConnectionString %>"
insertcommand='INSERT INTO "COUNTRY"
("COUNTRY", "CURRENCY")
VALUES (?, ?)'
providername="<%$ ConnectionStrings:C:\programs\us\web\asp_net\
asp_net_20_ado_net\_data\employee_2.jdsConnectionString.ProviderName %>"
updatecommand='UPDATE "COUNTRY"
SET "CURRENCY" = ?
WHERE "COUNTRY" = ? AND "CURRENCY" = ?'
oldvaluesparameterformatstring="original_{0}"
conflictdetection="CompareAllValues"
selectcommand='SELECT "COUNTRY", "CURRENCY"
FROM "COUNTRY"'>
<DeleteParameters>
<asp:Parameter type="String" name="original_COUNTRY"></asp:Parameter>
<asp:Parameter type="String" name="original_CURRENCY"></asp:Parameter>
</DeleteParameters>
<UpdateParameters>
<asp:Parameter type="String" name="CURRENCY"></asp:Parameter>
<asp:Parameter type="String" name="original_COUNTRY"></asp:Parameter>
<asp:Parameter type="String" name="original_CURRENCY"></asp:Parameter>
</UpdateParameters>
<InsertParameters>
<asp:Parameter type="String" name="COUNTRY"></asp:Parameter>
<asp:Parameter type="String" name="CURRENCY"></asp:Parameter>
</InsertParameters>
</asp:SqlDataSource>
</form>
</body>
</html>
|
and this is called "declarative GridView", which is the opposite of "programmatic GridView" (the Asp.Net 1.x way of linking to the DataView
of a DataTable and calling the Web Control's DataBind method)
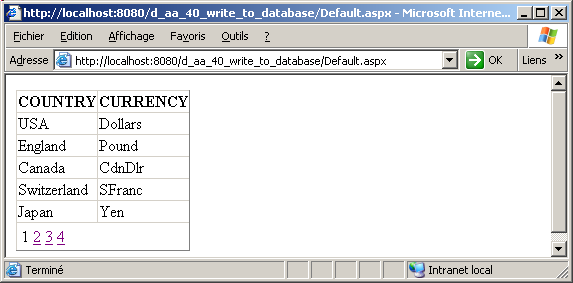
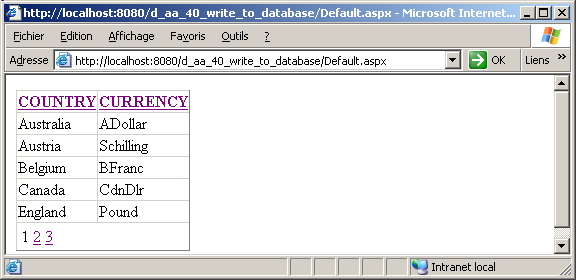
5.2 - Paging thru the Table Instead of displaying all the rows, we can set a paging mode:
5.3 - Sorting by column We can as easily add column sorting:
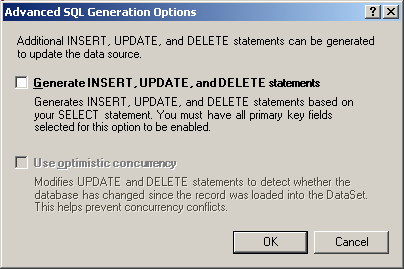
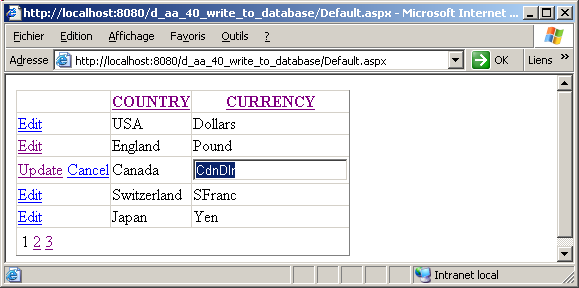
5.4 - Adding Update Insert Delete to the GridView If the previous examples, there is still no editing possibility. Do add those, we can use the smart task menu:
Note that
Instead of using the "declarative mode", you still can use the traditional "programmatic" mode: - for the Asp.Net part, we would handle the RowEditing and RowUpdating events
- for the Ado.Net part, we can use hand crafted Sql requests, or components like the CommandBuilder
Those techniques were explained in our previous Asp.Net and Ado.Net articles.
6 - Comments 6.1 - The mysterious App_Data bsql_aspnetdb.jds Database Whenever we created a new Asp.Net project, when we run the project, RAD
Studio automatically created an App_Data path, which is fine, and stored a 2 Meg bsql_aspnetdb.jds database in this folder, which is surprising. Being simply curious, we created an Ado.Net remote connection for this
mysterious database, and here is its content: 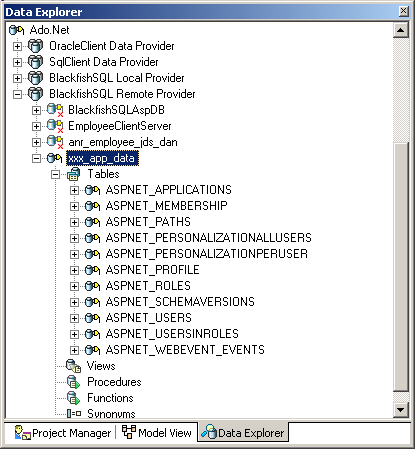
It turns out that this is the Blackfish implementation of the "provider model" which allows Asp.Net 2.0 to use different data sources (.XML, streams, in-memory data, database, and here Blackfish Sql database) for handling
membership, profiles, roles etc. We assume this is also linked to the ASPNET_REGDB.EXE located in c:\windows\Microsoft.NET\Framework\v2.0 and which, in the first versions of
RAD Studio had to be run in order to "populate the database with the provider Tables". So this is now executed automatically.
For using Blackfish Sql, we kept the default Windows Service
implementation. You might want to use in-process versions or other setup. In this case, the starting and stopping of the Service or the execution of the
standalone version of Blackfish using the RAD Studio BSqlServer.Exe might be necessary. See the Blackfish manual, or our Blackfish article for more information.
6.2 - .INI vs .CONFIG
Letting the user comment in or out some parameters which will decide how the application will work does not look very reliable to us. There was a big fuss when we went from Windows 3 to Windows 95 about the .INI files, which the
users could modify using NOTEPAD, whereas the Registry was advertised as a much more safe way to parametrize the applications. And now we are encouraged to let the user fiddle the much more obscure Web.Config .XML. Granted the Web.Config
is on the server, with a competent and generously paid administrator, but nevertheless, the .XML file, with no uniform presentation, wild indentation, erratic tabs and blank lines, incredibly long lines with no spaces, does not seem to be an improvement.
6.3 - Help ! In the November RAD Studio upgrade, Tom AVILA added an update of the Help. This included the .Net 2.0 help. Boy oh boy, was this anxiously awaited. You simply cannot develop .Net
applications without this help.
6.4 - What was not covered Well, a lot. Asp.Net security, cache handling, session management for
instance. And the GridView / DetailView / FormView alone would fill complete books. More detailed presentations and examples are offered during our Training sessions.
6.5 - Overall opinion Having used RAD Studio 2007 for a couple of days to write this article, our feeling is the following - this version is much more stable than the Delphi 2006 version. There is
also a perfect synchronization between Cassini, Internet Explorer and RAD Studio (Delphi 2006 sometimes required to run a second time to get those in sync)
- for Asp.Net, it would be foolish not to use the 2.0 version. We sweated many hours to adapt the Asp.Net 1.x Portal Starter kit to
Delphi 2006. Now, with the Master Pages, the navigation controls, the membership management, a similar application should be much more easy to build.
So for Asp.Net development, you will love this new version. Some minor points: - on the IDE front, there are still some parts which could use some more polishing. We know that with this new IDE there are LOTS of dialogs,
contextual menus, icons, toolbars. Every day we discover another one which was sitting there smug under our nose . However, in the database area, there are too many different versions of the same kind of dialogs: some have
connection string editors or not, other allow you to generate the request or let you type in a string etc.
- in a similar area, it is sad that the names were not normalized (sometimes
it is xxx_Reader, sometimes xxx_DATA_reader, sometimes we have to call xxx_reader.Columncount, another time xxx_reader.Fieldcount).
Certainly there is the weight of the legacy CLASSes and the fact that CodeGear has to live with the Microsoft naming schemes. In any case, this is one of the reasons why we draw UML Class Diagrams which can be used as
quick cheat sheets.
7 - Download the Example Sources Here are the source code files:
The .ZIP file(s) contain: - the main program (.DPROJ, .DPR, .RES, .CONFIG), the main form (.PAS, .ASPX), and any other auxiliary form or files
- any .TXT for parameters, samples, test data
- all units (.PAS .ASPX and other) for units
Those .ZIP - are self-contained: you will not need any other product (unless expressly mentioned).
- will not modify your PC in any way beyond the path where you placed the .ZIP
(no registry changes, no path outside from the container path creation etc).
To use the .ZIP: - create a c:\programs\us\web\asp_net\asp_net_20_ado_net folder
- unzip the downloaded file in this folder
- using Delphi, compile and execute
You may use another path, of course, but will have to change the database path names (in the code and / or in Web.Config). To remove the .ZIP simply delete the folder.
The Pascal code uses the Alsacian notation, which prefixes identifier by program area: K_onstant, T_ype, G_lobal, L_ocal, P_arametre, F_unction, C_lass etc. This notation is presented in the Alsacian Notation paper.
As usual:
- please tell us at fcolibri@felix-colibri.com if you found some errors, mistakes, bugs, broken links or had some problem downloading the file. Resulting corrections will
be helpful for other readers
- we welcome any comment, criticism, enhancement, other sources or reference suggestion. Just send an e-mail to fcolibri@felix-colibri.com.
- or more simply, enter your (anonymous or with your e-mail if you want an answer) comments below and clic the "send" button
- and if you liked this article, talk about this site to your fellow developpers, add a link to your links page ou mention our articles in
your blog or newsgroup posts when relevant. That's the way we operate: the more traffic and Google references we get, the more articles we will write.
8 - References Here are a couple of links:
- for Asp.Net with Rad Studio 2007:
- our previous articles
- about DbExpress 4 and Blackfish
- out Ado.Net and Asp.Net, with the .Net 1.x framework, but still of interest:
We also offer Delphi training courses, and have added new sessions for Asp.Net 2.0.
9 - The author
Felix John COLIBRI works at the Pascal Institute. Starting with Pascal in 1979, he then became involved with Object Oriented Programming, Delphi, Sql, Tcp/Ip, Html, UML. Currently, he is mainly
active in the area of custom software development (new projects, maintenance, audits, BDE migration, Delphi
Xe_n migrations, refactoring), Delphi Consulting and Delph
training. His web site features tutorials, technical papers about programming with full downloadable source code, and the description and calendar of forthcoming Delphi, FireBird, Tcp/IP, Web Services, OOP / UML, Design Patterns, Unit Testing training sessions.
|