|
Abstract Factory and Bridge Design Patterns - Felix John COLIBRI. |
- abstract : presentation of Abstract Factory and Bridge. Example in the Lexi Document Editor
- key words : Design Patterns, Abstract Factory, Bridge, Gof, Gang Of Four, Lexi
- software used : Windows XP, Delphi 6
- hardware used : Pentium 1.400Mhz, 256 M memory, 140 G hard disc
- scope : Delphi 1 to 8 for Windows, Kylix
- level : Delphi developer
- plan :
1 - Introduction
When we wrote the Lexi code, we followed the Gof order: Composite, Strategy, Decorator, Abstract Factory, Bridge, Command, Iterator and Visitor.
However Strategy and Decorator use Iterator, and Factory and Bridge are required as soon as you start drawing, which is right at the beginning, since
c_glyph, the base of the whole demonstration, will contain some drawing methods. It turns out that Factory and Bridge are complex patterns because: - they involve many participants
- they assume that you will be using several windowing libraries (Win32, X-Windows, Presentation Manager). You might develop cross platform code, but I very much doubt that any Design Pattern student will work with a
multi-windowing development tool to learn patterns.
It is possible to follow the Gof example, imagining that you are on such multi-windowing tool. But you cannot test, change, or adapt the example. The
goal of our Lexi coding effort was to allow this hands-on experience. Therefore we simulated the "multi-windowing" development library, and included it in our Lexi project.
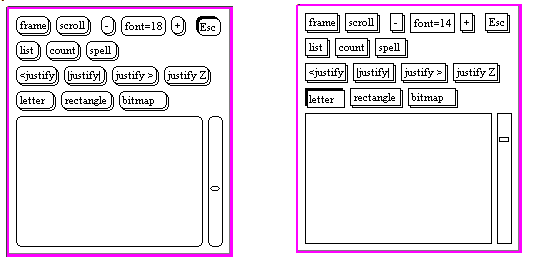
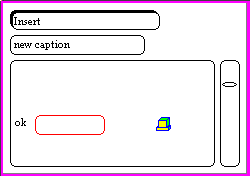
2 - The Round and Square Control Worlds 2.1 - Look and Feel We offer two different window controls libraries: - the "round" control world, where all shapes (button, label, selection
rectangle) have rounded edges
- the "square" control world, where rectangle have their usual square edges
Here are two snapshots showing the difference:
2.2 - The Control specification In order to simulate different libraries, we used different display (round vs square) but also the definitions of our controls.
To specify and rectangular buttons, we have many choices: - use Left, Top, Width and Height (Delphi)
- use two opposite corners (X1, Y1, X2, Y2) like Win23 Rectangle
- any other 4 parameters could be used (X, Y, angle to the center and diagonal size etc)
The drawing can be performed - whith a library specific Rectangle function (Win32)
- using a PostScript-like library (SetPath, LineTo, StrokePath etc)
- with a page description (PDF)
- at a higher level with tagged languages like HTML, XML, possibly style sheets
- or at the opposite corner, directly changing the colors of the screen pixels, what everybody ends up doing anyway
And to handle user actions, we can use:
- interrupt redirection (DOS): the action on the keybord calls an interrupt handler
- event driven call backs (Mac, Windows): the OS send a message and the application's message loop dispatches the message to an event handler
- TPC-IP communications (X Windows): whenever the user hits "A" on the keyboard, a TCP-IP packet is sent off to Hawaii, travels all the way to Japan, checks what's happening Down Under, and finally comes running back in
New York to print 'A' on your screen. Fine.
We chose to use - 2 kind of rectangle specification
- X1, Y1, X2, Y2 for the square controls
- X1, Y1, horizontal size and percentage height for the round controls
- a single event call back mechanism for user actions
Our choices were not made for efficiency or code simplicity: we would have used the Delphi convention. But then there would have been neither Abstract
Factory nor Bridge to talk about ... Certainly we could have obfuscated the matter a little bit more and made the trip all the way to Hawaii, but I think enough is enough.
2.3 - The Square Class
Here is the definition of the square control ancestor:
c_square_abstract_control= Class(c_abstract_control)
m_x_1, m_y_1, m_x_2, m_y_2: Integer;
constructor create_square_abstract_control(p_name: String;
p_c_control_list_ref: c_control_list;
p_x_1, p_y_1, p_x_2, p_y_2: Integer);
function f_display_control: String; Override;
function f_hit_test(p_x, p_y: Integer): Boolean; Override;
// -- the library primitives for drawing on the control
procedure draw_blank_rectangle;
procedure draw_square_shape;
end; // c_square_abstract_control
|
From this ancestor, we derive the real controls: buttons, labels, scroll bars etc. The button definition, for instance is the following:
c_square_button_control= Class(c_square_abstract_control)
m_caption: String;
constructor create_square_button_control(p_name: String;
p_c_control_list_ref: c_control_list;
p_x_1, p_y_1, p_x_2, p_y_2: Integer;
p_on_click: t_on_click);
procedure handle_control_mouse_down(p_x, p_y: Integer); Override;
procedure handle_control_mouse_up(p_x, p_y: Integer); Override;
procedure draw_control; Override;
end; // c_square_button_control
| We simply added the additional attributes (caption in our case) and event handler (mouse up and down to display the shadow change which visually shows the push down effect)
2.4 - The Round class
In a similar fashion, we have devifed a "round" hierarchy. Here is the abstract round control:
c_round_abstract_control= Class(c_abstract_control)
m_x_1, m_y_1, m_size: Integer;
m_percent: Double;
constructor create_round_abstract_control(p_name: String;
p_c_control_list_ref: c_control_list;
p_x_1, p_y_1, p_size: Integer; p_percent: Double);
function f_hit_test(p_x, p_y: Integer): Boolean; Override;
procedure draw_blank_rectangle;
procedure draw_round_rectangle(p_x_1, p_y_1, p_size, p_percent: Integer);
end; // c_round_abstract_control
|
2.5 - The abstract control You might have noticed that both square and round controls have a c_abstract_control ancestor. Are we cheating by any chance ? Well yes and no. In this case:
- we must keep an access to our controls. This could be through global variables, but, quite naturally, it is better to use some kind of list. In the same way that Delphi uses Components and Controls attached to each
tForm
- whenever we have to encapsulate a tList or a tStringlist, we start from a template unit with a basic class and a tList or tStringlist container class, and simply change the names
- in our case, the unit for the round or square controls would have been identical, but for the "round" or "square" name. So we decided to use the same unit, and made the basic class the common ancestor of the
c_round_control and c_square_control
Here is this list encapsulation:
t_on_mouse_down= Procedure(p_x, p_y: Integer) of Object;
t_on_click= Procedure of Object;
c_control_list= Class; // forward
c_abstract_control= Class(c_basic_object)
m_c_control_list_ref: c_control_list;
m_on_click: t_on_click;
m_on_mouse_down, m_on_mouse_move, m_on_mouse_up: t_on_mouse_down;
Constructor create_abstract_control(p_name: String;
p_c_control_list_ref: c_control_list);
function f_display_control: String; Virtual;
function f_hit_test(p_x, p_y: Integer): Boolean; Virtual;
procedure draw_control; Virtual; Abstract;
procedure handle_control_mouse_down(p_x, p_y: Integer); Virtual;
procedure handle_control_mouse_move(p_x, p_y: Integer); Virtual;
procedure handle_control_mouse_up(p_x, p_y: Integer); Virtual;
end; // c_abstract_control
c_control_list= class(c_basic_object)
m_c_paintbox_ref: tPaintbox;
m_c_canvas_ref: tCanvas;
m_c_save_canvas_stack: c_save_canvas_stack;
m_c_control_list: tStringList;
Constructor create_control_list(p_name: String;
p_c_paintbox_ref: tPaintBox);
function f_control_count: Integer;
function f_c_abstract_control(p_control_index: Integer): c_abstract_control;
function f_index_of(p_control_name: String): Integer;
procedure add_control(p_control_name: String; p_c_abstract_control: c_abstract_control);
procedure display_control_list;
function f_c_find_mouse_control(p_x, p_y: Integer): c_abstract_control;
procedure handle_mouse_down(p_x, p_y: Integer);
procedure handle_mouse_move(p_x, p_y: Integer);
procedure handle_mouse_up(p_x, p_y: Integer);
procedure draw_control_list;
Destructor Destroy; Override;
end; // c_control_list
|
You may check that this list does not contain any "round" or "square" specific code.
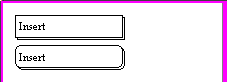
2.6 - Using the Controls If we want to use the control, say the "square" controls, the client code would use constructors like this:
var g_c_control_list: c_control_list= Nil;
procedure TForm1.on_insert_button_click;
begin
display('insert');
Panel1.Color:= ClRed;
end; // on_insert_button_click
procedure TForm1.create_square_world_Click(Sender: TObject);
var l_c_square_button: c_square_button_control;
begin
g_c_control_list:= c_control_list.create_control_list('control_list', PaintBox1);
l_c_square_button:= c_square_button_control.create_square_button_control('Insert',
g_c_control_list, 10, 10, 120, 35, on_insert_button_click);
end; // create_square_world_Click
|
Should we want to use the other library, we would have called:
procedure TForm1.create_round_world_Click(Sender: TObject);
var l_c_round_button: c_round_button_control;
begin
g_c_control_list:= c_control_list.create_control_list('surface', PaintBox1);
l_c_round_button:= c_round_button_control.create_round_button_control('Insert',
g_c_control_list, 10, 40, 110, 0.2272, on_insert_button_click);
end; // create_round_world_Click
|
The programmer therefore will have to remember all the subtelties of the
different calling conventions, like the radius offset and conversion ratios used to have the same final result
Enters the Abstract Factory pattern.
3 - The Abstract Factory Pattern 3.1 - Objectives The purpose of this pattern is: - to offer a common single convention creating controls from different
windowing libraries
- to hide the details of the creation in a separate class
Assuming that the only controls we want to use are buttons, labels, drawing area and scrollbars, we will define the following classes:
c_abstract_button_widget= Class(c_basic_object)
end; // c_abstract_button_widget
c_abstract_label_widget= Class(c_basic_object)
end; // c_abstract_label_widget
c_abstract_draw_surface_widget= Class(c_basic_object)
end; // c_abstract_draw_surface_widget
c_abstract_scrollbar_widget= Class(c_basic_object)
end; // c_abstract_draw_surface_widget
c_abstract_widget_factory=
class(c_basic_object)
m_c_control_list_ref: c_control_list;
Constructor create_abstract_widget_factory(p_name: String;
p_c_control_list_ref: c_control_list);
function f_c_create_button_widget(p_caption: String;
p_left, p_top, p_width, p_height: Integer;
p_on_click: t_on_click): c_abstract_button_widget; Virtual; Abstract;
function f_c_create_label_widget(p_caption: String;
p_left, p_top, p_width, p_height: Integer): c_abstract_label_widget; Virtual; Abstract;
function f_c_create_draw_surface_widget(p_caption: String;
p_left, p_top, p_width, p_height: Integer;
p_on_mouse_down, p_on_mouse_move, p_on_mouse_up: t_on_mouse_down):
c_abstract_draw_surface_widget; Virtual; Abstract;
function f_c_create_scrollbar_widget(p_caption: String;
p_left, p_top, p_width, p_height: Integer): c_abstract_scrollbar_widget; Virtual; Abstract;
procedure create_lexi_world(p_left, p_top, p_width, p_height: Integer);
end; // c_abstract_widget_factory
|
A you see, we have standardized all the creation conventions using the Delphi Left, Top, Width and Height parameters. In addition those classes are all
ABSTRACT (they are either empty or contain VIRTUAL; ABSTRACT methods).
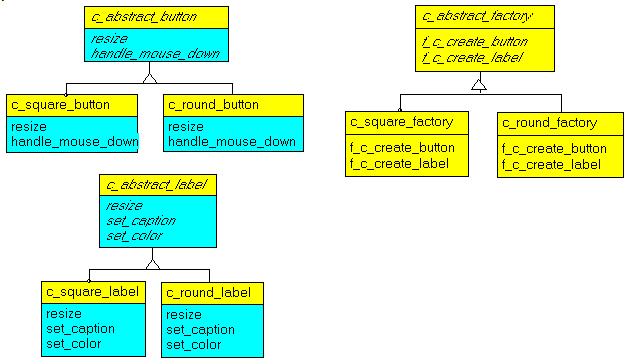
Now if our user wants to use square controls, he will use descendents of both the factory and of the abstract widgets:
// -- the width height square widgets
c_square_button_widget= Class(c_abstract_button_widget)
m_c_square_button_control: c_square_button_control;
Constructor create_square_button_widget(p_name: String;
p_c_abstract_widget_factory: c_abstract_widget_factory;
p_left, p_top, p_width, p_height: Integer;
p_on_click: t_on_click);
end; // c_square_button_widget
// -- ... here the other square widgets
// -- the concrete square widget factory
c_square_widget_factory=
class(c_abstract_widget_factory)
Constructor create_square_widget_factory(p_name: String;
p_c_control_list_ref: c_control_list);
function f_c_create_button_widget(p_caption: String;
p_left, p_top, p_width, p_height: Integer;
p_on_click: t_on_click): c_abstract_button_widget; Override;
function f_c_create_label_widget(p_caption: String;
p_left, p_top, p_width, p_height: Integer): c_abstract_label_widget; Override;
function f_c_create_draw_surface_widget(p_caption: String;
p_left, p_top, p_width, p_height: Integer;
p_on_mouse_down, p_on_mouse_move, p_on_mouse_up: t_on_mouse_down):
c_abstract_draw_surface_widget; Override;
function f_c_create_scrollbar_widget(p_caption: String;
p_left, p_top, p_width, p_height: Integer): c_abstract_scrollbar_widget; Override;
end; // c_abstract_factory
| and the user will call:
procedure TForm1.create__Click(Sender: TObject);
var l_c_widget_factory: c_abstract_widget_factory;
l_running_y, l_running_x: Integer;
procedure add_button(p_caption: String; p_width: Integer; p_click_event: t_on_click);
begin
with l_c_widget_factory do
f_c_create_button_widget(p_caption, l_running_x, l_running_y, p_width, k_button_default_height,
p_click_event);
Inc(l_running_x, p_width+ 5);
end; // add_button
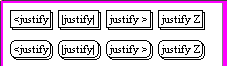
begin // create_Click
g_c_control_list:= c_control_list.create_control_list('surface', PaintBox1);
l_c_widget_factory:= c_square_widget_factory.create_square_widget_factory('square_fact', g_c_control_list);
l_running_y:= 5;
l_running_x:= 5;
add_button('<justify_button', 43, Nil);
add_button('|justify|_button', 43, Nil);
add_button('justify >_button', 47, Nil);
add_button('justify Z_button', 47, Nil);
l_c_widget_factory.Free;
l_c_widget_factory:= c_round_widget_factory.create_round_widget_factory('round_fact', g_c_control_list);
l_running_y:= 35;
l_running_x:= 5;
add_button('<justify_button', 43, Nil);
add_button('|justify|_button', 43, Nil);
add_button('justify >_button', 47, Nil);
add_button('justify Z_button', 47, Nil);
l_c_widget_factory.Free;
end; // create_Click
|
with the following result:
Also notice that the Abstract Factory not only unifies the calling
conventions but also allows RUN TIME change of the creation (in the above example, be creating different concrete factories, we could use controls of both kinds in the same application)
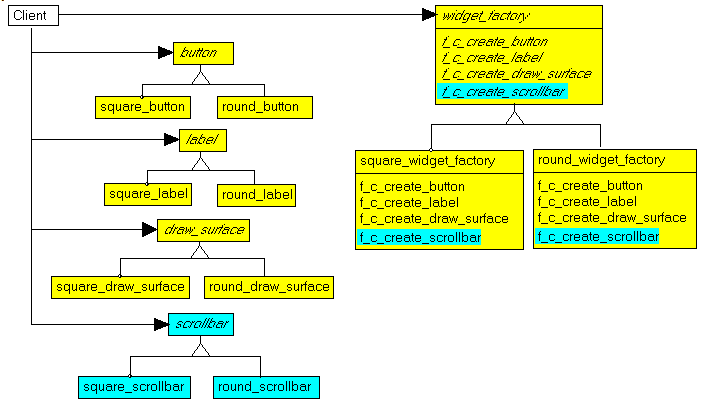
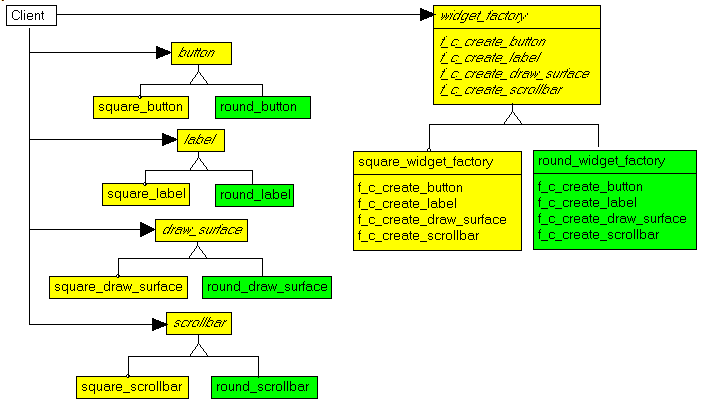
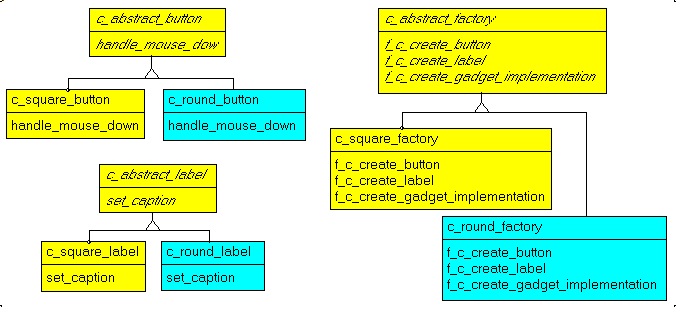
3.2 - UML Class Diagrams
The UML diagram of the Abstract Factory is the following:
In the previous figure, we have highlighted in blue what has to be added when we want to use a new widget:
- the abstract widget and its two concrete implementations
- methods for the creation in the abstract an in the concrete factories
When we add a new windowing system, we have to - create new concrete widgets
- create a new concrete factory
This is illustrated by coloring the addition in green:
3.3 - The Class Explosion
As seen previously, the addition of a new control will lead to the addition of 3 new classes (in addition to the 3 functions). This is sometimes criticized as a "class explosion". But this is the price to pay for the ability to use a
single call in the client code for each control creation
3.4 - Selection of the Concrete Factory In our example, all creations took place in a single OnClick event. So we
declared the Factory as a local variable, used this variable to perform the creation, and freed the factory at the end.
var l_c_widget_factory: c_abstract_widget_factory;
l_c_button_widget: c_abstract_button_widget;
begin
l_c_widget_factory:= c_square_widget_factory.create_square_widget_factory('square_fact', ...
l_c_button_widget:= l_c_widget_factory.f_c_create_button_widget('insert', ...
...
l_c_widget_factory.Free;
end;
|
If we do not reference the Factory variable elsewhere, we could even use a "super local" variable within the WITH clause:
var l_c_button_widget: c_abstract_button_widget;
begin
WITH c_square_widget_factory.create_square_widget_factory('square_fact', ... ) DO
BEGIN
l_c_button_widget:= f_c_create_button_widget('insert', ...
...
Free;
END; // WITH c_square_widget_factory
end |
So, for all the mutliple windowing systems, we need only a single Factory CLASS. In addition, in the client code, we only need a single Factory
object. So the Gof suggest to treat the Factory class as a Singleton class. This factory would then be fetched using a call like
var l_c_button_widget: c_abstract_button_widget;
begin
l_c_button:= c_abstract_widget_factory.f_c_instance.f_c_create_button_widget('insert' ...
end;
| This is quite elegant. But how is the kind of concrete factory chosen ? The Gof simply show this kind of call.
So we investigated a little bit more. The fact that we live in a square or round world HAD to be used to select the concrete factory, but where was this done ? Well it turns out that in the Singleton chapter, they suggest using an
ENVIRONMENT VARIABLE. Of all things ! We used a local variable, even a "super local", and they suggest a sytem wide global ! Naturally there are other ways to select the concrete singleton, but I wanted
to highlighte this recommendation of an environment variable.
You may use without any difficulties a Singleton for this example, but we will stick to our local variables, explicitly creating the required concrete factory.
4 - Bridge 4.1 - Standardizing Behaviour Abstract Factory allows us to create widgets from different window control
libraries with uniform creation calls. But this is a static structural problem. What about interacting with those widgets after their creation ? The widgets created by the Factory could be modified to include in each
control kind the attributes and methods specific to this control: However, each time we want to add a new control, we face the class explosion problem and have many changes to do.
Bridge solves this by allowing to change the widget hierarchy independently from the windowing hierarchy. The hierarchy is separated in two parts: - on one hand, the routines to perform the primitive functions are modeled in
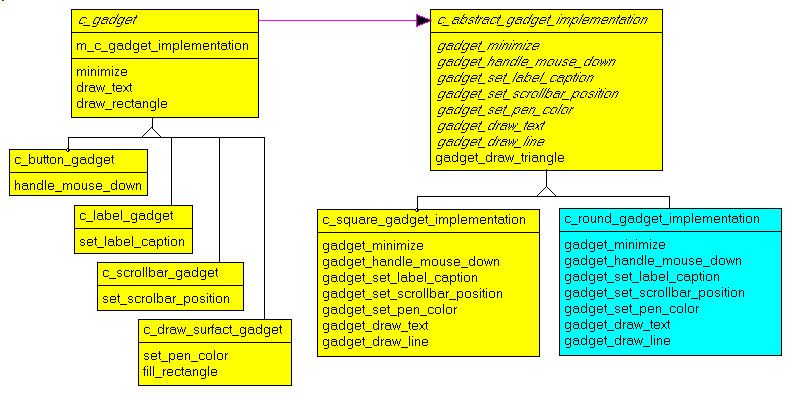
a c_gadget_implementation hierarchy, which will enable to draw text, lines, rectangle.
This hierarchy hides all windowing library by defining an interface for performing all actions on our controls in a uniform (library independent) way
- on the other hand the different controls are modeled by c_gadget hierarchy, whose children contain c_button_gadget, c_label_gadget etc.
This hierarchy is independent of the windowing library chosen:
- the ancestor may define some methods used by all the descendent classes (draw text, draw rectangle)
- the descendent have methods specific to their task (set a check, fetch an ItemIndex)
In both cases, the work is performed using only the c_gadget_implementation interface, not the library specific routines.
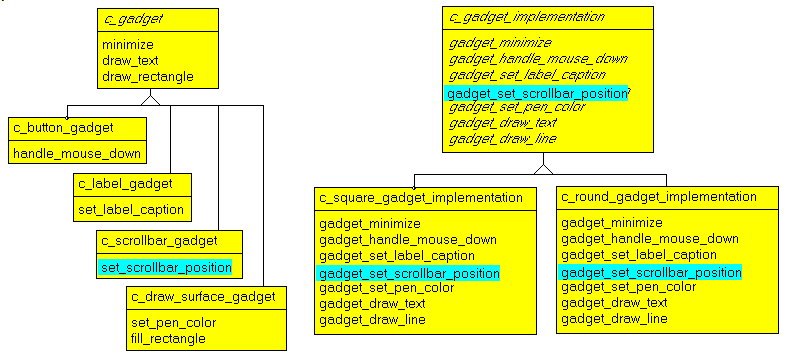
Here is the UML representation:
In this diagram: - c_gadget_implementation
- exports raw tCanvas routines, like set_pen_color
- might add some methods using the previous one (draw_triangle which uses
draw_line)
- c_abstract_gadget uses m_c_gadget_implementation_ref to add other methods used by all its concrete descendents (draw_rectangle)
- the concrete descendents use m_c_gadget_implementation_ref to add specific methods (fill_rectangle)
- the client only uses the c_gadget concrete descendents, never directly
using c_gadget_implementation or its reference m_c_gadget_implementation_ref
4.2 - Bridge summary Bridge is a complex pattern though.
In their book, the Gof take the window / window_implementation example. They tell us about "IconWindows" and "TransientWindows", "floating palettes". I assume this means "minimized" window, "dialog" and "dialog with a toolbar". The
implementation part then offers all kinds of drawing primitives. Does that mean that to minimize an X-Windows window, we have to draw them ourselves on the screen using the implementation routines ? This would be awfull: we would
rebuild the library down to the last pixel. If this is not the recommendations, there should be some library routines, like x_window.iconify() and pm_window.iconify(), but they are not present in the window implementation
classes. Their sample code only talks about drawing inside a window: so bridge would be some kind of "generalized canvas". This bridge example only handles the content
drawing of windows. The draw_content is then adapted to the specific control, displaying text for an Edit, or loading a bitmap for an minimized window. But this has nothing to do with control specific generalization (scrollbar
position, ItemIndex etc). In addition, the minimized display or scroll position are handled transparently by most windowing libraries: we might have to encapsulate different method names and parameters, but will never resort to
actually drawing the scrollbar thumb or marking a checkbox.
In our example, we took the more general position of a Bridge used for ALL control handling: the control-specific tasks (scrollbar position) as well as
the general tasks (drawing the content).
4.3 - Our implementation Here is the gadget_implementation, which encapsulates the windowing libraries
specificities part:
t_on_gadget_mouse_down= u_c_control.t_on_mouse_down;
c_abstract_gadget_implementation=
Class(c_basic_object)
m_c_control_list_ref: c_control_list;
constructor create_abstract_gadget_implementation(p_name: String;
p_c_control_list_ref: c_control_list);
// -- label
procedure set_label_caption(p_caption: String); Virtual; Abstract;
// -- scrollbar
procedure set_scrollbar_position(p_scrollbar_name: String;
p_position: Integer); Virtual; Abstract;
function f_get_scrollbar_position: Integer; Virtual; Abstract;
// -- drawing
procedure save_device_context; Virtual; Abstract;
procedure restore_device_context; Virtual; Abstract;
procedure set_pen_color(p_pen_color: Integer); Virtual; Abstract;
procedure set_brush_style(p_brush_style: tBrushStyle); Virtual; Abstract;
// -- here placed the code at this level rather than duplicating
// -- it for the demo
procedure set_pen_mode(p_pen_mode: tPenMode); Virtual;
procedure set_brush_color(p_brush_color: Integer); Virtual;
procedure canvas_set_font_height(p_font_height: Integer); Virtual;
function f_canvas_get_font_height: Integer; Virtual;
procedure canvas_draw_bitmap(p_x, p_y: Integer; p_c_bitmap: tBitMap); Virtual;
function f_canvas_character_width(p_character: Char): Integer; Virtual; Abstract;
function f_canvas_character_height(p_character: Char): Integer; Virtual; Abstract;
procedure canvas_line(p_x_1, p_y_1, p_x_2, p_y_2: Integer); Virtual; Abstract;
procedure draw_rectangle(p_left, p_top, p_width, p_height: Integer); Virtual; Abstract;
procedure device_text_out(p_x, p_y: Integer; p_text: String); Virtual; Abstract;
procedure fill_rectangle(p_left, p_top, p_width, p_height,
p_color: Integer); Virtual; Abstract;
end; // c_abstract_gadget_implementation
|
The c_square_gadget_implementation and c_round_gadget_implementation definitions are similar to this abstract ancestor.
Here is the c_abstract_gadget, which will use the c_abstract_gadget_implementation class:
c_abstract_gadget=
class(c_basic_object)
m_c_abstract_gadget_implementation_ref: c_abstract_gadget_implementation;
m_gadget_left, m_gadget_top, m_gadget_width, m_gadget_height: Integer;
m_on_mouse_down, m_on_mouse_move, m_on_mouse_up: t_on_gadget_mouse_down;
Constructor create_abstract_gadget(p_name: String;
p_c_abstract_gadget_implementation_ref: c_abstract_gadget_implementation;
p_gadget_left, p_gadget_top, p_gadget_width, p_gadget_height: Integer);
function f_display_gadget: String; Virtual;
procedure save_graphic_context;
procedure restore_graphic_context;
procedure set_pen_color(p_color: Integer);
procedure set_pen_mode(p_pen_mode: tPenMode);
procedure set_brush_style(p_brush_style: tBrushStyle);
procedure set_brush_color(p_brush_color: Integer);
procedure set_font_height(p_font_height: Integer);
function f_get_font_height: Integer;
function f_character_width(p_character: Char): Integer;
function f_character_height(p_character: Char): Integer;
procedure draw_line(p_x_1, p_y_1, p_x_2, p_y_2: Integer);
procedure draw_triangle(p_left, p_top, p_width, p_height: Integer);
procedure draw_rectangle(p_left, p_top, p_width, p_height: Integer);
procedure draw_text(p_x, p_y: Integer; p_text: String); Virtual;
procedure shrink_gadget(p_delta_left, p_delta_top, p_delta_right, p_delta_bottom: Integer); Virtual;
procedure fill_rectangle(p_left, p_top, p_width, p_height, p_color: Integer);
procedure draw_bitmap(p_x, p_y: Integer; p_c_bitmap: tBitmap);
procedure draw_content; Virtual; Abstract;
end; // c_abstract_gadget
| The c_abstract_gadget offers some routines which might be used by descendent
concrete gadgets. If all gadgets had to draw triangles, we could use:
c_button_gadget= class(c_abstract_gadget)
Constructor create_button_gadget(p_name: String;
p_c_abstract_gadget_implementation_ref: c_abstract_gadget_implementation;
p_gadget_left, p_gadget_top, p_gadget_width, p_gadget_height: Integer);
end; // c_dialog_gadget
c_label_gadget=
class(c_abstract_gadget)
Constructor create_label_gadget(p_name: String;
p_c_abstract_gadget_implementation_ref: c_abstract_gadget_implementation;
p_gadget_left, p_gadget_top, p_gadget_width, p_gadget_height: Integer);
procedure set_caption(p_caption: String);
end; // c_dialog_gadget
c_scrollbar_gadget=
class(c_abstract_gadget)
Constructor create_scrollbar_gadget(p_name: String;
p_c_abstract_gadget_implementation_ref: c_abstract_gadget_implementation;
p_gadget_left, p_gadget_top, p_gadget_width, p_gadget_height: Integer);
procedure draw_content; Override;
procedure shrink_gadget(p_delta_left, p_delta_top,
p_delta_right, p_delta_bottom: Integer); Override;
procedure set_position(p_position: Integer);
function f_get_position: Integer;
end; // c_scrollbar_gadget
c_draw_surface_gadget=
Class(c_abstract_gadget)
Constructor create_draw_surface_gadget(p_name: String;
p_c_abstract_gadget_implementation_ref: c_abstract_gadget_implementation;
p_gadget_left, p_gadget_top, p_gadget_width, p_gadget_height: Integer);
procedure draw_content; Override;
end; // c_draw_surface_gadge
|
And the concrete gadgets with some specific methods:
c_button_gadget= class(c_abstract_gadget)
Constructor create_button_gadget(p_name: String;
p_c_abstract_gadget_implementation_ref: c_abstract_gadget_implementation;
p_gadget_left, p_gadget_top, p_gadget_width, p_gadget_height: Integer);
end; // c_dialog_gadget
c_label_gadget=
class(c_abstract_gadget)
Constructor create_label_gadget(p_name: String;
p_c_abstract_gadget_implementation_ref: c_abstract_gadget_implementation;
p_gadget_left, p_gadget_top, p_gadget_width, p_gadget_height: Integer);
procedure set_caption(p_caption: String);
end; // c_dialog_gadget
c_scrollbar_gadget=
class(c_abstract_gadget)
Constructor create_scrollbar_gadget(p_name: String;
p_c_abstract_gadget_implementation_ref: c_abstract_gadget_implementation;
p_gadget_left, p_gadget_top, p_gadget_width, p_gadget_height: Integer);
procedure draw_content; Override;
procedure shrink_gadget(p_delta_left, p_delta_top,
p_delta_right, p_delta_bottom: Integer); Override;
procedure set_position(p_position: Integer);
function f_get_position: Integer;
end; // c_scrollbar_gadget
c_draw_surface_gadget=
Class(c_abstract_gadget)
Constructor create_draw_surface_gadget(p_name: String;
p_c_abstract_gadget_implementation_ref: c_abstract_gadget_implementation;
p_gadget_left, p_gadget_top, p_gadget_width, p_gadget_height: Integer);
procedure draw_content; Override;
end; // c_draw_surface_gadge
| As an example, here is the code for the c_label_gadget:
Constructor c_label_gadget.create_label_gadget(p_name: String;
p_c_abstract_gadget_implementation_ref: c_abstract_gadget_implementation;
p_gadget_left, p_gadget_top, p_gadget_width, p_gadget_height: Integer);
begin
Inherited create_abstract_gadget(p_name, p_c_abstract_gadget_implementation_ref,
p_gadget_left, p_gadget_top, p_gadget_width, p_gadget_height);
end; // create_label_gadget
procedure c_label_gadget.set_caption(p_caption: String);
begin
draw_text(m_gadget_left, m_gadget_top, p_caption);
end; // c_dialog_gadget
|
We then added a c_abstract_gadget_factory:
c_abstract_gadget_factory=
class(c_basic_object)
m_c_control_list_ref: c_control_list;
_m_c_abstract_gadget_implementation_ref: c_abstract_gadget_implementation;
Constructor create_abstract_gadget_factory(p_name: String;
p_c_control_list_ref: c_control_list);
function f_c_create_button_gadget(p_caption: String;
p_left, p_top, p_width, p_height: Integer;
p_on_click: t_on_click): c_button_gadget; Virtual; Abstract;
function f_c_create_label_gadget(p_caption: String;
p_left, p_top, p_width, p_height: Integer): c_label_gadget; Virtual; Abstract;
function f_c_create_draw_surface_gadget(p_caption: String;
p_left, p_top, p_width, p_height: Integer;
p_on_mouse_down, p_on_mouse_move, p_on_mouse_up: t_on_mouse_down):
c_draw_surface_gadget; Virtual; Abstract;
function f_c_create_scrollbar_gadget(p_caption: String;
p_left, p_top, p_width, p_height: Integer): c_scrollbar_gadget; Virtual; Abstract;
function f_c_create_gadget_implementation(p_name: String):
c_abstract_gadget_implementation; Virtual; Abstract;
procedure create_lexi(p_left, p_top, p_width, p_height: Integer);
end; // c_abstract_gadget_factory
| And here is the definition of the concrete square factories:
c_square_button_gadget= Class(c_button_gadget)
m_c_square_button_control: c_square_button_control;
Constructor create_square_button_gadget(p_name: String;
p_c_abstract_gadget_factory: c_abstract_gadget_factory;
p_left, p_top, p_width, p_height: Integer;
p_on_click: t_on_click);
end; // c_square_button_gadget
c_square_label_gadget= Class(c_label_gadget)
m_c_square_label_control: c_square_label_control;
Constructor create_square_label_gadget(p_name: String;
p_c_abstract_gadget_factory: c_abstract_gadget_factory;
p_left, p_top, p_width, p_height: Integer);
end; // c_square_label_gadget
c_square_draw_surface_gadget= Class(c_draw_surface_gadget)
m_c_square_draw_surface_control: c_square_draw_surface_control;
Constructor create_square_draw_surface_gadget(p_name: String;
p_c_abstract_gadget_factory: c_abstract_gadget_factory;
p_left, p_top, p_width, p_height: Integer;
p_on_mouse_down, p_on_mouse_move,
p_on_mouse_up: t_on_mouse_down);
end; // c_square_draw_surface_gadget
c_square_scrollbar_gadget= Class(c_scrollbar_gadget)
m_c_square_scrollbar_control: c_square_scrollbar_control;
Constructor create_square_scrollbar_gadget(p_name: String;
p_c_abstract_gadget_factory: c_abstract_gadget_factory;
p_left, p_top, p_width, p_height: Integer);
end; // c_square_scrollbar_gadget
c_square_gadget_factory= class(c_abstract_gadget_factory)
Constructor create_square_gadget_factory(p_name: String;
p_c_control_list_ref: c_control_list);
function f_c_create_button_gadget(p_caption: String;
p_left, p_top, p_width, p_height: Integer;
p_on_click: t_on_click): c_button_gadget; Override;
function f_c_create_label_gadget(p_caption: String;
p_left, p_top, p_width, p_height: Integer): c_label_gadget; Override;
function f_c_create_draw_surface_gadget(p_caption: String;
p_left, p_top, p_width, p_height: Integer;
p_on_mouse_down, p_on_mouse_move,
p_on_mouse_up: t_on_mouse_down): c_draw_surface_gadget; Override;
function f_c_create_scrollbar_gadget(p_caption: String;
p_left, p_top, p_width, p_height: Integer):
c_scrollbar_gadget; Override;
function f_c_create_gadget_implementation(p_name: String): c_abstract_gadget_implementation; Override;
end; // c_abstract_factory
|
And here is an example of the use of those classes:
4.4 - Decoupling of Abstract and Implementation Hierarchies
The announced objective of Bridge is to "decouple abstraction from implementation so that the two can vary independently". How well do we fare on this account ? In the If we add another windowing system, all that needs do be changed is the
xxx_implementation part:
However, if we want to add another control with some specific handling, like an edit with text selection and clipboard routines, the hierarchies are no longer
independent: the SetSelStart and CutToClipBoard must be added to the "implementation" hierarchy.
4.5 - Mary Bridge and Factory ?
Could we unify Bridge and Factory ? They seem to work in the same area of abstracting away from the different windowing libraries. Looking at the UML Class Diagram, if the factory creates a Bridge gadget, it
would have to have two This is just what the Bridge wants to avoid: having to deal with the implementation of the controls in the c_gadget unit.
Using the Bridge for any "classic" windowing library would amount to drag the complete VCL methods into the abstract_implementation class. This clearly is unrealistic.
Ok. Then let's try to limit the Bridge to a part of the classes: the controls would have each their abstract / square / round classes, and for some kind of handling, we would hide the specificities of the windowing libraries with a
mini-bridge. We tried this for a "universal canvas": - the canvas_implementation offers a standardized interface to do client-region drawing
- the c_draw_surface_gadget uses this implementation
This works, but it is no Bridge: there is an "implementation hierarchy" (the green part) but there is no "abstract hierarchy" (the blue part).
So I tried, and very hard. But somehow, this Bridge thingy does not come across. Pushing all the functionalities into the abstract_implementation violates both encapsulation and loose coupling, and downsizing the abstract
hierarchy destroys the Bridge. What is the lesson ? - first, in the Bridge chapter in the Gof book, other examples are presented: Collections, String hierarchies with cache and reference counting, bags of
different data types. Many papers and tools performing reengineering or refactoring, like FAMOOS This will be the next trial. I shall return !
- second, the exercise demonstrates the usefulness of the UML notation: we can
sketch out several architectures, compare their benefits and costs, before jumping to the keyboard. And even if you do not have a nice drawing tool with colors and all, pencil and paper will already allow to reason about several alternatives.
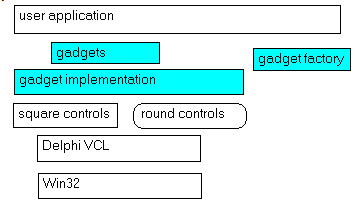
5 - Improvements 5.1 - The architecture We will simply summarize the classes that we used in our last example. There are 4 levels in our hierarchy:
- Win32, with routines like RegisterClass, CreateWindow
- Delphi encapsulates those routines in the VCL Classes, with the tPaintBox and a tCanvas
- to simulate two different windowing libraries, the square and the round worlds, we created the c_square_controls and c_round_controls
- to insulate our application from the windowing libraries, our Bridge defined
- a c_abstract_gadget_implementation to define the library independent gadget handling interface
- a c_gadget hierarchy with all the gadgets we intended to use: c_button_gadget etc
- an Abstract Factory creates
- the concrete gadget_implementation
- all the concrete gadgets
This looks like this:
We did not display the "widget" classes, which were the first encapsulation of the controls, but not with a bridge. So our naming conventions are: - "controls" for the windowing libraries simulations
- "widgets" for the first factory trial
- "gadget" for the Bridge example
We avoided to use "window" in any of our class names, since this is an already too much overloaded name.
5.2 - Improvements
Many details could be improved: - the "events" are not completely working (if you click on a button and move the mouse outside of the button area, the button remains pushed. We should capture the mouse)
- the list of controls could also have been separated in two, to improve the simulation of two different libraries
- the Paint function has been totally ignored
- the freeing of objects also has not been much taken care of
But the most controversial part certainly remains the mixing of Bridge and the concrete gadget classes of the two kinds (there is a c_square_gadget and a c_round_gadget) whereas Bridge should have avoided this. The
Lexi Editor .ZIP contains another version of Bridge, where the Bridge is only used as a general canvas, and this might be a cleaner example.
6 - Download the Sources The source code is contained in:
The complete Lexi project can be found in the companion paper
The .ZIP file contain: - the main program (.DPR, .DOF, .RES), the main form (.PAS, .DFM), and any
other auxiliary form
- any .TXT for parameters
- all units (.PAS) for units
Those .ZIP - are self-contained: you will not need any other product (unless expressly mentioned).
- can be used from any folder (the pathes are RELATIVE)
- will not modify your PC in any way beyond the path where you placed the .ZIP (no registry changes, no path creation etc).
To use the .ZIP:
- create or select any folder of your choice
- unzip the downloaded file
- using Delphi, compile and execute
To remove the .ZIP simply delete the folder.
As usual:
- please tell us at fcolibri@felix-colibri.com if you found some errors, mistakes, bugs, broken links or had some problem downloading the file. Resulting corrections will
be helpful for other readers
- we welcome any comment, criticism, enhancement, other sources or reference suggestion. Just send an e-mail to fcolibri@felix-colibri.com.
- or more simply, enter your (anonymous or with your e-mail if you want an answer) comments below and clic the "send" button
- and if you liked this article, talk about this site to your fellow developpers, add a link to your links page ou mention our articles in
your blog or newsgroup posts when relevant. That's the way we operate: the more traffic and Google references we get, the more articles we will write.
7 - Conclusion
We presented the Abstract Factory and the Bridge design patterns used for the coding of the Lexi case study of the Gang of Four book.
8 - References
- The FAMOOS Reengineering Handbook : references about the printed book, a downloadable handbook and many papers about this reegineering effort. Sadly
enough, I could not find the tool anywhere, even in .EXE
- The Lexi Editor : the companion paper presenting the
6 other Design Pattern (Composite, Decorator, Iterator, Strategy, Visitor, Command) included in the Gof Lexi Case Study, with Delphi sources, of course.
9 - Other Papers with Source and Links |
Database | |
database reverse engineering | Extraction of the Database Schema by analyzing the content of the application's .DFMs
| | sql parser | Parsing SQL requests in Delphi, starting from an EBNF grammar for SELECT, INSERT and UPDATE |
| ado net tutorial |
a complete Ado Net architectural presentation, and projects for creating the Database, creating Tables, adding, deleting and updating rows, displaying the data in controls and DataGrids, using in memory DataSets, handling Views, updating the Tables with a DataGrid
| | turbo delphi interbase tutorial |
develop database applications with Turbo Delphi and Interbase. Complete ADO Net architecture, and full projects to create the database, the Tables, fill the rows, display and update the values with DataGrids. Uses the BDP |
| bdp ado net blobs | BDP and Blobs : reading and writing Blob fields using the BDP with Turbo Delphi |
| interbase stored procedure grammar |
Interbase Stored Procedure Grammar : The BNF Grammar of the Interbase Stored Procedure. This grammar can be used to build stored procedure utilities, like pretty printers, renaming tools, Sql Engine conversion or ports | |
using interbase system tables |
Using InterBase System Tables : The Interbase / FireBird System Tables: description of the main Tables, with their relationship and presents examples of how to extract information from the schema | |
eco tutorial |
Writing a simple ECO application: the UML model, the in memory objects and the GUI presentation. We also will show how to evaluate OCL expressions using the EcoHandles, and persist the data on disc | |
delphi dbx4 programming |
the new dbExpress 4 framework for RAD Studio 2007 : the configuration files, how to connect, read and write data, using tracing and pooling delegates and metadata handling | |
blackfishsql |
using the new BlackfishSql standalone database engine of RAD Studio 2007 (Win32 and .Net) : create the database, create / fill / read Tables, use Pascal User Defined Functions and Stored Procedures | |
rave pdf intraweb |
how to produce PDF reports using Rave, and have an Intraweb site generate and display .PDF pages, with multi-user access | |
embarcadero er studio |
Embarcadero ER Studio tutorial: how to use the Entity Relationship tool to create a new model, reverse engineer a database, create sub-models, generate reports, import metadata, switch to Dimensional Model | | |
| Web |
| sql to html | converting SQL ascii request to HTML format
| | simple web server |
a simple HTTP web Server and the corresponding HTTP web Browser, using our Client Server Socket library | |
simple cgi web server |
a simple CGI Web Server which handles HTML <FORM> requests, mainly for debugging CGI Server extension purposes | |
cgi database browser | a CGI extension in order to display and modify a Table using a Web Browser | |
whois | a Whois Client who requests information about owners of IP adresses. Works in batch mode. | |
web downloader |
an HTTP tool enabling to save on a local folder an HTML page with its associated images (.GIF, .JPEG, .PNG or other) for archieving or later off-line reading | |
web spider | a Web Spider allowing to download all pages from a site, with custom or GUI filtering and selection. | |
asp net log file |
a logging CLASS allowing to monitor the Asp.Net events, mainly used for undesrtanding, debugging and journaling Asp.Net Web applications | |
asp net viewstate viewer |
an ASP.NET utility displaying the content of the viewtate field which carries the request state between Internet Explorer and the IIS / CASSINI Servers | |
rss reader |
the RSS Reader lets you download and view the content of an .RSS feed (the entry point into somebody's blog) in a tMemo or a tTreeView. Comes complete with an .HTML downloader and an .XML parser | |
news message tree |
how to build a tree of the NNTP News Messages. The downloaded messages are displayed in tListBox by message thread (topic), and for each thread the messages are presented in a tTreeVi"ew | |
threaded indy news reader |
a NewsReader which presents the articles sorted by thread and in a logical hierarchical way. This is the basic Indy newsreader demo plus the tree organization of messages | |
delphi asp net portal programming |
presentation, architecture and programming of the Delphi Asp Net Portal. This is a Delphi version of the Microsoft ASP.NET Starter Kit Web Portal showcase. With detailed schemas and step by step presentation, the Sql scripts and binaries of the Database
| | delphi web designer |
a tiny Delphi "RAD Web Designer", which explains how the Delphi IDE can be used to generate .HTML pages using the Palette / Object Inspector / Form metaphor to layout the page content | |
intraweb architecture |
the architecture of the Intraweb web site building tool. Explains how Delphi "rad html generator" work, and presents the CLASS organization (UML Class diagrams) | |
ajax tutorial |
AJAX Tutorial : writing an AJAX web application. How AJAX works, using a JavaScript DOM parser, the Indy Web Server, requesting .XML data packets - Integrated development project | |
asp net master pages |
Asp.Net 2.0 Master Pages : the new Asp.Net 2.0 allow us to define the page structure in a hierarchical way using Master Pages and Content Pages, in a way similar to tForm inheritance |
| delphi asp net 20 databases |
Asp.Net 2.0 and Ado.Net 2.0 : displaying and writing InterBase and Blackfish Sql data using Dbx4, Ado.Net Db and AdoDbxClient. Handling of ListBox and GridView with DataSource components
| | asp net 20 users roles profiles |
Asp.Net 2.0 Security: Users, Roles and Profiles : Asp.Net 2.0 offers a vaslty improved support for handling security: new Login Controls, and services for managing Users, grouping Users in Roles, and storing User preferences in Profiles
| | bayesian spam filter |
Bayesian Spam Filter : presentation and implementation of a spam elimination tool which uses Bayesian Filtering techniques | | |
| TCP/IP | |
tcp ip sniffer | project to capture and display the packets travelling on the Ethernet network of your PC. | |
sniffing interbase traffic |
capture and analysis of Interbase packets. Creation of a database and test table, and comparison of the BDE vs Interbase Express Delphi components | |
socket programming | the simplest Client Server example of TCP / IP communication using Windows Sockets with Delphi |
| delphi socket architecture |
the organization of the ScktComp unit, with UML diagrams and a simple Client Server file transfer example using tClientSocket and tServerSocket | | |
| Object Oriented Programming Components |
| delphi virtual constructor |
VIRTUAL CONSTRUCTORS together with CLASS references and dynamic Packages allow the separation between a main project and modules compiled and linked in later. The starting point for Application Frameworks and Plugins
| | delphi generics tutorial |
Delphi Generics Tutorial : using Generics (parameterized types) in Delphi : the type parameter and the type argument, application of generics, constraints on INTERFACEs or CONSTRUCTORs | |
| | UML Patterns |
| the lexi editor |
delphi source code of the Gof Editor: Composite, Decorator, Iterator, Strategy, Visitor, Command, with UML diagrams | |
factory and bridge patterns |
presentation and Delphi sources for the Abstract Factory and Bridge patterns, used in the Lexi Document Editor case study from the GOF book | |
gof design patterns |
delphi source code of the 23 Gof (GAMMA and other) patterns: Composite, Decorator, Iterator, Strategy, Visitor, Command | | | |
| | Graphic |
| delphi 3d designer |
build a 3d volume list, display it in perspective and move the camera, the screen or the volumes with the mouse. | |
writing a flash player |
build your own ShockWave Flash movie Player, with pause, custom back and forward steps, snapshots, resizing. Designed for analyzing .SWF demos. | | |
| Utilities | |
the coliget search engine |
a Full Text Search unit allowing to find the files in a directory satisfying a complex string request (UML AND Delphi OR Patters) | |
treeview html help viewer |
Treeview .HTML Help Viewer : the use of a Treeview along with a WebBrowser to display .HTML files alows both structuring and ordering of the help topics. This tool was used to browse the Delphi PRISM Wiki help. | |
| | Delphi utilities |
| delphi net bdsproj |
structure and analysis of the .BDSPROJ file with the help of a small Delphi .XML parser | | dccil bat generator
| generation of the .BAT for the Delphi DCCIL command line compiler using the .BDSPROJ | | dfm parser |
a Delphi Project analyzing the .DFM file and building a memory representation. This can be used for transformations of the form components | |
dfm binary to text | a Delphi Project converting all .DFM file from a path from binary to ascii format |
| component to code |
generate the component creation and initialization code by analyzing the .DFM. Handy to avoid installing components on the Palette when examining new libraries | |
exe dll pe explorer |
presents and analyzes the content of .EXE and .DLL files. The starting point for extracting resources, spying .DLL function calls or injecting additional functionalities | |
dll and process viewer |
analyze and display the list of running processes, with their associated DLLs and Memory mapped files (Process Walker) | | |
| Controls | |
find memo | a tMemo with "find first", "find next", "sort", "save" capabilities | | |
| |
10 - The author
Felix John COLIBRI works at the Pascal Institute. Starting with Pascal in 1979, he then became involved with Object Oriented Programming, Delphi, Sql, Tcp/Ip, Html, UML. Currently, he is mainly
active in the area of custom software development (new projects, maintenance, audits, BDE migration, Delphi
Xe_n migrations, refactoring), Delphi Consulting and Delph
training. His web site features tutorials, technical papers about programming with full downloadable source code, and the description and calendar of forthcoming Delphi, FireBird, Tcp/IP, Web Services, OOP / UML, Design Patterns, Unit Testing training sessions.
|